By Priya Harini B | Madanapalle, Andhra Pradesh | 4+ Years Container Gardening Experience
Day 2 of the 30-Day Summer Gardening Challenge: Solving Your Biggest Summer Problems
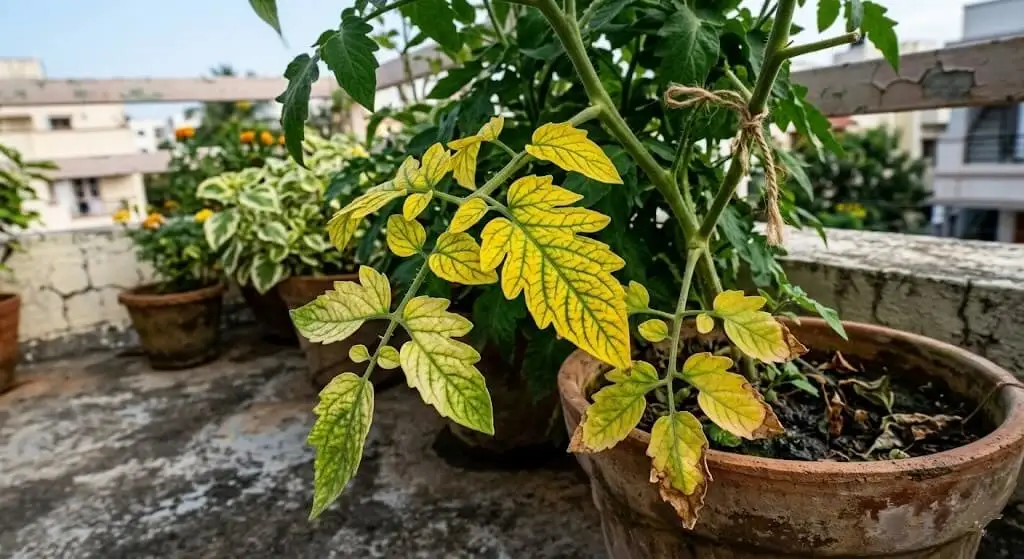
Table of Contents
Introduction
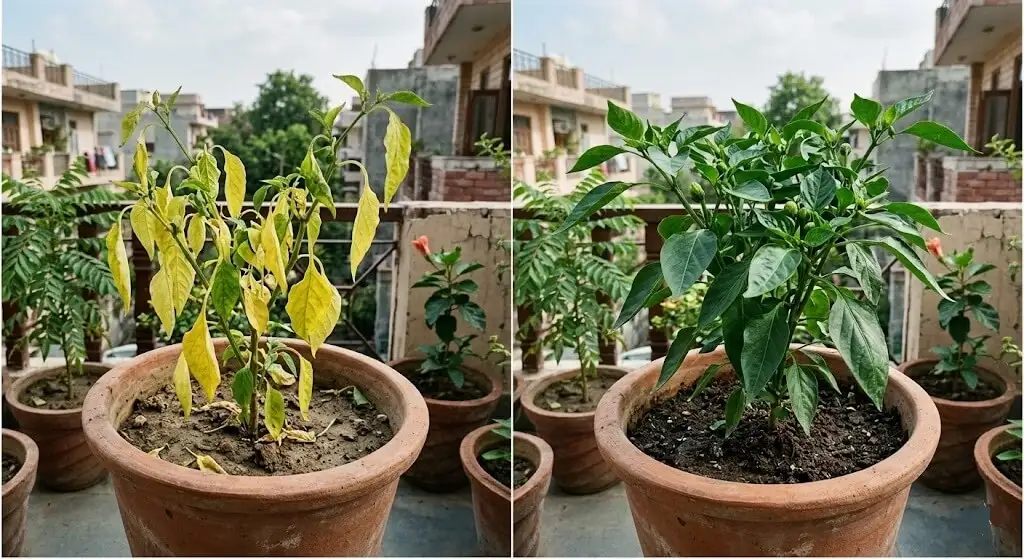
If you are searching for why are my plant leaves turning yellow in pots India you are probably standing in front of a plant that looked perfectly fine last week and now looks like it is quietly giving up on you.
I know that feeling. And I want to tell you the one thing that will actually help before you do anything else: do not touch it yet.
No extra water. No fertilizer. No spraying. Nothing until you finish reading the next three paragraphs.
Because the most expensive mistake Indian balcony gardeners make with yellow leaves is not neglect. It is treating the wrong problem. And with yellow leaves, the wrong treatment does not just fail it actively makes things worse. I have the dead tomato plant to prove it.
Yellow leaves on plants are usually caused by overwatering, nutrient deficiency, or heat stress especially in Indian climates.
Last May, Meera from Pune sent me a photo of her tomato plant. She had been nurturing it for two months, it had finally set fruits, and overnight half the leaves had turned bright yellow.
“Priya, what did I do wrong? I water it every day. I even gave it fertilizer last week.”
She was already reaching for more fertilizer when she messaged me. I am glad she paused first.
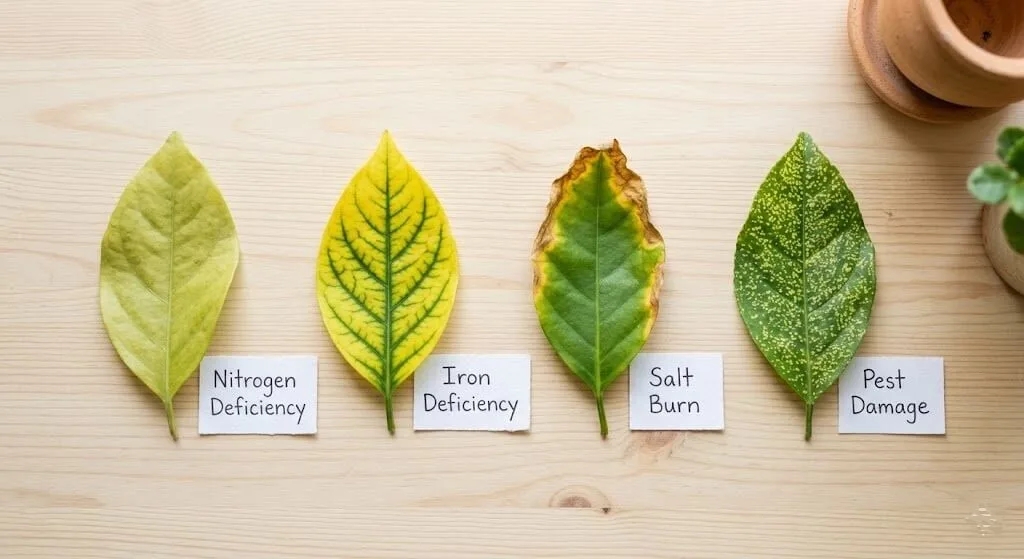
Here is what most yellow leaf guides will not tell you upfront: yellow leaves are never the problem. They are the symptom of a problem and that problem could be one of eight completely different things. Nitrogen deficiency, iron deficiency, overwatering, magnesium deficiency, heat scorch, spider mites, natural leaf aging, or fertilizer salt buildup. Every single one of these causes yellow leaves. Every single one looks slightly different from the others. And several of them have fixes that are the exact opposite of each other.
Treat nitrogen deficiency when the real problem is root rot as I once did and you will kill the plant faster than doing nothing at all.
This is why plant leaves turn yellow in ways that feel so confusing: the symptom looks the same but the causes are completely different. Getting the diagnosis right before you act is everything.
I learned this the painful way in April 2022. I had a Pusa Ruby tomato in a 12-inch pot on my Madanapalle terrace with 8 fruits on the vine. Within one week, the bottom half of the plant went neon yellow. I panicked, Googled, read “nitrogen deficiency” a dozen times, and dumped fertilizer on it.
Within three days the plant was nearly dead.
The actual problem was root rot. The drainage hole had slowly clogged with roots, the soil had stayed waterlogged for days, and the roots had started dying. Adding nitrogen fertilizer to a plant with rotting roots is like forcing someone with a severe stomach infection to eat a heavy meal. The plant could not absorb anything. The fertilizer made the root environment worse. That plant died. All 8 tomatoes went with it.
And I spent the next year obsessively learning how to read yellow leaves before ever reaching for a fix.
This guide is everything I learned across four summers on my Andhra Pradesh terrace about why plant leaves turn yellow specifically in Indian container gardens. I will walk you through all 8 causes with the exact visual pattern for each, India-specific fixes using products available at your local agricultural shop, rupee costs for every solution, and honest recovery timelines based on what I have actually seen work.
By the end of this guide, you will be able to look at yellow leaves on any of your plants and know within 60 seconds exactly what is happening and exactly what to do next.
How to Diagnose Yellow Leaves Before You Do Anything Else
Before you water, fertilize, spray, or touch your plant spend 60 seconds just looking at it. The pattern of yellowing is the single most important clue you have.
| Symptom | Likely Cause |
|---|---|
| Yellow + soggy soil | Overwatering |
| Yellow + dry soil | Underwatering |
| Yellow + brown edges | Heat stress |
Ask yourself which leaves are yellowing. Are they the bottom older leaves close to the soil? The youngest new growth at the very top? All leaves across the whole plant at once? Or just random leaves scattered here and there?
Ask yourself what the yellow looks like. Is it solid, uniform yellow with no pattern? Yellow but the veins are still clearly green? Yellow edges with a green center? Tiny yellow dots like someone pricked the leaf with a pin hundreds of times?
Ask yourself when it started. Right after you changed your fertilizer? After a brutal 42°C heatwave? After heavy rain or overwatering? Or has it been slowly building over weeks?
Keep those answers in your mind. I’ll refer back to them throughout this guide, and they’ll tell you exactly which section applies to your plant right now.
Cause 1: Nitrogen Deficiency – The Most Common Culprit in Container Gardens
What It Looks Like
The bottom and older leaves turn a uniform pale yellow-green and then progress to bright yellow. The yellowing starts at the leaf tips and slowly moves inward. The new growth at the very top of the plant stays green. The whole plant takes on a washed-out or pale look, like someone turned the color saturation down.
Why It Happens in Indian Containers
Nitrogen is highly soluble, which means it washes out of pots quickly especially during our heavy monsoon season and the frequent deep watering that summer heat demands. A container has limited soil volume to begin with, so once you’ve been growing in the same pot for six to eight weeks without fertilizing, nitrogen depletes fast.
Here’s something most gardening guides don’t mention: Indian municipal water tends to sit at pH 7.5 to 8.5. Alkaline water gradually raises the pH of your potting mix over time, and at high pH, nitrogen becomes less chemically available to the plant even when it’s technically present in the soil.
My Experience
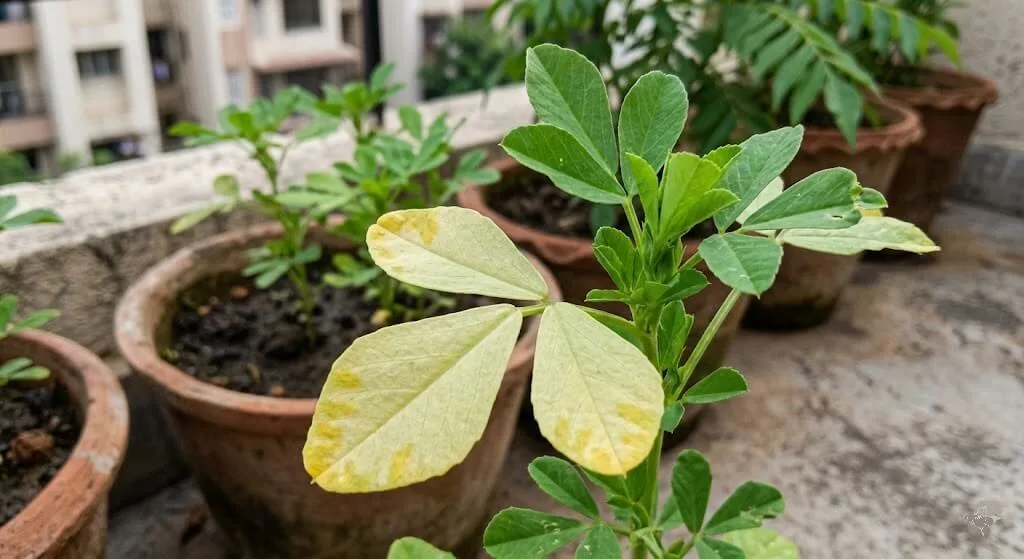
This is the deficiency I see most often in my own garden typically around week six to eight of the growing season when I’ve been lazy about fertilizing. My methi always shows it first. The older leaves go pale, new growth comes out lighter than normal, and the whole plant just looks tired. Once I recognize the pattern, the fix is fast.
How to Fix It
Fast fix — results in 5 to 7 days: Apply a diluted nitrogen fertilizer as a foliar spray. Plants absorb nitrogen through their leaves much faster than through their roots, so this gives the quickest visible result.
The recipe I use: dissolve 1 teaspoon of Urea in 1 litre of water and spray on all leaf surfaces in the early morning before 8 AM while it’s still cool. Repeat every 5 days for 3 applications. Urea is available at any agricultural shop for ₹20 to ₹30 for 500g.
Medium-term fix — results in 2 to 3 weeks: Apply well-composted vermicompost as a top dressing to the top 2 inches of soil around the plant and water it in well. Vermicompost costs around ₹40 to ₹60 per kg at nurseries — Ugaoo brand is also available online.
Best long-term habit: Switch to a balanced NPK fertilizer on a regular schedule. I use NPK 19:19:19, available at every nursery for roughly ₹80 to ₹100 for 500g. During the growing season I apply one-quarter teaspoon dissolved in 1 litre of water every 10 days. Consistent feeding prevents the deficiency from developing in the first place.
Recovery timelines by plant: Tomato responds in 5 to 7 days with foliar feed. Brinjal in 7 to 10 days. Capsicum in 10 to 14 days. Methi and spinach in 5 to 7 days. Curry leaf in 2 to 3 weeks.
Approximate cost: ₹30 to ₹80
Cause 2: Iron Deficiency (Chlorosis) – The Sneaky India-Specific Problem
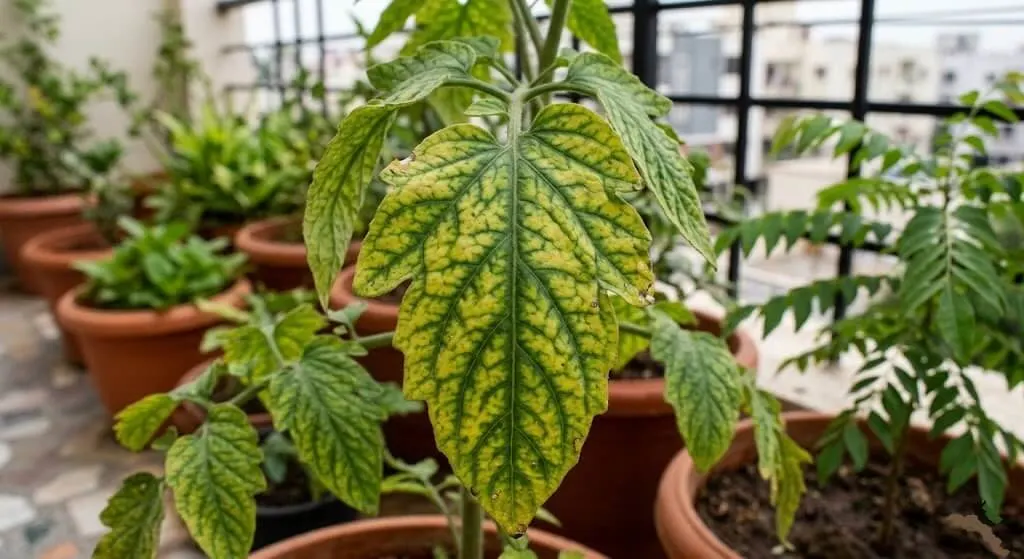
What It Looks Like
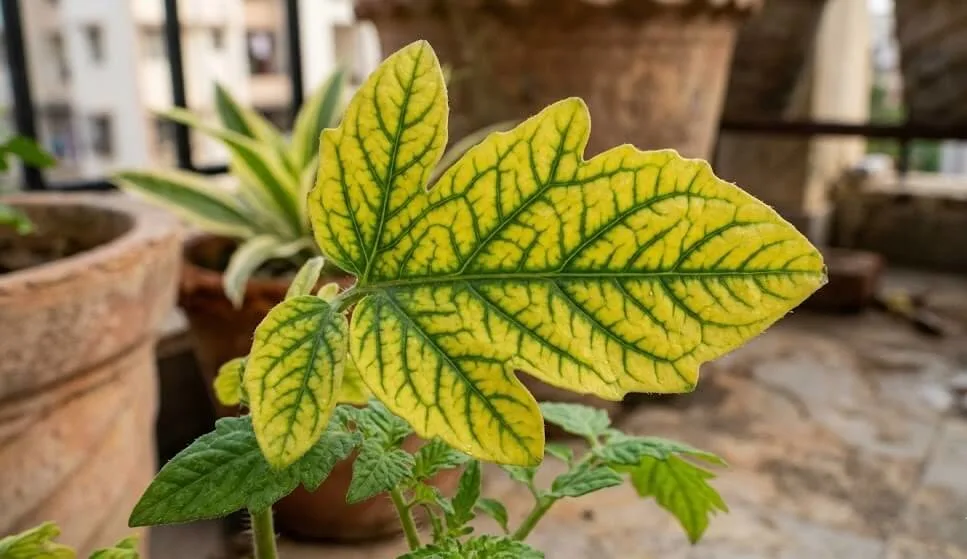
The newest, youngest leaves at the very top of the plant turn yellow, but the veins stay clearly and visibly green. The leaf ends up looking like a yellow page with a green skeleton drawn across it this is called interveinal chlorosis. The older leaves lower on the plant remain green. This is the exact opposite pattern from nitrogen deficiency, and confusing the two leads to the wrong treatment.
Why It Happens – And Why It’s So Common in India
Iron becomes chemically unavailable to plants when soil pH rises above roughly 7. Most Indian cities have tap water with pH between 7.5 and 8.5. Even if your potting mix contains plenty of iron, your plant literally cannot absorb it when the pH is too high. The iron is there it’s just locked out.
Three things combine to make this epidemic in Indian container gardens. First, alkaline tap water as described. Second, many commercially sold potting mixes in India contain garden soil that’s naturally alkaline combined with alkaline watering, pot pH can push to 8.0 to 8.5. Third, many of us over-apply high-phosphorus fertilizers in the early days, and excess phosphorus binds with iron and makes it unavailable.
My Experience
In February 2024, I ran an experiment on my terrace with six identical pots of methi. I watered three with regular tap water (pH 8.1 – tested with pH strips, ₹150 for 100 on Amazon) and three with the same water to which I’d added 1 ml of apple cider vinegar per litre, bringing pH down to about 6.8. Same soil, same fertilizer, same sun position. After 6 weeks, the tap-water pots had classic iron chlorosis on all new growth. The acidified-water pots were beautifully, uniformly green. One small change. Enormous difference.
For reference, here’s what Indian tap water typically looks like by city — though testing your own with pH strips is always more reliable:
| City | Typical Tap Water pH | Iron Deficiency Risk |
|---|---|---|
| Delhi | 7.5 – 8.0 | Moderate to High |
| Mumbai | 7.0 – 7.5 | Moderate |
| Bangalore | 6.8 – 7.5 | Moderate |
| Chennai | 7.5 – 8.5 | High |
| Hyderabad | 7.5 – 8.2 | High |
| Madanapalle | 7.8 – 8.3 | High |
| Ahmedabad | 8.0 – 8.5 | Very High |
| Rajasthan (hard water areas) | 8.5+ | Very High |
pH strips cost ₹150 for 100 strips on Amazon or Flipkart. That single investment can save you months of mysterious yellowing.

How to Fix It
Fastest fix — results in 3 to 5 days: Chelated iron (iron EDTA or iron DTPA) sprayed directly on the leaves bypasses the soil pH problem entirely. It’s sold as Sequestrene or Librel Fe at agricultural shops for ₹80 to ₹150 for 100g. Mix 1g per litre of water and spray on young leaves, both upper and lower surfaces. Apply in the evening to prevent leaf burn from afternoon sun.
Soil application — results in 1 to 2 weeks: Iron sulfate (ferrous sulfate) mixed into the top 2 inches of soil works slower but treats the root zone. About half a teaspoon per 12-inch pot, watered in well. Available at agricultural shops for ₹30 to ₹50 per 500g.
The real long-term solution — fix your water pH: Add 1 to 2 ml of apple cider vinegar per litre to your watering water. This brings pH from around 8.0 down to roughly 6.5 to 7.0. RO water and collected rainwater are naturally lower in pH and work equally well. Agricultural sulphur added to your soil (₹40/kg) also slowly acidifies the potting mix over several weeks.
Approximate cost: ₹80 to ₹150
Cause 3: Overwatering and Root Rot — My Biggest Mistake
What It Looks Like
Leaves turn yellow uniformly across the whole plant both old and new at the same time. The yellowing is often accompanied by wilting, which is confusing because the soil is clearly wet. Leaves may feel soft rather than crisp. Stems can turn brown or black at the base. The soil often smells musty or faintly sour.
Why It Happens
Indian summer gardening advice is genuinely contradictory. Everyone says water more because of the heat and plants do need more water. But the mistake is watering on a fixed schedule without checking whether the soil has actually dried between waterings. Many Indian balcony pots also have small drainage holes that slowly clog with roots over months. When roots sit in waterlogged soil, they suffocate roots need oxygen as much as water and begin to rot. Rotting roots can’t deliver anything to the leaves, so they turn yellow even though the pot is full of moisture.
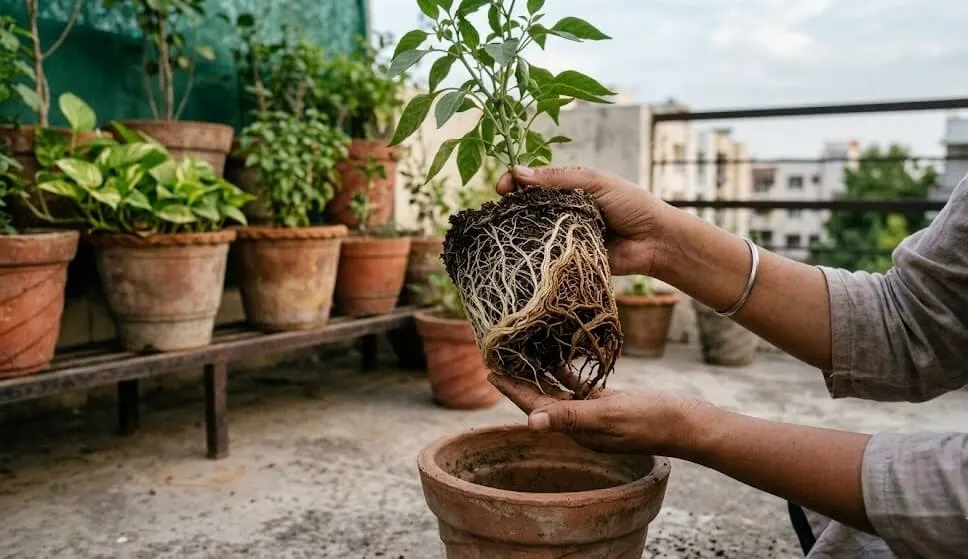
How I Tell the Difference From Nitrogen Deficiency
Both cause yellow leaves, so I always run two quick checks before assuming either one.
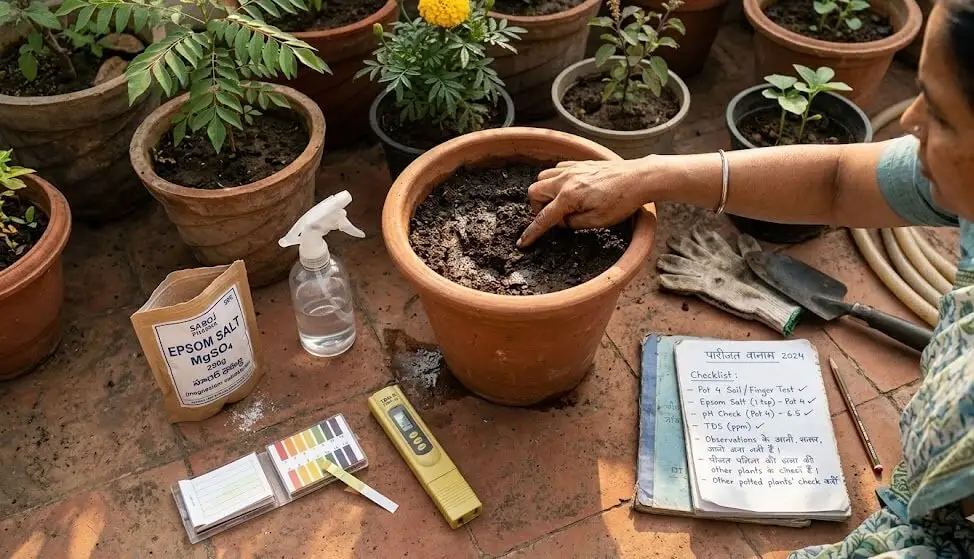
The Finger Test: push your finger 2 inches into the soil. Still wet or damp don’t water, suspect overwatering. Dry at 2 inches likely a nutrient issue, safe to water.
The Lift Test: pick up the pot. Waterlogged soil feels dramatically heavier than well-drained soil. If it’s surprisingly heavy, water is trapped.
The Root Check: gently remove the plant and look at the roots. White or cream roots are healthy. Brown or black mushy roots are rotting. Brown but firm roots are stressed but not yet rotted.
My Experience
July 2023 was relentlessly humid in Madanapalle 80% humidity or above for three full weeks. I was still watering my capsicums daily out of summer habit, not realizing the humidity meant the soil was staying wet far longer than it would in dry heat. By week three, all three plants had yellow leaves throughout. When I finally checked, the bottom 30% of each root system was black and mushy.
I lost one plant completely. The other two I saved by stopping all watering immediately, letting the soil dry out fully over 5 days, then carefully removing each plant and trimming every blackened root section with scissors sterilized in diluted Dettol. I soaked the trimmed roots in diluted hydrogen peroxide solution (3% H2O2 from any pharmacy, ₹50 to ₹80 mixed 1 part H2O2 with 10 parts water) for 30 minutes to kill fungal pathogens. Then repotted in a fresh mix: 1 part cocopeat, 1 part compost, 1 part perlite. No fertilizer for 2 weeks just let the roots recover first.
If root rot has taken more than 50% of the root system, the better move is honestly to take healthy stem cuttings and propagate those. The original plant is usually too far gone.
How to Fix and Prevent It
Stop all watering immediately and let the soil fully dry out. Clear and check drainage holes monthly clogged holes are the #1 cause of summer root rot in Indian balcony gardens. Water based on the finger test, not a fixed schedule. Elevate pots on stands (₹80 to ₹200) so drainage is unobstructed. During the monsoon, move pots to covered areas or reduce watering frequency significantly.
Approximate cost: ₹50 to ₹200 depending on what’s needed
Cause 4: Magnesium Deficiency -The Fertilizer Aftermath
What It Looks Like
Yellow patches appear between the leaf veins on older, lower leaves, while the veins themselves stay green. This is interveinal chlorosis on old growth and that timing is the key difference from iron deficiency, which shows on new growth. The yellow patches often appear in a distinctive V-shape or mottled pattern spreading outward from the midrib of the leaf.
Why It Happens
Magnesium deficiency in Indian container gardens almost always follows one of two patterns. The first is over-applying calcium or potassium. Many gardeners add lime calcium carbonate, the same chuna sold for walls thinking it improves drainage. Excess calcium competes with magnesium for root absorption. Excess potassium does the same. The second pattern is heavy monsoon leaching. Magnesium is fairly mobile in soil and washes out with sustained heavy watering.
My Experience
I had this badly in summer 2023 after getting too enthusiastic with a calcium-rich fertilizer on my tomatoes. Classic mottled yellow patches on older leaves, veins still clearly green. Once I recognized the pattern, the fix was embarrassingly simple.
How to Fix It
Epsom salt is magnesium sulfate the most readily available and affordable magnesium source anywhere in India. You can find it at any pharmacy (sold as a laxative or for baths) for ₹30 to ₹60 for 500g, at agricultural shops labeled as magnesium sulfate fertilizer for ₹40 to ₹80 per kg, or on Amazon and Flipkart for ₹60 to ₹100 per kg.
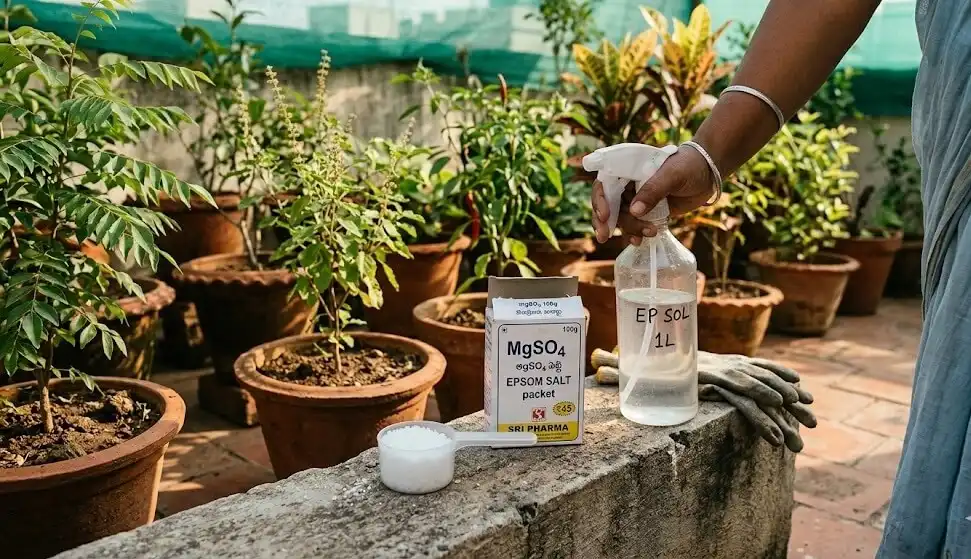
For the fastest result, mix 2 teaspoons Epsom salt in 1 litre of water and spray directly on all leaf surfaces, especially the yellow areas. Apply every 7 days for 3 to 4 weeks. For a longer-lasting soil treatment, mix 1 tablespoon Epsom salt in 4 litres of water and drench the soil once every 2 weeks during the growing season.
Symptoms stop spreading within 5 to 7 days. New healthy growth appears in 10 to 14 days.
Approximate cost: ₹30 to ₹80
Cause 5: Heat Scorch and Sunburn – A Summer-Specific Problem
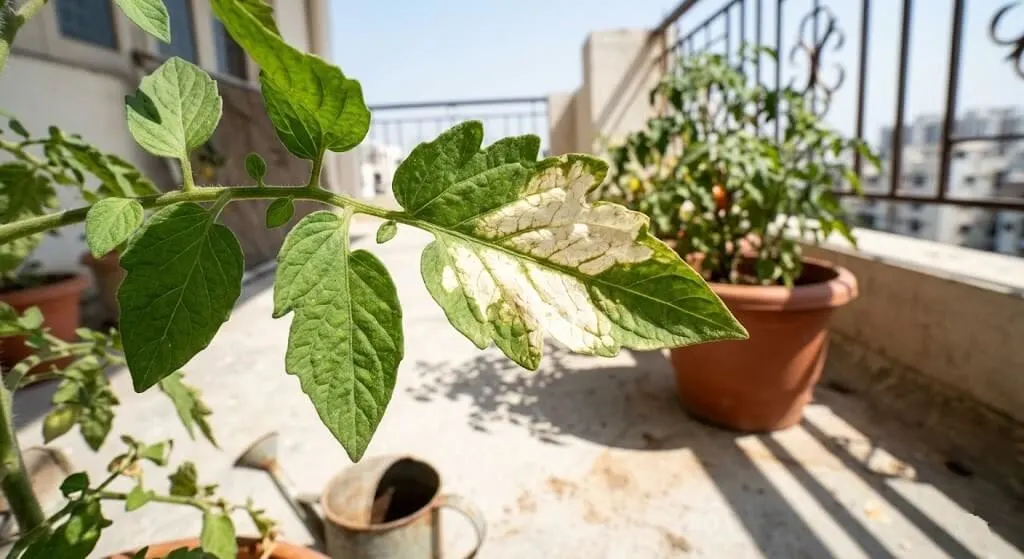
What It Looks Like
Bleached, whitish-yellow patches that appear specifically on the leaves facing the most intense direct sun the top of the plant and the south- or west-facing sides. The damage appears suddenly after a hot day, not gradually over weeks. On severe days above 42°C, leaves can look genuinely cooked pale white to yellow in irregular patches, turning papery or crispy as they dry out while the surrounding tissue stays green.
This looks completely different from nutrient deficiencies. It’s not gradual. It happens almost overnight. And the damaged areas are always specifically on the sun-facing side.
Why It’s Worse on Indian Balconies
Concrete and tile reflect heat dramatically. The reflected heat off balcony floors can push air temperature near pots 5 to 8°C above ambient. I measured this on my south-facing terrace on April 14, 2024, when the ambient shade temperature was 41°C:
| Location | Temperature at 1 PM |
|---|---|
| Air temperature in shade at 1.5m | 41°C |
| Balcony floor surface | 58°C |
| Air 10cm above floor | 47°C |
| Air 50cm above floor | 44°C |
| Air 1m above floor (where pots sit) | 42°C |
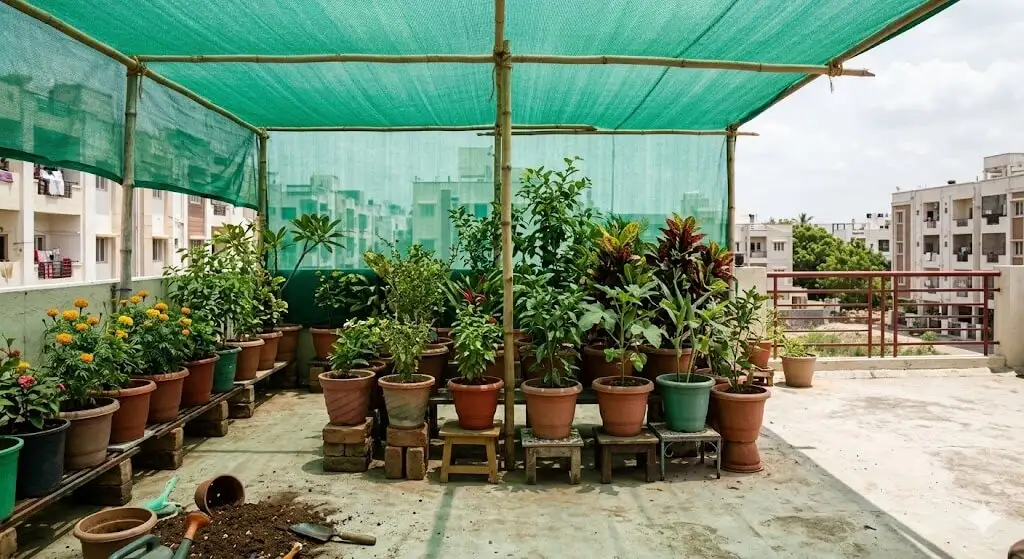
| Air under 50% shade cloth | 38°C |
This is why I keep every pot elevated on stands at least 20 to 25cm off the floor. The heat trap above Indian concrete in summer is severe, and almost no gardening guide mentions it. Black pots make this significantly worse by absorbing and radiating heat directly into the root zone.
Also worth knowing: moving plants suddenly from shade to full sun causes immediate scorch. Plants need 1 to 2 weeks to acclimate to changing light levels.
How to Fix It
Move affected plants immediately to bright shade or filtered sun under a 50% shade net is ideal. Do not remove the scorched leaves yet; they still contribute some photosynthesis and protect the plant. Water the root zone only (not the leaves) in the evening. New growth that emerges in proper shade will be completely healthy.
For a permanent summer setup: 50% green shade net costs ₹8 to ₹15 per square foot at hardware stores and nurseries and a basic structure lasts 5 to 7 years. Elevate all pots on stands at least 20 to 25cm off the floor. Move vulnerable plants to east-facing positions (morning sun only) during April through June. Use light-colored or white pot covers to reflect heat instead of absorbing it.
Approximate cost: ₹500 to ₹2,000 for a shade setup that lasts years
Cause 6: Pest Damage – Spider Mites Are the Summer Villain
What It Looks Like
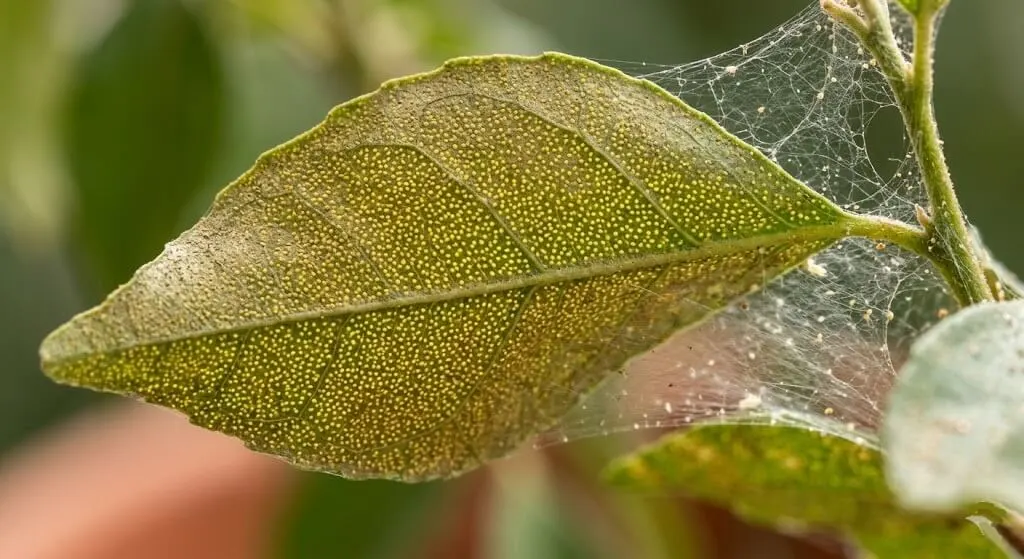
Pest damage creates tiny yellow dots or stippling all over the leaf surface like someone dotted the leaf with a yellow pen in hundreds of tiny pinpricks. Under bright light or a magnifying glass, you’ll see tiny moving dots on the underside of leaves. In heavier infestations, fine webbing appears between leaves and along stems.
Spider mites absolutely explode in Indian summer conditions they love temperatures above 35°C and dry air. I’ve watched a plant go from completely clean to severely infested within a single week during a hot dry spell in May.
Other pests that create yellow spots include thrips (silvery-yellow streaks on leaves), whiteflies (yellow patches with sticky honeydew residue on leaf surfaces), and aphids (yellow and distorted young leaves clustered near growing tips).
How I Confirm It’s Mites
Hold a white sheet of paper under a suspect leaf and tap the leaf sharply once. If you see tiny moving dots on the paper smaller than a pinhead you have mites. This test takes 10 seconds and is definitive.
My Experience
My curry leaf tree suffered the worst spider mite infestation I’ve ever seen in May 2024. Within 10 days of the weather turning hot and dry, an entire branch had webbing and stippled yellow leaves across it. I caught it when I noticed early speckling the white paper test confirmed mites immediately.
How to Fix It
Start with physical control: Spray all leaf surfaces especially the undersides with a strong stream of water on three consecutive early mornings. Mites dehydrate quickly and cannot survive being dislodged and wetted. This alone can break a mild infestation.
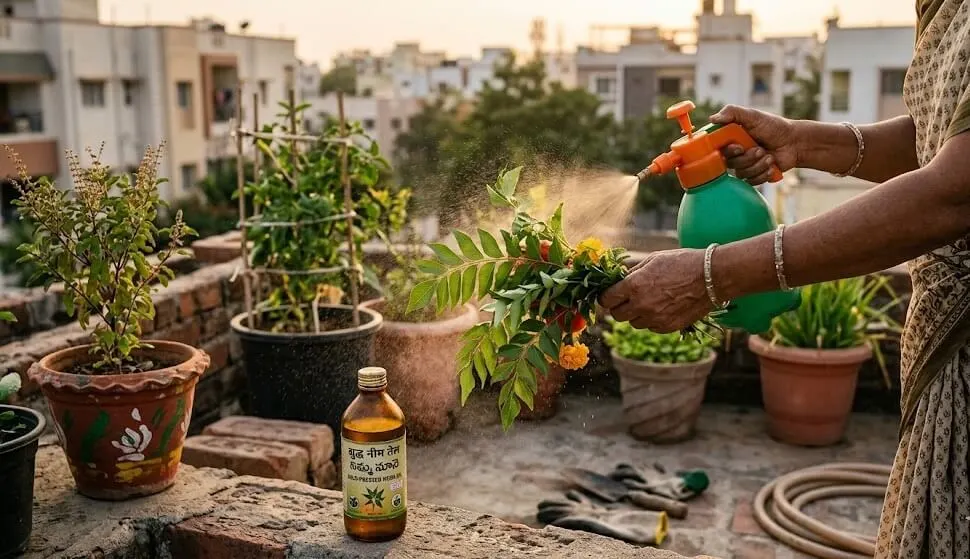
Neem oil spray for reliable organic control: Mix 5 ml cold-pressed neem oil with 1 to 2 ml of dish soap (the soap is essential as an emulsifier neem doesn’t mix with water without it) in 1 litre of water. Shake thoroughly. Spray every leaf surface, especially undersides. Apply in the evening to prevent leaf burn. Repeat every 5 days for 3 applications. Cold-pressed neem oil is available at agricultural shops for ₹150 to ₹250 per 500 ml or online.
For severe infestations: Ask your agricultural shop specifically for a miticide. Oberon (spiromesifen) is widely available for ₹200 to ₹400 for small packs. Regular pesticides don’t always kill mites you need something specifically labeled for mite control.
Prevention during summer: Group pots closer together to raise humidity. Place shallow water trays near plants. Inspect leaf undersides every single week during April through June catching an infestation at day 3 versus day 15 is the difference between a quick spray and three weeks of intensive recovery.
Approximate cost: ₹150 to ₹400
Cause 7: Natural Aging – When Yellow Leaves Are Completely Normal
What It Looks Like
A few leaves at the very bottom of the plant slowly turn yellow, then drop. The yellowing is limited entirely to the oldest leaves. New growth at the top is perfectly green, growing normally, and the plant overall looks vigorous and healthy.
Plants naturally shed older leaves as they focus energy on new growth and fruit production. This is completely normal for tomatoes, brinjal, cucumbers, beans, and most fast-growing vegetables. It’s also normal at the end of a fruiting cycle.
How to Tell It’s Just Aging
Three signs confirm that it’s normal aging and nothing to worry about: only the very bottom 2 to 3 leaves are yellow, the new growth at the top is green and healthy, and the plant is actively flowering or setting fruit.
If all three are true relax. Just remove the yellow leaves to maintain airflow and appearance and move on.
Where I draw the line: if more than 20% of total leaves are yellow, or if the yellowing is climbing up the plant quickly rather than staying at the very bottom, that’s no longer normal aging. Check the other causes in this guide.
Cause 8: Salt Buildup – The Overenthusiastic Gardener’s Problem
What It Looks Like
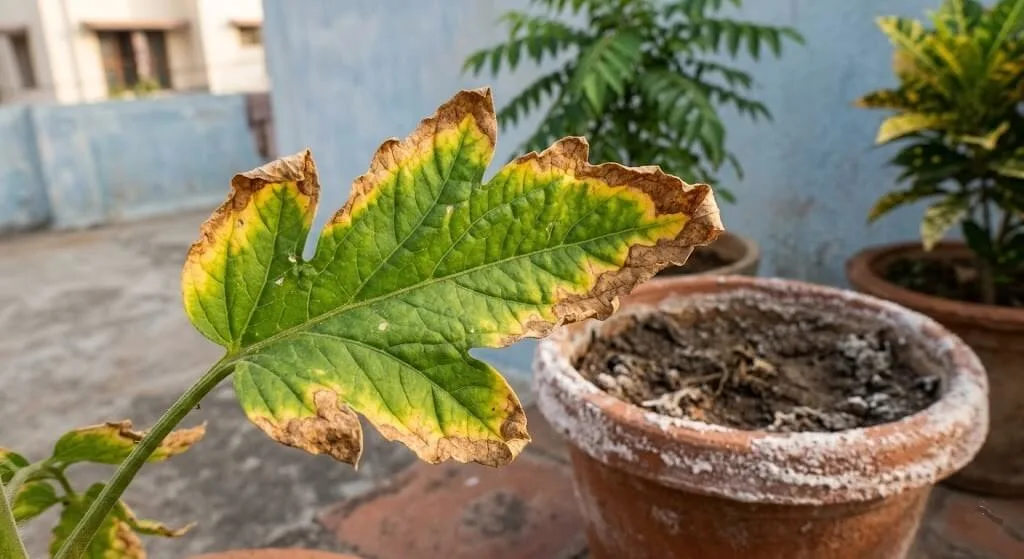
Leaf tips and edges turn yellow, then brown and crispy, while the center of the leaf stays green. You’ll often see a white crusty residue on the top of the soil or on the outside of terracotta pots that’s fertilizer salt crystallizing as water evaporates. The yellowing typically appears suddenly after a heavy fertilizing session, which is the main clue.
Why It Happens in Containers
Container plants are uniquely vulnerable because fertilizer salts accumulate in the limited pot volume with nowhere to go. Every application adds more. If you water shallowly not enough for water to flow freely through the drainage hole salts concentrate at the root zone and essentially poison the plant. Indian tap water also has higher dissolved mineral content than water in many Western countries, which compounds the accumulation over time.
My Experience
My first summer gardening in 2021, I was convinced that more fertilizer meant more tomatoes. By June, every single plant had crispy, yellowed edges and I had absolutely no idea why despite all the care I was giving them. I bought a TDS meter (₹300 to ₹500 on Amazon) and tested my soil it read over 3,000 ppm. Healthy potting soil should stay below 1,500 ppm. I had created a salty desert in every single pot.
How to Fix It
Water your plants heavily until water pours freely from the drainage hole for 3 to 5 continuous minutes. This flushes accumulated salts down and out of the pot. Do this once a week for 2 to 3 weeks.
Take a complete break from all chemical fertilizers for 3 to 4 weeks. When you resume, use one-quarter to one-half the dose shown on the packaging. Switch organic fertilizers vermicompost, cow manure, neem cake as your primary feeding method. They release nutrients slowly and never cause salt buildup. Use chemical fertilizers only as occasional supplements.
For long-term prevention: always water deeply enough that water flows freely from drainage holes with every session. Check soil TDS monthly with a TDS meter it’s a one-time investment that pays for itself many times over.
Approximate cost: ₹0 for flushing; ₹300 to ₹500 for the TDS meter as a permanent diagnostic tool
Quick Diagnosis Reference Table
Use this with the pattern you identified at the very start:
| What the yellow looks like | Location on the plant | Additional signs | Most likely cause | Your first step |
|---|---|---|---|---|
| Uniform pale yellow | Old/bottom leaves first | Whole plant looks washed out | Nitrogen deficiency | Urea foliar spray |
| Yellow with clearly green veins | NEW top leaves only | Veins stay dark green | Iron deficiency | Chelated iron spray |
| Mottled yellow between veins | OLD bottom leaves | V-shaped patches between veins | Magnesium deficiency | Epsom salt spray |
| Yellow edges, brown crispy tips | Any leaf | White crust on soil surface | Salt/fertilizer burn | Deep water flush |
| Bleached white-yellow patches | Top/sun-facing side | Appeared after a hot day suddenly | Heat scorch | Move to shade immediately |
| Tiny yellow dots all over | Any leaf | Fine webbing on stems or leaves | Spider mites | Neem oil spray |
| Uniform yellow, whole plant | All leaves, old and new | Wet soil, musty smell | Overwatering/root rot | Stop watering; check roots |
| 2–3 bottom leaves only, slow | Very bottom only | Rest of plant perfectly healthy | Normal aging | Remove yellow leaves |
Summer Heat Impact on Yellow Leaves- The Compounding Problem India-Specific Guides Miss
Most yellow leaf guides treat each cause in isolation. But in Indian summer conditions April through June, ambient temperatures 38 to 45°C heat rarely works alone. It amplifies every other cause on this list simultaneously. Understanding how heat compounds these problems is what separates Indian container gardening from the advice you find in Western gardening resources.
How Summer Heat Makes Every Yellow Leaf Cause Worse
Heat accelerates nitrogen loss. At soil temperatures above 35°C, the nitrogen cycle in container soil speeds up dramatically beneficial bacteria break down organic nitrogen faster, and the resulting nitrates leach out with evaporation and watering at double the normal rate. A pot that holds adequate nitrogen in March can become visibly deficient by May with no change in your fertilising routine. This is why many Indian gardeners notice their plants looking well-fed through February and March, then steadily yellowing from April onward despite the same feeding schedule. The heat changed the equation, not your routine.
Heat locks out iron further. Indian tap water already sits at pH 7.5 to 8.5 high enough to restrict iron availability. But as soil temperature rises, the chemical reactions that lock iron out of root cells accelerate. At 40°C soil temperature, iron uptake efficiency drops significantly even at the same pH. This is why iron chlorosis becomes dramatically more visible in May compared to March even when your water source and pH have not changed.
Heat and watering create a root rot trap. The most dangerous pattern I see every Indian summer: the heat is intense, so you water more. The roots are in hot soil and already stressed. The drainage hole gets partly blocked. The extra watering fills the air pockets in the root zone with water. The roots suffocate in hot, wet conditions which is significantly more damaging than either heat alone or overwatering alone. Root rot in July-humid conditions kills plants in 5 to 7 days, far faster than the same problem in cooler months.
Heat causes overnight yellowing that looks like multiple causes at once. On a 44°C day, a plant can experience heat scorch on its sun-facing leaves, iron deficiency symptoms on new growth, and stress-triggered yellowing on lower leaves all simultaneously. When this happens, gardeners understandably panic and cannot identify a single cause. The answer is usually to manage the heat first (shade + elevation + mulch, as covered in Day 3 of this challenge) and then address individual nutrient issues once the plant is in a stable thermal environment.
The Heat-Yellow Leaf Diagnosis Sequence
When it is peak Indian summer and your plant has yellow leaves, work through this sequence before reaching for any fix:
First question: Is the soil temperature above 38°C at noon? If you have not measured this, check Day 3 of this challenge. Soil above 38°C causes root stress that mimics almost every nutrient deficiency — and no nutrient fix works well when the roots are heat-damaged.
Second question: Has there been a heatwave in the last 3 to 5 days? Sudden yellowing after extreme heat (42°C or above) is often heat scorch or acute heat stress rather than a nutrient problem. Moving the plant to shade is the priority, not fertilising.
Third question: Is it the monsoon or high humidity period? Humidity above 75% combined with heat creates root rot conditions almost automatically in containers with imperfect drainage. The yellowing cause shifts from nutrient deficiency to overwatering risk even when you have not changed your watering frequency.
Fourth question: What is the season-specific pattern? March and April yellowing is most commonly iron deficiency from alkaline water. May and June yellowing is most commonly heat compounding root zone problems. July and August yellowing is most commonly monsoon overwatering and drainage issues.
What to Do Differently in Indian Summer
In the April through June peak heat period, my full approach changes compared to cooler months:
I shift all fertilising to early morning applications before 7 AM so nutrient solutions do not evaporate or concentrate in hot afternoon soil. I reduce chemical fertiliser frequency by half and increase organic top-dressing. I check pH and TDS every two weeks instead of monthly, because heat accelerates both alkalinity rise and salt concentration. I water only at 6 to 7 AM and 6 to 7 PM never midday so cool water does not shock hot roots and hot afternoon sun does not evaporate nutrients before roots can absorb them. I apply chelated iron spray in the evening rather than morning to prevent leaf burn and maximise absorption time.
These adjustments, combined with the soil temperature management from Day 3, are what keep my terrace garden producing through May and June when most Indian balcony gardens have given up for the season.
Hard Water Issues The India-Specific Yellow Leaf Problem Nobody Else Covers
This section does not exist in any Western gardening guide because hard water water with high dissolved calcium and magnesium mineral content is a mild inconvenience in most European and North American cities. In India, it is a serious and widespread container gardening problem that compounds iron deficiency, creates soil crust, blocks drainage, and accelerates salt buildup simultaneously.
Understanding Indian hard water properly can explain months of mysterious plant decline.
What Hard Water Actually Does to Your Container Soil
Hard water is water with high concentrations of dissolved calcium carbonate and magnesium carbonate the same minerals that leave white deposits on your bathroom tiles and inside your kettle. In India, hard water is the norm rather than the exception across most of the country, particularly in the north, central, and western regions.
When you water your plants with hard water repeatedly over weeks, three things happen to your container soil:
It raises soil pH progressively. Calcium carbonate is alkaline. Each watering deposits a small amount of it into the soil. Over six to eight weeks of daily watering with hard water, pot soil pH can rise from a healthy 6.5 to 7.0 up to 7.8 to 8.3 well into the range where iron, manganese, zinc, and boron become chemically unavailable to plant roots. This is the direct link between hard water and iron deficiency yellowing on new top growth. You have not changed anything in your routine but your soil chemistry has quietly shifted.
It forms a surface crust that blocks water and air. Calcium deposits accumulate on the soil surface and in the top layer of potting mix, forming a hard, pale crust that water struggles to penetrate. You will see this as water beading on the soil surface and running down the sides of the pot instead of soaking in. This crust also blocks oxygen exchange in the root zone, which stresses roots in the same way overwatering does but without the waterlogging.
It contributes to salt buildup. Hard water has higher TDS total dissolved solids than soft water. Cities with hard water typically have tap water TDS of 300 to 600 ppm or higher. As covered in Day 4 of this challenge, every litre of high-TDS water adds to the soil salt load. Hard water gardeners reach dangerous salt concentrations faster than those with soft or moderate-TDS water.
How to Identify Hard Water as Your Problem
You already have the test strips and meters mentioned earlier in this article. Use them together:
Test your tap water pH. Above 7.5 = hard water risk. Above 8.0 = high risk. This alone costs ₹150 for a pack of pH strips.
Test your tap water TDS. Above 400 ppm = significantly hard. Above 600 ppm = very hard water that needs active management.
Look at your kettle or bathroom tap. White or yellowish mineral deposits = hard water confirmed.
Look at your terracotta pot exteriors. White crystalline staining on the outside of pots is calcium and mineral deposits from your water — a visible hard water indicator.
| Water Quality | pH | TDS | Yellow Leaf Risk |
|---|---|---|---|
| Soft water | 6.0–7.0 | Below 200 ppm | Low |
| Moderate water | 7.0–7.5 | 200–400 ppm | Medium |
| Hard water | 7.5–8.0 | 400–600 ppm | High |
| Very hard water | Above 8.0 | Above 600 ppm | Very High |
| Borewell hard water | 7.5–9.0 | 500–1,500 ppm | Severe |
My Hard Water Experiment Madanapalle 2024
Madanapalle municipal water runs at pH 7.8 to 8.3 depending on the season and source. I tested this across two summers and saw consistent iron chlorosis on every plant watered without pH adjustment.
In March 2024, I set up three identical capsicum seedlings in identical potting mix. For eight weeks:
Pot A received tap water at pH 8.1 no modification. Pot B received tap water brought to pH 6.8 with 1.5 ml apple cider vinegar per litre. Pot C received collected rainwater at pH 6.2 naturally soft.
At week 4: Pot A showed early iron chlorosis on new leaves. Pots B and C were identical in appearance. At week 6: Pot A had clear interveinal yellowing on all new growth. Pot B had slight yellowing on one leaf. Pot C was fully healthy. At week 8: Pot A soil pH tested at 8.4. Pot B soil pH tested at 7.1. Pot C soil pH tested at 6.6.
The same plant, same soil, same position, same sun, same fertiliser just three different water sources. Tap water without correction had pushed soil pH from 6.5 to 8.4 in eight weeks. That is the power of Indian hard water on container soil.
Hard Water Fix Recipes
The Daily Fix Apple Cider Vinegar Method: For every litre of watering water, add 1 to 2 ml of raw apple cider vinegar and stir. This brings typical Indian tap water pH from 7.8 to 8.2 down to approximately 6.5 to 7.0 the ideal range for container vegetable growing. Cost: ₹100 to ₹200 for 500 ml of ACV, which lasts months at this dose.
The Soil Fix Agricultural Sulphur: If your soil has already become alkaline from months of hard water watering, mixing agricultural sulphur (₹40 per kg) into the top 2 inches of soil will slowly acidify it over 3 to 4 weeks. Use approximately half a teaspoon per 10-inch pot. This works slowly it is a long-term correction rather than an emergency fix.
The Iron Rescue Fix – Chelated Iron Spray: When you already have iron chlorosis showing on new leaves from hard water damage, use chelated iron (Sequestrene, ₹80 to ₹150 per 100g) as an immediate foliar spray. This bypasses the soil pH problem entirely and delivers iron directly to the leaf tissue. Mix 1g per litre and spray in the evening. Results in 3 to 5 days on new growth.
The Long-Term Fix – Switch Water Source: Collected rainwater (near-zero TDS, pH 6.0 to 6.5) is the best possible water for Indian container gardens. RO product water (pH 6.5 to 7.0, TDS 20 to 50 ppm) is the second-best option and available in most Indian households. Even mixing tap water 50/50 with rainwater or RO water reduces hard water impact by half.
Approximate cost for daily management: ₹0 to ₹200 depending on water source adjustment
Monsoon Drainage Problems When Too Much Water Creates the Same Symptoms as Too Little
Indian gardeners know monsoon as relief from heat and for garden beds and outdoor plants, it usually is. For container plants, the monsoon is a completely different story. The same heavy rainfall that replenishes groundwater and cools the air can waterlog every container pot on your terrace within a single afternoon, creating root rot conditions that cause widespread yellowing within days.
This section is almost entirely absent from standard gardening guides because it is a uniquely Indian problem the intensity and duration of Indian monsoon rainfall has no equivalent in the climates where most container gardening literature is written.
What Happens to Container Soil in Indian Monsoon
A typical Mumbai or Bangalore monsoon day can deliver 50 to 100 mm of rainfall in 3 to 4 hours. A Chennai northeast monsoon event can bring 150 to 200 mm in a day. For comparison, a standard 12-inch container holds approximately 8 to 10 litres of soil with 3 to 4 litres of air pore space. Even 20 mm of rainfall hitting an open container pot exceeds its drainage capacity many times over.
The result: pots sitting on open terraces fill with water faster than drainage holes can release it. Soil becomes completely saturated. All air pore space fills with water. Roots lose access to oxygen within 12 to 24 hours. Root cell death begins. The plant’s water and nutrient delivery system fails. Yellow leaves appear within 3 to 7 days indistinguishable from overwatering or root rot at any other time of year.
The compounding problem: monsoon also brings high humidity (80 to 95%), reduced sunlight, and cooler soil temperatures. This combination slows plant metabolism and root recovery significantly a plant that might bounce back from 48 hours of waterlogging in April can be seriously damaged by the same event in July because recovery conditions are so much poorer.
The Monsoon Yellow Leaf Pattern
Monsoon-related yellowing has a distinctive sequence that is different from summer overwatering:
It appears on a large percentage of plants at once not just one pot because the rainfall affects all your outdoor pots simultaneously.
The yellowing progresses very fast within 3 to 5 days of a major rainfall event rather than the gradual 1 to 2 week progression of regular overwatering.
Soil stays wet for much longer than normal because monsoon humidity slows evaporation. A pot that would drain and dry in 2 days in April can stay waterlogged for 5 to 7 days during July monsoon.
New growth that emerges post-monsoon often shows iron deficiency symptoms because the sustained waterlogging temporarily damages the fine root hairs responsible for iron absorption, and the damp cloudy conditions slow recovery.
My Monsoon System Built After the 2023 Loss
July 2023 was the worst monsoon month I have experienced as a container gardener. Three days of sustained heavy rainfall followed by 70% humidity and minimal sun. I lost one capsicum plant completely to root rot and two more came close. That year taught me the specific protocols I now use every monsoon season.
The Drainage Audit Before Monsoon Season: Every May, before the monsoon arrives, I inspect every pot. I push a thin bamboo skewer through every drainage hole to confirm it is clear and unobstructed. Any holes smaller than my little finger get carefully enlarged. I check that pots are elevated at least 20cm off the floor elevated pots drain gravity-assisted and do not sit in pooled water. I look for saucers or plates accidentally left under pots that would trap water. These are removed entirely from outdoor pots for monsoon season.
The Cover Strategy During Heavy Rain Events: I keep a roll of clear polythene sheet available at any hardware store for ₹50 to ₹100 that I can quickly drape over my most vulnerable pots during sustained heavy rainfall. This is not permanent shade just protection during a downpour. Tomatoes, capsicums, and any pot currently fruiting get covered first. Methi, curry leaf, and hardier plants can handle the rain better.
The 24-Hour Check After Heavy Rainfall: After any rainfall event, I lift every pot 24 hours later. A pot that still feels very heavy 24 hours after rain stopped has drainage problems. I immediately push a bamboo skewer through the drainage hole again, sometimes forcefully if a root has re-blocked it. If the soil is still completely saturated after 48 hours, I tilt the pot at a 45-degree angle for 2 to 3 hours to force drainage with gravity this works surprisingly well.
The Post-Monsoon Recovery Feed: After a heavy monsoon week, Indian container soil has typically lost a significant amount of nitrogen through leaching. The yellow leaves that appear in late August and September are often nitrogen deficiency from monsoon leaching rather than any root damage. A single application of diluted NPK 19:19:19 (half-strength, one teaspoon per 2 litres) after the heavy rains ease off is usually enough to bring plants back quickly.
Monsoon-Ready Drainage Improvements
For new pots: Layer 2 to 3cm of broken terracotta pieces, pebbles, or gravel at the very bottom of the pot before adding soil. This prevents the drainage hole from being blocked by compacted soil or roots and keeps the base layer draining freely even when the rest of the pot is saturated.
For existing pots you cannot repot: Push a bamboo skewer through the drainage hole before monsoon season. Repeat monthly through the monsoon period.
For balconies that flood: Raise all pots to a height where they sit above your balcony’s water retention level. Even 5 to 10cm of elevation can prevent pots from sitting in pooled floodwater during peak monsoon events.
For high-rainfall cities Mumbai, Chennai, Goa, Kerala coastal areas: Consider moving your most vulnerable fruiting plants (tomatoes, capsicums) to covered areas entirely from July through September. These plants are not adapted to sustained heavy rainfall and will not fruit productively under monsoon conditions regardless of drainage management. Better to pause, let them rest, and bring them back out in October when conditions improve.
The Monsoon Recovery Checklist
If you are reading this during or after a heavy monsoon week and seeing yellow leaves across your container garden:
Stop all watering immediately the soil is already saturated. Lift every pot to check drainage tilt at 45 degrees anything still waterlogged after 48 hours. Do not fertilise for at least one week root systems are compromised and cannot absorb nutrients. Remove any saucers from under outdoor pots. After the rain stops and soil drains, apply a single diluted NPK feed this recovers monsoon-leached nitrogen. Check new growth over the following 2 weeks if new leaves show green veins on yellow background (iron chlorosis), it means fine root hairs were damaged in the waterlogging event and need chelated iron spray to recover.
Approximate cost for monsoon preparation: ₹100 to ₹300 (polythene cover + drainage pebbles)
Anjali’s Story: From 60% Yellow to First Harvest in 6 Weeks
Anjali from Hyderabad messaged me in May 2024 with photos of her balcony garden that genuinely made me wince. She had six capsicum plants and every single one had about 60% yellow leaves from the bottom up. She’d been gardening for two years and couldn’t understand what she’d done wrong.
I asked three questions: How often are you watering? Do you know your tap water pH? And are the veins still green on those yellow leaves?
Her answers: daily, sometimes twice. pH unknown. And yes, definitely green veins on some.
Classic Hyderabad combination overwatering AND iron deficiency from alkaline water, both happening at once.
Week one: no watering for five full days. She bought pH strips, tested her tap water at 8.2, and started adding a small amount of apple cider vinegar to her watering can. Week two: watered every 2 to 3 days based only on the finger test, plus chelated iron applied as a foliar spray. Week three: Epsom salt spray added because a few older leaves also showed interveinal yellowing, suggesting magnesium deficiency alongside the iron issue. Weeks four through six: regular diluted NPK 19:19:19 feeding at half strength.
At six weeks, new growth was coming in dark, healthy green. The plants started flowering. By week eight she sent me a photo of a small bowl of red, yellow, and green capsicums from six plants she had nearly thrown out. Honestly one of my favourite messages of all of last year.
Total cost of the entire recovery: under ₹500.
My 5-Minute Sunday Morning Prevention Routine
After four years and three Andhra Pradesh summers, this is the weekly check I do every Sunday before chai. It catches almost every problem before it becomes a crisis.
The Finger Test : I push my finger 2 inches into each pot. Still wet means I skip watering. Dry means I water that day.
The Lift Check : I pick up each pot briefly. Surprisingly heavy means water isn’t draining. Suspiciously light means it’s very dry.
Unusually heavy = overwatered. Unusually light = underwatered.
The Underside Check : I flip 3 to 4 leaves on each plant and look at the undersides. Dots or webbing means mite action is needed this week.
The New Growth Check : I look at the newest top leaves. Green and perky means the plant is healthy. Yellow or pale means iron deficiency is likely developing.
Green and perky = plant is healthy. Yellow or pale = iron deficiency
The Bottom Leaves Check : 1 to 2 bottom leaves yellowing is normal aging. 5 or more means I need to check nitrogen levels and my watering habits.
1-2 leaves = normal aging. 5+ leaves = check nitrogen or watering.
The Soil Surface Check : White crust on the surface means salt buildup. I flush thoroughly with water that same day.
That’s the entire routine. Less time than making chai, but catching a mite infestation at day 3 versus day 15 is the difference between a quick neem spray and three weeks of intensive recovery.
What to Realistically Expect During Recovery
This is the part nobody tells you and it causes a lot of unnecessary worry after applying a fix.
Existing yellow leaves will not turn green again. This is not a sign that your fix isn’t working. Once chlorophyll breaks down in a leaf, it doesn’t rebuild. What you are looking for is new growth emerging healthy and green. That’s your signal that the treatment worked.
Here’s a realistic breakdown of what to expect:
| Cause | Spreading Stops | New Green Growth | Full Recovery |
|---|---|---|---|
| Nitrogen deficiency | 3–5 days after fertilizing | 5–10 days | 3–4 weeks |
| Iron deficiency | 3–5 days after chelated iron | 7–14 days | 4–6 weeks |
| Magnesium deficiency | 5–7 days after Epsom salt | 10–14 days | 4–6 weeks |
| Mild root rot | 7–10 days after fixing drainage | 14–21 days | 6–8 weeks |
| Salt burn | 5–7 days after flushing | 10–14 days | 3–5 weeks |
| Heat scorch | Immediate (move to shade) | 14–21 days | 4–6 weeks |
| Spider mites | 7–10 days after neem treatment | 14–21 days | 4–6 weeks |
Don’t remove old yellow leaves the moment you apply a fix. Leave them until new growth has come in to replace them they’re still doing something for the plant. Remove them once healthy green growth has taken over.
Product Recommendations – What I’ve Actually Used in India
These are products I’ve personally bought and used here. No affiliate links, just honest notes on what works.
For diagnosis:
pH test strips at ₹150 for 100 strips (Amazon search “pH test strips for plants”), a TDS meter at ₹300 to ₹500 (Amazon), and a 10x loupe or magnifying glass at ₹150 to ₹300 (Amazon — invaluable for confirming spider mites before treating).
For nitrogen deficiency:
Urea at ₹20 to ₹30 per 500g from any agricultural shop or Amazon. NPK 19:19:19 balanced fertilizer at ₹80 to ₹100 per 500g from nurseries or Amazon. Vermicompost at ₹40 to ₹60 per kg from nurseries Ugaoo brand is also available online.
For iron deficiency:
Chelated iron / Sequestrene at ₹80 to ₹150 per 100g from agricultural shops or Amazon. Apple cider vinegar at ₹100 to ₹200 per 500ml from grocery stores for ongoing pH adjustment of watering water.
For magnesium deficiency:
Epsom salt at ₹30 to ₹60 per 500g from any pharmacy, Amazon.
For pest control:
Cold-pressed neem oil at ₹150 to ₹250 per 500ml from agricultural shops or Amazon. Oberon miticide at ₹200 to ₹400 from agricultural shops for severe spider mite infestations.
For heat protection: 50% shade net at ₹8 to ₹15 per square foot from hardware stores and nurseries. Pot elevating stands at ₹80 to ₹200 from nurseries or Amazon.
Frequently Asked Questions
Should I cut off yellow leaves?
Only remove them once they’re more than 50% yellow and only after you’ve identified and started treating the underlying cause. Even partly yellow leaves still photosynthesize and removing them creates unnecessary stress. Once new healthy growth has come in, remove the old yellow leaves to improve airflow and appearance.
Can yellow leaves turn green again?
No. Once chlorophyll breaks down in a leaf, that leaf won’t recover. Fix the underlying problem and all new growth will come in green. Focus on new growth, not trying to rescue what’s already yellow.
I applied the fix but the plant still has yellow leaves did it not work?
It probably did work. Existing yellow leaves never recover regardless of treatment. Give it 2 to 3 weeks and look specifically at new growth. If new leaves are coming in green, you’ve solved the problem correctly.
My whole plant turned yellow suddenly, almost overnight. What happened?
Sudden whole-plant yellowing is almost always root rot or severe waterlogging. Check the roots immediately using the Root Check method in Cause 3 above. This is an emergency that needs fast action.
All my plants are yellowing at the same time what does that mean?
When multiple pots yellow simultaneously, it’s pointing at a shared systemic issue either a watering habit problem affecting everything, a water quality issue (alkaline water causing iron deficiency across all pots), or a fertilizer practice problem. A single plant yellowing is more likely specific to that pot’s drainage, roots, or pests.
My mango, curry leaf, or lemon tree has yellow leaves. Is the diagnosis the same?
The same causes apply, but fruit trees and perennial plants recover on much longer timelines often 3 to 4 months for full recovery versus 3 to 6 weeks for annual vegetables. Fruit trees are also significantly more sensitive to root disturbance, so be cautious about removing them from pots for root inspection unless you’re quite certain root rot is the problem.
Final Thoughts: Yellow Leaves Are a Message, Not a Death Sentence
I want to leave you with the most important thing I’ve learned in four years of container gardening on my Madanapalle terrace yellow leaves are never the problem. They are always the symptom of a problem.
The gardeners who lose plants are the ones who see yellow and immediately reach for fertilizer, or water more, or do both at once. I was one of them in 2021 and 2022. I killed plants because I treated the symptom instead of diagnosing the cause first.
The gardeners who recover like Anjali in Hyderabad who went from 60% yellow leaves to her first capsicum harvest in six weeks are the ones who pause, look at the pattern, identify the cause, and then treat it correctly.
That’s genuinely all this guide is trying to give you. Not a magical spray. Not an expensive product. Just a way of reading what your plant is actually telling you.
If your bottom leaves are yellowing uniformly, your plant is hungry for nitrogen. If your new top leaves are yellow with green veins, your alkaline tap water is locking out iron. If the whole plant is yellow and the soil is wet, the roots are in trouble and more water is the last thing it needs. If you see tiny dots and webbing, mites arrived before you noticed. And if it’s just two leaves at the very bottom of an otherwise thriving plant close this article and go enjoy your garden.
Yellow leaves can look alarming. But with the right diagnosis, almost every case in this guide is fixable within a few weeks, often for less than ₹200. Your plant is not giving up. It’s asking for something specific. Now you know how to listen.
Today’s Action Checklist
☐ Identify your yellowing pattern using the Quick Diagnosis section at the top of this article
☐ Confirm the most likely cause using the reference table above
☐ Do the 5-Minute Check right now: finger test, lift test, underside check, new growth check, soil surface check
☐ Purchase one diagnostic tool if you don’t have it yet — pH strips (₹150) or TDS meter (₹300 to ₹500)
☐ Start the appropriate fix for your identified cause
☐ Set a phone reminder 10 to 14 days from now to check on new growth
☐ Remove any leaves that are more than 50% yellow — but only after starting the correct fix
Coming Up Tomorrow: Day 3 – Soil Getting Too Hot
If you’ve fixed your yellow leaves but your plants still aren’t thriving in the summer heat, there’s a good chance your soil temperature is the hidden villain. On a 42°C summer day, unshaded black container soil can hit 60 to 65°C — and most plant roots begin to die above 38°C. I measured this in detail on my own terrace.
Tomorrow in Day 3 of the 30-Day Summer Challenge, I’ll show you exactly how to measure, monitor, and cool your soil temperature — with solutions ranging from completely free (mulching with dry leaves) to highly effective (the double-potting technique I’ve been using for two summers).
Have you solved a yellow leaf mystery in your own garden? Tell me what it was in the comments below, or DM me on Instagram @thetrendvaultblog. I answer every message — and your garden problem might become a case study that helps hundreds of other Indian balcony gardeners figure out the exact same thing.
— Priya Harini B, Madanapalle, Andhra Pradesh
About the Author
Priya Harini B has been container gardening on her terrace in Madanapalle, Andhra Pradesh for over four years. She has grown 40+ varieties of vegetables, herbs, and fruit trees in containers and specializes in adapting gardening techniques for Indian climate conditions, soil types, and locally available materials. Every experiment including the ones that fail gets documented honestly at thetrendvaultblog.com.
Part of the 30-Day Summer Gardening Challenge — solving India’s most common summer gardening problems, one day at a time.