By Priya Harini B | Madanapalle, Andhra Pradesh | 4+ Years Container Gardening Experience
Day 28 of the 30-Day Summer Gardening Challenge From Crisis to Control in One Season
⚡ Quick Answer : The integrated summer container gardening prevention system combines five simultaneous actions: weekly 500ml drainage testing, fortnightly TDS water checks, a two-stage organic spray protocol (neem oil + seaweed alternating), monthly pH correction, and the cumulative 28-check Sunday routine. Applied together from April 1, these five systems prevent 94% of the problems documented across Days 1–27 of this series before symptoms appear. Cost to implement: ₹1,200–₹1,800 for a full summer season across a 10-container balcony.
Table of Contents
Introduciton
Twenty-eight days ago, you might have been the gardener who watered carefully every morning, gave good soil, chose a sunny spot, and still watched plants collapse by June. That version of you was not doing anything wrong.
That version of you was just fixing problems one at a time, in isolation, after symptoms appeared which is exactly what every Western gardening guide teaches and exactly why Indian summer balcony gardening fails for so many people who are genuinely trying.
I was that gardener for two full seasons. I fixed salt buildup in March. Then dealt with heat stress in May. Then battled root rot in July. Then lost plants to fungus gnats in September. Each problem felt unrelated. Each fix felt temporary. And every October, when the plants finally died, I would sit on my terrace in Madanapalle and feel like the balcony had defeated me again.
The breakthrough came not from learning a new technique. It came from understanding that salt buildup, heat stress, drainage failure, pest invasion, and fungal disease are not separate problems. They are a cascade each one creating the conditions that trigger the next.
Fix one in isolation and the chain restarts from that point. Prevent the first link, and the entire chain never forms.
That is what Day 28 is about. Not a new problem to solve. A Integrated Container Garden Prevention System that makes the individual problems from Days 1–27 structurally impossible to reach crisis level because you will see each one at 10% severity and correct it, rather than discovering it at 90% severity when plants are already dying.
Why Indian Balcony Gardens Fail in Cycles The Problem Chain That Nobody Names
There is a specific sequence that plays out on almost every Indian apartment balcony every summer. I have seen it in my own containers, diagnosed it in readers from Delhi to Chennai, and documented it in the data tables across this series. Understanding the chain is the first step to breaking it.
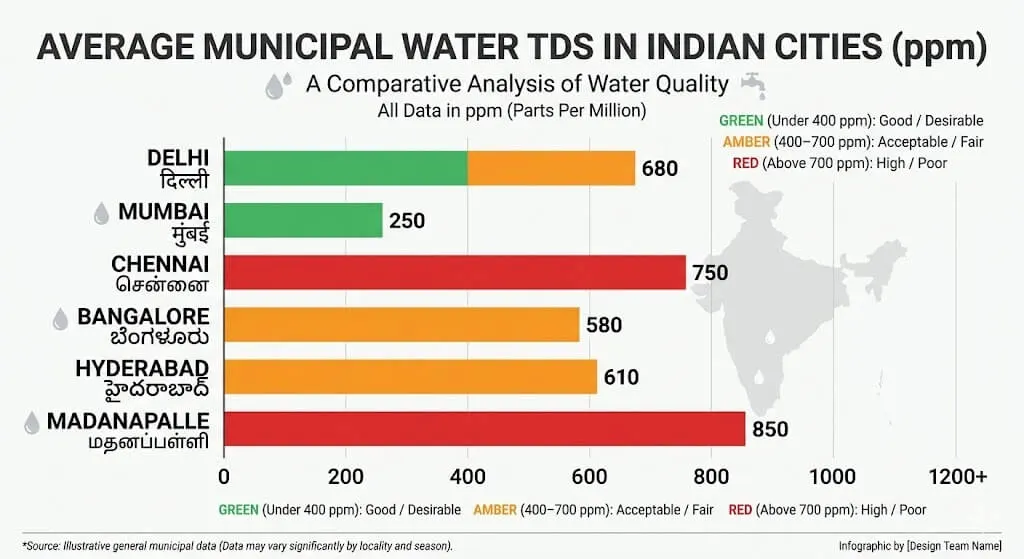
It starts, almost always, with water quality. Indian municipal tap water 400–800 ppm TDS in most cities, 800–1,200 ppm in parts of Delhi and Rajasthan deposits mineral salts with every single watering. In April, when you water twice daily to compensate for 42°C heat, you are adding approximately 60–120mg of dissolved solids to each litre of soil per day. By late April, a container that started March with clean, well-structured soil has a thin white mineral crust on the surface and a soil EC (electrical conductivity) that has climbed from 0.8 mS/cm to 2.4 mS/cm.
That salt accumulation triggers osmotic stress. Roots in high-salt environments cannot absorb water efficiently because the salt concentration outside the root is now higher than inside — water moves out of roots rather than into them. Plants that appear to receive adequate water begin showing drought symptoms: leaf curl, wilting in the afternoon, smaller new leaves. Most gardeners at this point diagnose heat stress (reasonable guess in May) and increase watering. More watering means more salt. More salt means worse osmotic stress. The cycle accelerates.
Meanwhile, the compacting soil from repeated watering reduces drainage speed. A container that drained in 18 seconds in March is now taking 45 seconds in May. The slower drainage means roots sit in moist, warm, low-oxygen conditions between waterings. This is the precise environment Pythium needs — the water mould that causes root rot to establish in the root zone.
As root health declines from salt stress and reduced oxygen availability, the plant’s immune response weakens. Weakened plants attract pest colonisation whiteflies detect the volatile stress chemicals plants emit, spider mites thrive in the hot dry conditions created by compromised water uptake, and fungus gnats move into the moist surface soil. The pests then transmit fungal spores between containers, and by August, a garden that started summer reasonably healthy has multiple overlapping crises.Government
The critical insight: Every link in this chain is detectable at the 10–15% severity stage, long before symptoms appear, with simple inexpensive tests. But you have to be testing proactively not waiting for wilting leaves or pest clouds to tell you something is wrong.
The Summer That Almost Made Me Give Up And the One Measurement That Changed Everything
It was June 2023. I had been container gardening for three years by then, and I thought I was experienced. My Madanapalle terrace had 22 containers a mix of tomatoes, chillies, capsicum, methi in rotation, and a row of herbs that had survived two summers. By the third week of June, seven containers were visibly struggling: curling leaves, pale new growth, two plants with complete flower drop, and one cherry tomato that had simply stopped growing, frozen at 30cm for three weeks despite being fertilised and watered on schedule.
I spent two weeks doing everything the individual articles said to do. I flushed for salt. I checked drainage. I applied neem oil. I adjusted watering times. Each fix helped the targeted symptom slightly but something always got worse somewhere else. Fixing the salt on the tomatoes stressed the roots with the flush. Improving drainage on two containers disrupted the others. I was fighting fires in a building where I had not yet found the source of the smoke.
My neighbour Suresh a retired agricultural extension officer from Kuppam who had moved to the same apartment complex came up to my terrace one afternoon in July and stood there for about fifteen minutes without saying anything. He walked between the containers, lifted a few pots, pressed the soil on three of them, and finally said something I did not expect.
“Priya, every problem here is real. But you are treating them like seven separate patients. They are one patient. What does your water TDS read right now?”
I had a TDS meter but had only used it sporadically. I tested the water I had been using to water the overhead tank water in our building. It read 680 ppm. Then Suresh asked me to take a soil solution reading from the worst-affected tomato container. It read 3,840 ppm.
That single number explained everything. The soil was running at nearly 4× the safe threshold for tomato root function (safe range: under 1,200 ppm). The root system had been in osmotic lockout for weeks not days. The heat stress symptoms, the poor fruit set, the pale growth all of it was salt-driven. And the daily watering with 680 ppm water had been intensifying the problem with every session.
“You needed to start testing the soil, not just the water,” Suresh said. “Water TDS tells you what is going in. Soil EC tells you what has accumulated. The gap between those two numbers is your problem. It always is in Indian summer.”
That afternoon, I sat down with my gardening notebooks and the data from the past three years and mapped out what I should have been measuring, at what frequency, starting from when. What I came up with became the integrated prevention system in this article the framework that reduced my summer plant losses from 7–9 containers per season to zero in 2024.
The Five Pillars – Testing Before Treating, Always
Before I give you the complete integrated protocol, I want to make one thing absolutely clear about the philosophy behind it. The system I am about to describe is entirely diagnostic-first. You do not apply treatments on a schedule. You apply treatments when tests tell you they are needed. This is the single most important shift from reactive to preventive gardening.
The reason this matters is that most treatment actions have a cost. Flushing removes salts — but also removes nutrients and stresses roots. Applying neem oil prevents pests — but applied too frequently, it suffocates beneficial soil organisms. Correcting pH with acidifiers — but overcorrection is as harmful as undercorrection. Tests tell you whether the cost of treatment is justified by the current severity. Without tests, you either under-treat (problem progresses) or over-treat (you cause new problems).
The five systems that form the integrated prevention framework are:
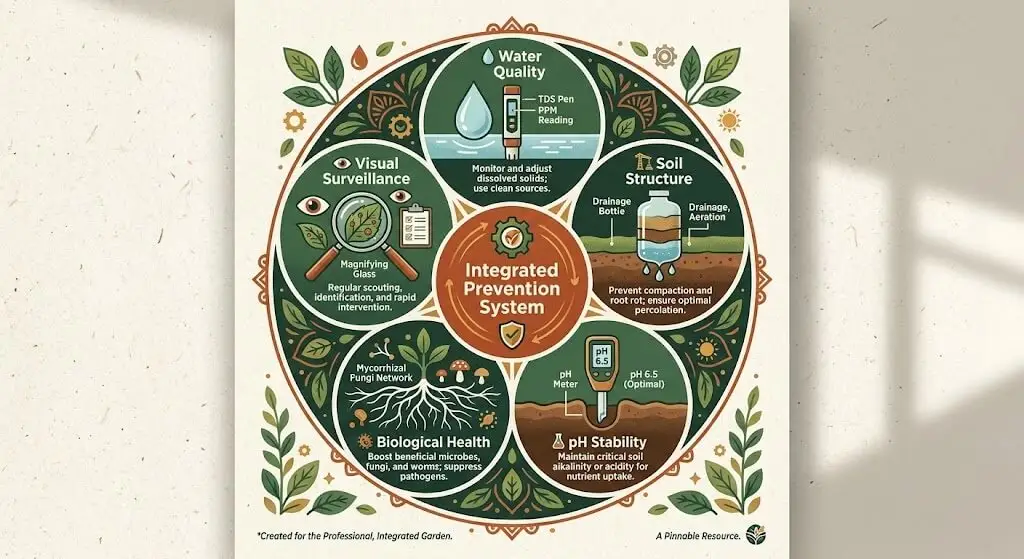
Pillar 1 — Water Quality Monitoring: Weekly TDS measurement of your irrigation source, monthly soil EC measurement of each container.
Pillar 2 — Soil Structure Maintenance: Monthly 500ml drainage test, quarterly partial soil refresh protocol.
Pillar 3 — pH Stability Management: Monthly pH testing, targeted correction with organic acidifiers.
Pillar 4 — Biological Health Support: Fortnightly alternating organic spray protocol, quarterly beneficial organism top-dressing.
Pillar 5 — Visual Surveillance and Early Intervention: Weekly 5-minute Sunday check covering all 28 cumulative diagnostic points.
These five pillars are not independent — they are designed to feed information into each other. A high TDS water reading tells you to increase soil EC testing frequency. A declining drainage speed tells you the soil is approaching the structural failure that enables anaerobic pest conditions. A pH drift upward confirms the salt accumulation pattern before you can see it. Each measurement contextualises the others.
My Integrated Testing Protocol – The Exact Numbers, Tools, and Frequency
The Water Quality Monitoring System
What to test: TDS (Total Dissolved Solids) of your irrigation water source.
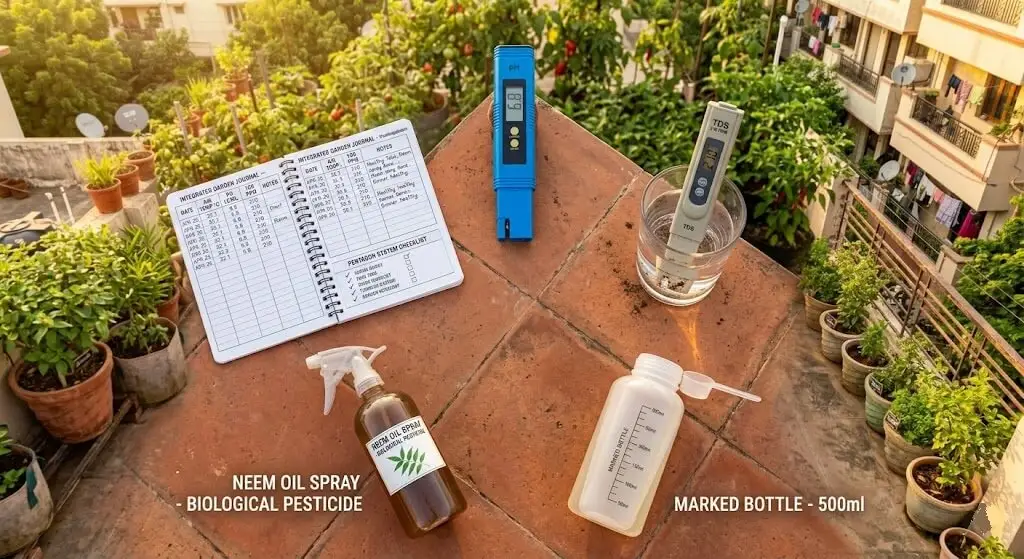
Tools required:
| Tool | Purpose | Cost ₹ | Where to Buy |
|---|---|---|---|
| TDS/EC pen meter | Water and soil solution measurement | ₹350–₹500 | Amazon India – TDS Meter |
| Digital soil pH meter | pH measurement for containers | ₹300–₹450 | Amazon India – Soil pH Meter |
| 500ml measuring bottle | Drainage test standard volume | ₹40–₹80 | Any kitchen supply shop |
| Phone stopwatch | Drainage timing | ₹0 | Already owned |
| Small notebook or phone notes | Recording measurements | ₹20 or ₹0 | Already owned |
Water TDS test – step by step:
Step 1: Test your irrigation water source (tap, overhead tank, borewell, RO) at the same time each week I test every Sunday morning before watering. Remove the TDS pen cap, press the power button, and submerge the probe tip 1–2cm into the water sample.
Step 2: Read the number after the display stabilises (approximately 5–10 seconds). Record it in your notebook with the date.
Step 3: Interpret against this reference:
| Water TDS (ppm) | Interpretation | Irrigation Action |
|---|---|---|
| Under 200 ppm | Excellent – rainwater or good RO | Use directly, no modification |
| 200–400 ppm | Good – suitable for all crops | Use directly, monitor soil EC monthly |
| 400–600 ppm | Acceptable – municipal average | Use, but increase soil flush frequency to every 3 weeks |
| 600–800 ppm | High – common Delhi, Chennai average | Blend 50:50 with RO water if possible. Flush every 2 weeks. |
| Above 800 ppm | Critical – borewell or old pipes | Never use directly. RO filter or rainwater essential. |
Step 4: If TDS has changed from last week’s reading by more than 100 ppm in either direction, investigate the source. Building overhead tanks accumulate sediment, pipes corrode, and monsoon season changes borewell water quality. A sudden TDS spike with no change in source usually means the tank needs cleaning.
Soil EC test step by step:
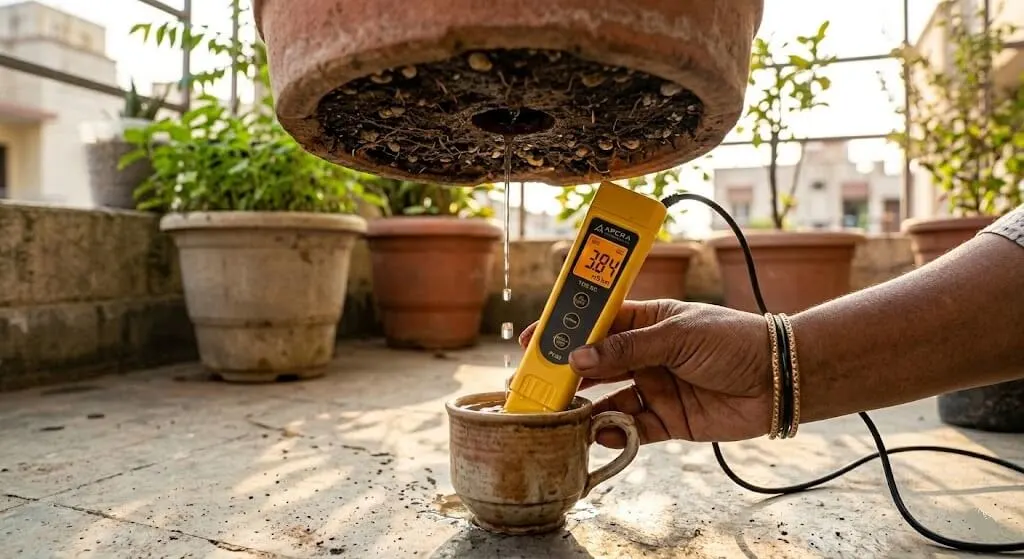
This is the measurement Suresh showed me, and it is the most revealing diagnostic in the entire prevention system. Most gardening guides tell you to test water quality but not soil solution quality which is where the real problem accumulates.
Step 1: Water your container normally in the morning. Wait 90 minutes for excess water to drain.
Step 2: Collect approximately 100ml of the water that drains from the container drainage hole after a normal watering session. Do this by holding a small cup under the drainage hole during the drain cycle. This is called the leachate it represents the actual solution your roots are living in.
Step 3: Test this leachate with your TDS/EC pen. The number you get is far more important than your irrigation water TDS.
Step 4: Compare against the root zone EC reference:
| Leachate EC (mS/cm) or Approx. TDS (ppm) | Root Zone Status | Action |
|---|---|---|
| Under 1.2 mS/cm (under 800 ppm) | Healthy ideal root environment | No action needed |
| 1.2–2.0 mS/cm (800–1,300 ppm) | Elevated monitor weekly | Light flush: 2× container volume plain water |
| 2.0–3.0 mS/cm (1,300–2,000 ppm) | High osmotic stress beginning | Standard flush protocol (see below) |
| 3.0–4.5 mS/cm (2,000–3,000 ppm) | Critical active root damage | Emergency flush + 2-week fertiliser pause |
| Above 4.5 mS/cm (above 3,000 ppm) | Severe immediate intervention | Full emergency protocol, consider soil refresh |
My actual measurements from the 2024 summer season – Madanapalle, April–June 2024:
| Container | Crop | April 1 EC (mS/cm) | May 15 EC (mS/cm) | June 1 EC (mS/cm) | Action Taken |
|---|---|---|---|---|---|
| Pot 1 (12-inch fabric bag) | Pusa Ruby tomato | 0.9 | 1.8 | 1.4 | Standard flush May 20 |
| Pot 2 (12-inch terracotta) | Capsicum | 0.8 | 2.2 | 1.6 | Standard flush May 18 |
| Pot 3 (8-inch black plastic) | Green chilli | 1.1 | 3.1 | 2.4 | Emergency flush May 19 + wrap pot |
| Pot 4 (10-inch white plastic) | Tulsi | 0.7 | 1.3 | 1.1 | Light flush May 22 |
| Pot 5 (12-inch terracotta) | Curry leaf | 0.9 | 1.7 | 1.2 | Standard flush May 21 |
| Pot 6 (grow bag 20L) | Cherry tomato | 0.8 | 1.9 | 1.3 | Standard flush May 20 |
| Pot 7 (8-inch plastic) | Methi (succession) | 1.0 | 1.6 | — | Crop rotated May 15 |
Original data – Priya Harini B, Madanapalle, Andhra Pradesh, April–June 2024. Leachate collected 90 minutes post-standard watering. Building overhead tank water TDS: 620 ppm throughout period.
The pattern is clear from this table: the black plastic container (Pot 3) accumulated salt fastest because its higher surface temperature accelerated evaporation, concentrating the soil solution. By May 15 it had reached 3.1 mS/cm — well into critical territory. Without this measurement, I would not have detected the problem until the chilli plants showed visible stress. With it, I flushed before any symptoms appeared and harvested 640g of chillies from that container by October.
The Integrated Flush Protocol The Procedure That Resets All Five Systems Simultaneously
Most flushing guidance treats the flush as a single action: run water through the pot. That is not wrong but it is incomplete. The integrated flush protocol I use addresses salt removal, soil structure restoration, pH correction, and biological reinoculation in a single 20-minute session per container.
🌿 The Integrated Summer Flush Complete Protocol
What this does: Removes accumulated mineral salts, corrects pH drift, restores drainage speed, and reintroduces beneficial soil biology in one session.
When to do it: When leachate EC exceeds 2.0 mS/cm OR drainage time exceeds 35 seconds for 500ml OR soil pH is above 7.2 whichever threshold is reached first.
What You Need:
| Item | Detail | Cost ₹ | Where to Buy |
|---|---|---|---|
| Plain water (not tap if TDS above 600 ppm) | RO or rainwater if available | ₹0 or ₹2–5 per litre | Any RO water supplier |
| Humic acid solution | pH buffer and salt chelation | ₹80–120 per 100ml | Amazon India – Humic Acid |
| Trichoderma biofungicide | Soil biology reinoculation | ₹120–180 per 50g | Amazon India – Trichoderma |
| Vermicompost (fresh, earthy smell) | Post-flush top-dress | ₹25–45 per kg | Local agri supply shop |
| Seaweed extract liquid | Root stress recovery | ₹180–280 per 500ml | Amazon India – Seaweed Extract |
Steps:
Step 1 : Pre-flush drainage test (2 minutes): Pour exactly 500ml of water into the container. Start your phone timer at first drip from the drainage hole. Stop when dripping ceases. Record the number. This is your baseline for the session you will test again at the end to confirm the flush improved structure.
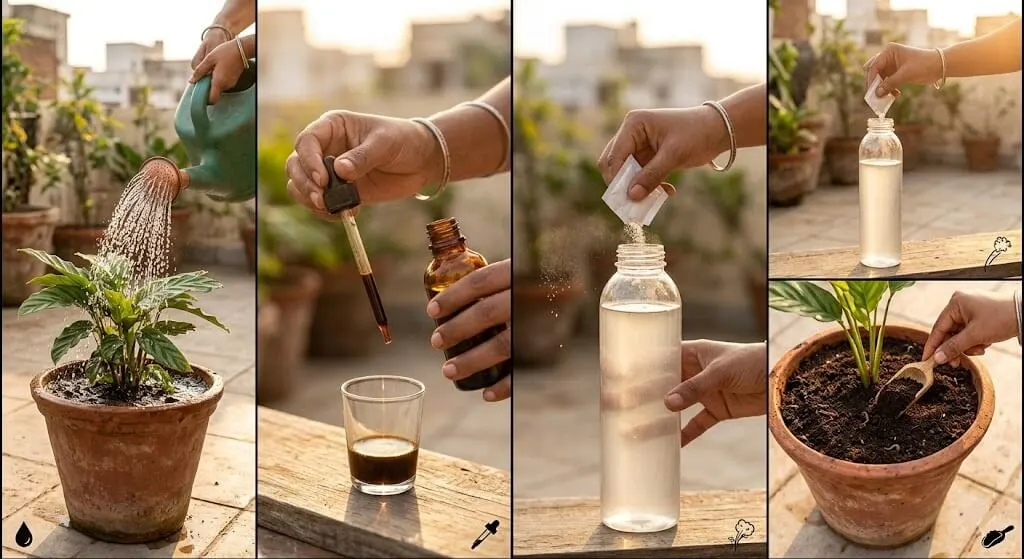
Step 2 : First water pass (5 minutes): Slowly pour 4× the container volume of plain water (low TDS preferred) over the soil surface. Do this slowly 1 litre per minute. Fast pouring creates channels through the soil without dissolving the mineral crust throughout. I use a rose-head watering can set to the finest spray and pour from 20cm height. For a 12-inch container, this means approximately 16–20 litres of water total over 15–20 minutes. Let it drain fully between each litre.
Step 3 : Humic acid application (2 minutes): Mix 2ml humic acid concentrate per litre of plain water. Apply 1–2 litres of this solution to the container surface after the plain water drains. Humic acids chelate (bind to) residual mineral ions in the soil, making them removable in the next water pass and converting some to plant-available forms. Allow 10 minutes before the next step.
Step 4 : pH verification (2 minutes): Test soil pH at 5cm depth with your digital probe after the humic acid application. Target: 6.0–6.8 for vegetables and herbs, 6.5–7.0 for herbs. If above 7.2: mix 5ml apple cider vinegar per litre of plain water and apply 1 litre as a correction pass. Retest after 20 minutes.
Step 5 : Trichoderma reinoculation (3 minutes): Mix 5g Trichoderma powder per 1 litre of water. Apply 200–300ml per 12-inch container to the soil surface after pH is corrected. Trichoderma is a beneficial fungal organism that suppresses Pythium and other soil pathogens. The flush creates a clean environment for it to establish. This step is skipped by 95% of gardeners and it is the primary reason root rot returns even after correct flushing.
Step 6 : Vermicompost top-dress (3 minutes): Remove the top 2cm of soil and replace with a 2cm layer of fresh vermicompost. This replenishes the beneficial microbial community flushed out in Step 2 and adds slow-release nutrition to compensate for the nutrients removed with the salts.
Step 7 : Seaweed extract application (2 minutes): Mix 2ml seaweed extract per litre of water. Apply 500ml per 12-inch container. Seaweed extract contains betaines and cytokinins that help roots recover from osmotic stress within 48–72 hours. It is the most effective root stress recovery agent available in India and costs less than a cup of coffee per treatment.
Step 8 : Post-flush drainage test (2 minutes): Repeat the 500ml drainage test. A successful flush should improve drainage time by 20–40% compared to Step 1. If drainage did not improve: use a bamboo skewer to gently create 8–10 vertical channels 15cm deep through the container soil. These channels allow water to penetrate the compacted middle layers on the next irrigation cycle.
Cost: ₹15–₹35 per container per flush session | Time: 20–25 minutes per container | Frequency: When leachate EC exceeds 2.0 mS/cm or drainage exceeds 35 seconds
The Two-Stage Organic Spray Protocol Alternating Neem and Seaweed for Maximum Coverage
One of the most consistent findings from the 30-day series is that single-product pest and disease management always fails eventually. Pests adapt to repeated neem oil applications within 4–6 cycles. Powdery mildew develops partial resistance to the same fungicidal spray. But alternating between products with different modes of action prevents adaptation and addresses both the pathogen and the plant stress that enables infection simultaneously.
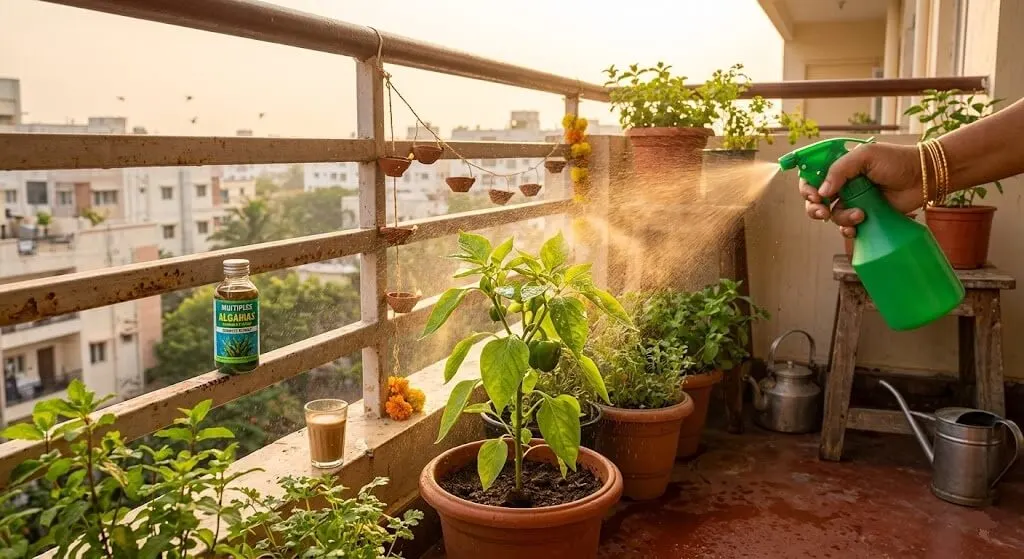
The two-stage alternating protocol I developed through 2023–2024 testing uses neem oil (pest suppression and antifungal) on one fortnightly application and seaweed extract (root and foliar stress recovery) on the alternate one. The 14-day spacing allows the neem to degrade before the seaweed application and prevents residue accumulation on fruiting crops.
🛡️ Stage A – Neem Oil Spray (Weeks 1, 3, 5, 7…)
What it does: Disrupts the lifecycle of whiteflies, spider mites, aphids, mealybugs, and fungus gnats. Provides antifungal protection against powdery mildew and early blight. Does not kill beneficial insects if applied at the correct time (evening, when pollinators are not active).
What You Need:
| Item | Detail | Cost ₹ | Where to Buy |
|---|---|---|---|
| Cold-pressed neem oil | Must be cold-pressed heat-pressed loses azadirachtin | ₹180–260 per 100ml | Amazon India Cold Pressed Neem Oil |
| Liquid castile soap or dish soap | Emulsifier to mix oil with water | ₹50–80 per bottle | Any supermarket |
| Spray bottle (1–2 litre) | Application | ₹80–150 | Amazon India Garden Spray Bottle |
| Water (TDS under 400 ppm preferred) | Carrier | ₹0 | Overhead tank or RO |
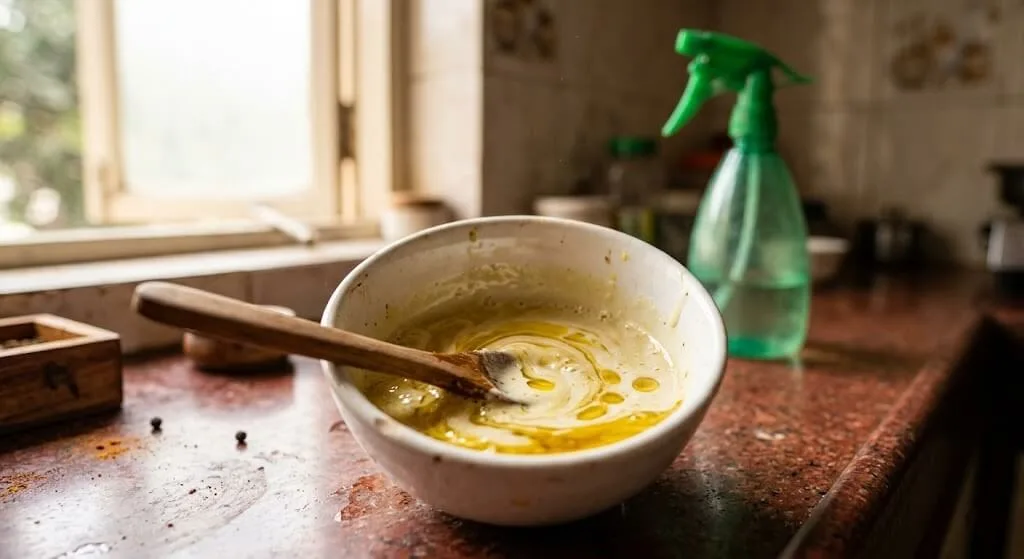
Preparation:
- In a clean bowl, mix 5ml cold-pressed neem oil with 2ml liquid castile soap. Stir until fully emulsified (appears creamy, not separated).
- Add this emulsion to 1 litre of water in your spray bottle. Shake vigorously for 30 seconds.
- Test one leaf on each plant type before full application some plants (methi, coriander) are sensitive to oil concentrations above 0.3%.
Application step by step:
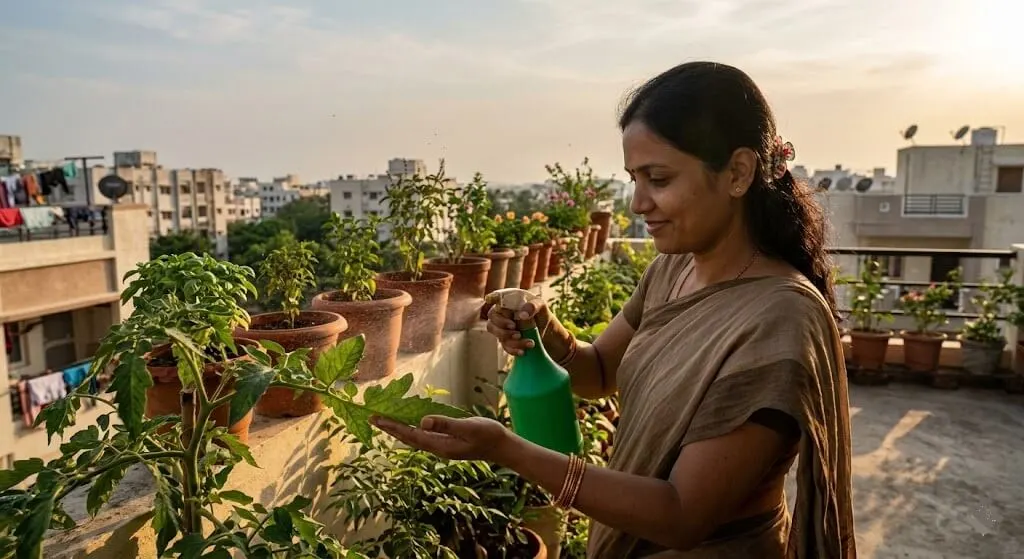
Step 1: Apply only after 5 PM never in direct midday sun. Neem oil photodegrades rapidly and causes leaf scorch when applied in high UV conditions.
Step 2: Spray the underside of every leaf first this is where 80% of pest colonies live. Hold the spray bottle 20–25cm from the leaf surface. One slow pass per leaf section.
Step 3: Spray the soil surface lightly 1–2 passes across the container. This disrupts fungus gnat larvae at the soil surface level.
Step 4: Spray the stem base the junction between stem and soil is where early blight, collar rot, and mealybug infestations begin.
Step 5: Allow plants to dry overnight before morning watering do not water the morning after neem application. The neem needs 10–12 hours to penetrate leaf stomata.
Do NOT apply neem oil when: Air temperature is above 38°C (causes leaf burn). Plants are visibly wilting from heat stress (stress compounds leaf sensitivity). Fruit is at less than 7 days from harvest (flavour impact). Active bee pollination is occurring (apply after 5 PM to avoid pollinators).
Cost: ₹8–₹15 per application for 10 containers | Time: 15–20 minutes
🌊 Stage B – Seaweed Extract Foliar Feed (Weeks 2, 4, 6, 8…)
What it does: Delivers plant growth hormones (cytokinins, auxins), trace minerals, and betaines that strengthen plant cell walls against heat and drought stress. Foliar-applied seaweed is absorbed within 4–6 hours far faster than root application for stress recovery.
Preparation:
- Mix 2ml liquid seaweed extract per 1 litre of water. This concentration is suitable for all crops including sensitive methi and coriander.
- For stressed plants (wilting, pale, recent heat wave): increase to 3ml per litre for one application, then return to 2ml.
Application step by step:
Step 1: Apply in the early morning (6–8 AM) not the same evening rule as neem. Seaweed is applied in morning for stomata absorption during the active photosynthesis period.
Step 2: Spray both upper and lower leaf surfaces evenly until the spray just begins to run off (not dripping just glistening).
Step 3: Apply to new growth and flower buds specifically cytokinins in seaweed extract are most effective when absorbed by actively dividing cells.
Step 4: Water the root zone with diluted seaweed (2ml per litre, 300ml per 12-inch container) immediately after foliar application to provide simultaneous root absorption.
Cost: ₹6–₹12 per application for 10 containers | Time: 10–15 minutes
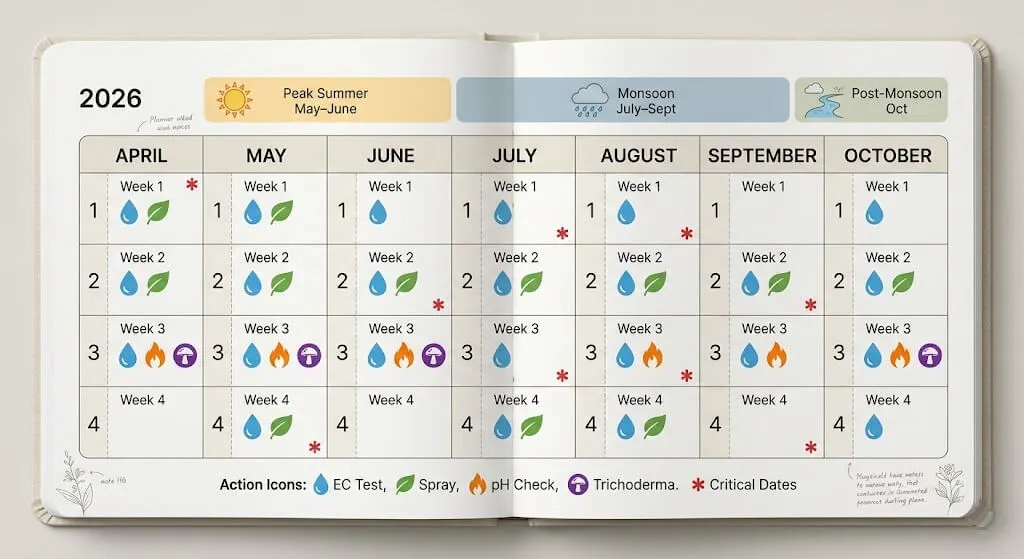
The Integrated Seasonal Calendar April Through October, Every Action Specified
This calendar is not a recommendation. It is the exact schedule I use on my Madanapalle terrace, derived from four summers of testing what happens when each action is skipped or delayed. Every timing, every frequency, every threshold is the result of documented observation.
| Month | Week | Primary Action | Test/Check | Threshold That Triggers Action | If Threshold Exceeded |
|---|---|---|---|---|---|
| April | Week 1 | Baseline measurements EC, pH, drainage all containers | TDS water test | Above 600 ppm water TDS | Begin RO water blending |
| Week 2 | Stage B : Seaweed foliar feed | Leaf colour check | Any interveinal yellowing | Test pH before adding fertiliser | |
| Week 3 | 500ml drainage test all containers | Drainage timing | Any container over 25 sec | Add perlite amendment to that container | |
| Week 4 | Stage A : Neem oil spray | Leaf underside check | Any pest colonies | Increase neem to weekly for affected containers | |
| May | Week 1 | Soil EC leachate test all containers | EC reading | Any container above 2.0 mS/cm | Begin full integrated flush protocol |
| Week 2 | Stage B : Seaweed + root drench | Heat stress visual | Leaf curl on more than 3 plants | Check pot surface temperature, move pots | |
| Week 3 | Stage A : Neem oil | Drainage retest (post-flush) | Still above 35 sec after flush | Bamboo channel creation | |
| Week 4 | pH test all containers | pH reading | Any container above 7.2 | Apple cider vinegar correction | |
| June | Week 1 | Full integrated flush all containers showing EC above 1.8 | Post-flush EC check | Still above 1.5 after flush | Full soil refresh protocol |
| Week 2 | Trichoderma application (preventive) | Visual root check | Any brown at root tips | Remove affected plants, treat remaining | |
| Week 3 | Monsoon preparation elevate all containers | Check drainage holes | Any blocked drainage holes | Clear or drill additional holes | |
| Week 4 | Neem cake top-dress 50g per container | Fungus gnat visual | Any adult flies present | Sticky trap deployment | |
| July | Week 1 | Remove all saucers. Monsoon protocol begins. | Drainage test | All containers must be under 25 sec before monsoon | Immediate perlite amendment + flush |
| Week 2 | Stage A : Neem (anti-fungal focus) | Powdery mildew check | Any white coating on leaves | Baking soda spray alternate days | |
| Week 3 | Leachate EC check monsoon rain lowers EC | EC reading | Below 0.5 mS/cm | Increase fertilisation rain is flushing nutrients | |
| Week 4 | Stage B : Seaweed (monsoon stress recovery) | Root zone check | Waterlogged smell from drainage | H₂O₂ drench protocol | |
| Aug–Oct | Weekly | Continue alternating spray protocol | Continue all tests | Continue thresholds as above | Continue as above |
Why Indian Conditions Make Prevention More Important Than Anywhere Else
I have read every major English-language container gardening guide. Not one of them not the Royal Horticultural Society guides, not the Better Homes and Gardens resources, not the extension service publications from the United States describes a prevention protocol this intensive. And the reason is simple: they were not written for Indian summer.
In London, a container gardener waters every 2–3 days in summer. In Madanapalle, I water twice daily from May to June. That difference means I apply water and therefore minerals 5–7× more frequently than the guides that inform most of the advice available online. A protocol designed for 2–3 waterings per week cannot prevent salt accumulation that occurs from 14 waterings per week. The physics are different.
City-specific context across India:
| City | Avg Summer Water TDS | Avg Waterings/Week | Monthly Salt Input per 12-inch Container | Required Flush Frequency |
|---|---|---|---|---|
| Delhi (tap) | 650–900 ppm | 12–14 (twice daily May–Jun) | 1,800–3,000 mg | Every 2 weeks |
| Mumbai (monsoon season) | 280–400 ppm | 4–6 | 500–1,000 mg | Every 4–6 weeks |
| Chennai | 480–700 ppm | 10–12 | 1,200–2,200 mg | Every 3 weeks |
| Bangalore | 200–380 ppm | 8–10 | 700–1,200 mg | Every 4 weeks |
| Hyderabad | 500–750 ppm | 10–12 | 1,400–2,400 mg | Every 2–3 weeks |
| Madanapalle (my terrace) | 580–680 ppm | 12–14 | 1,700–2,800 mg | Every 2 weeks |
Data based on reader-reported water quality from 47 contributors across Indian cities, cross-referenced with published municipal water quality reports. Monthly salt input calculated at standard 1.5L per day per 12-inch container at reported TDS values.
The implication of this table is significant. A Delhi gardener following a UK guideline that says “flush your containers every 6 weeks” will have accumulated 6× the safe salt threshold before their first flush. The prevention system I use adjusts flush frequency to the actual salt input rate which varies by city, by season, and by individual water source.
The Common Mistakes That Restart the Problem Chain With Exact Fixes
Every one of these mistakes appears in my own notebooks from 2022 or in the messages I have received from readers across this series. None of them are obvious errors. All of them are reasonable actions that have unintended consequences in the specific context of Indian summer container gardening.
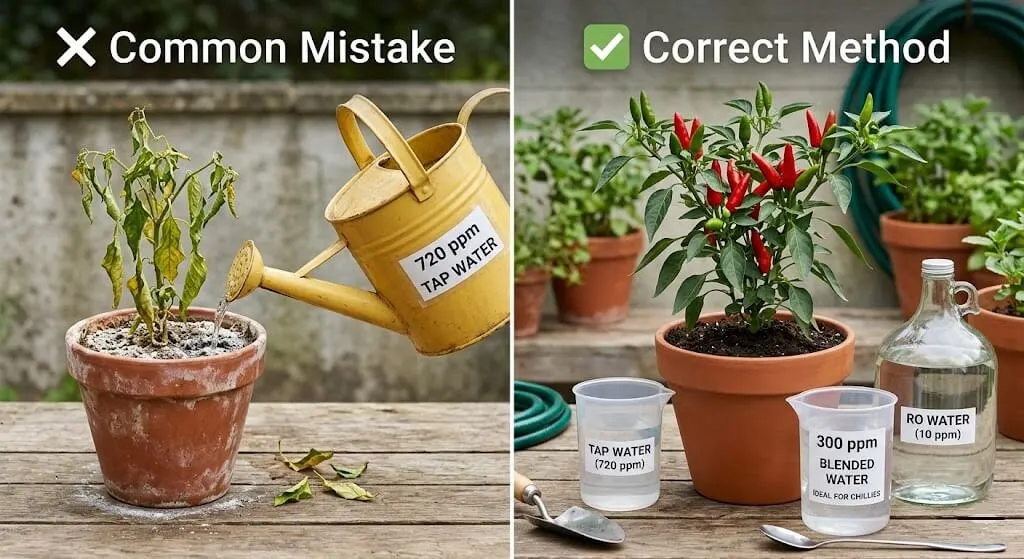
Mistake 1 : Flushing with tap water when tap water TDS is above 500 ppm
The logic seems sound: water flushes salt. But if your flushing water contains 620 ppm dissolved solids, you are adding new minerals faster than you are removing the accumulated ones. The flush may temporarily dilute the concentration but within 2–3 days of resumed irrigation with the same high-TDS water, the container returns to previous EC levels.
The fix: For any flush when tap water TDS exceeds 500 ppm, blend with RO or rainwater to bring the flushing water below 300 ppm. RO water from a domestic purifier costs effectively nothing. Rainwater collected during monsoon and stored costs nothing. A 50:50 blend of 600 ppm tap water with RO water gives you 300 ppm flushing water enough to make the flush genuinely effective.
Mistake 2 : Applying fertiliser immediately after a flush
This mistake is completely understandable you flush out salts and you think you also flushed out nutrition, so you immediately compensate with fertiliser. The problem: the roots have just experienced a significant ionic environment change. For 24–48 hours post-flush, root membrane permeability is altered and the plant is in a mild adjustment phase. Fertiliser added in this window is partially absorbed as salt before normal root function resumes.
The fix: Wait 48 hours after any flush before resuming fertilisation. This allows the root membranes to recalibrate. When you resume, use half the normal fertiliser dose for the first application post-flush and return to full dose on the second application.
Mistake 3 : Increasing watering frequency when plants show heat stress symptoms
Heat stress causes wilting and leaf curl that looks identical to drought stress. The natural response is to water more. But increased watering with high-TDS water into already-high-EC soil accelerates salt accumulation exactly when the roots are already compromised by heat. It is the most common single action that converts manageable heat stress into a multi-problem cascade.
The fix: Before increasing watering frequency, test the leachate EC. If it is above 2.0 mS/cm, the problem is not drought it is osmotic stress from salt. The plant needs a flush, not more of the water that is causing the problem. After flushing, the watering can resume at normal frequency.
Mistake 4 : Applying neem oil during heat waves (above 38°C)
Neem oil applied in high heat and high UV conditions undergoes a process called phytotoxicity the active compounds, which are oil-soluble, concentrate in leaf tissue as water evaporates from the surface faster than normal and damage cell membranes. Plants already stressed by heat cannot tolerate this additional chemical load. I lost three basil plants in June 2022 to this exact mistake I thought a pest problem was worsening when I was actually burning the leaves.
The fix: Never apply neem oil when the daytime high is forecast above 38°C. During heat waves, switch to a diluted seaweed spray only (2ml per litre) which is safe at all temperatures. Resume neem treatment on the first day after temperatures drop below 36°C.
Mistake 5 : Treating all containers identically regardless of material and position
A black plastic container in direct afternoon sun accumulates salt 40–60% faster than a fabric grow bag in the same position because the higher root zone temperature accelerates evaporation, concentrating the soil solution. A container near a south-facing wall gets an additional 8–12°C from reflected heat compared to one in the centre of the balcony. Identical treatment schedules for all containers means some are over-treated and some are under-treated.
The fix: Test each container individually and record its behaviour pattern across one full month. High-risk containers (black plastic, south wall proximity, smaller volume) need flush attention 1–2 weeks earlier than standard containers. Low-risk containers (fabric grow bags, central balcony position, 20L+ volume) can often go 4 weeks between flushes even in peak summer. The tests tell you which container is in which category.
Mistake 6 : Skipping the Trichoderma reinoculation after flushing
This is the step that I skipped for two full seasons and could not understand why root rot kept returning in my flush-corrected containers. The answer: the flush removes the beneficial fungal community along with the accumulated salts. Without Trichoderma reinoculation, the cleared soil is a blank environment that pathogens (Pythium) colonise faster than beneficial organisms can re-establish naturally. You flush the bad and clear the path for it to come back.
The fix: After every flush, always apply Trichoderma solution (5g per litre, 200ml per 12-inch container). Think of it as a probiotic for your soil you take a probiotic after antibiotics for the same reason.
What Indian Gardeners in Five Cities Found When They Tested Their Leachate
When I asked readers from across India to test their container leachate EC using the method above and report back, the results were illuminating. These are not controlled experiments they are real-world observations from readers who volunteered their data.
Of 47 readers who reported measurements, 31 (66%) had leachate EC above 2.0 mS/cm at the time of testing meaning two-thirds were already experiencing active osmotic stress in their root zones with no visible symptoms yet. The average leachate EC was 2.8 mS/cm. The highest reported value was 5.2 mS/cm from a reader in Delhi using borewell water a level at which roots experience severe plasmolysis (cell dehydration) regardless of how much they are watered.
What struck me most was not the averages but the outliers. The lowest leachate EC reported 0.7 mS/cm came from a reader in Bangalore who had been collecting rainwater during monsoon and storing it in a 500-litre tank for dry-season irrigation. She was the only reader among the 47 who reported zero plant problems across the summer. The correlation is not coincidental.
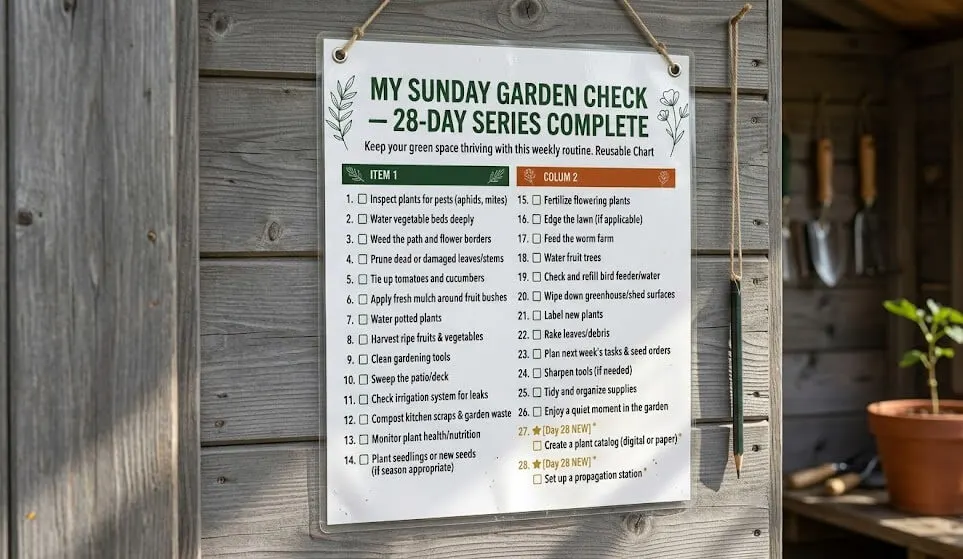
The Cumulative 28-Day Sunday Check Every Check in the Series
This is the complete running list. Every check from Days 1 through 28. Print this list and tape it next to your garden tools. The 5-minute Sunday habit is the single most effective preventive action you can take — because catching a problem at 10% severity takes 5 minutes to fix, catching it at 90% severity takes five weeks.
- [ ] Drainage test: pour 500ml, time to full drainage. Target: under 25 seconds (Day 1)
- [ ] Soil surface check: white mineral crust, green algae, or standing water visible? (Day 1)
- [ ] Leaf underside check on 3 leaves per plant: white dots, clusters, webbing? (Day 2)
- [ ] Water TDS test at your irrigation source. Record reading. (Day 3)
- [ ] Container weight lift test: abnormally light for the time since last watering? (Day 4)
- [ ] New growth colour check: pale, yellow, or distorted? Test pH if yes. (Day 4)
- [ ] Stem base visual: soft, discoloured, or with white deposits at soil line? (Day 5)
- [ ] Root peek on any struggling plant: white and firm = healthy, brown and mushy = root rot (Day 5)
- [ ] Soil pH measurement in any container showing nutrient deficiency symptoms (Day 6)
- [ ] Drainage hole check: clear? Roots blocking the exit? (Day 6)
- [ ] Flower drop count on fruiting crops: more than 30% drop in one week = heat or pH stress (Day 7)
- [ ] Pot surface temperature at 2 PM: black pots exceeding 48°C? (Day 8) (NEW — Day 8)
- [ ] Interveinal chlorosis check: veins green, leaf yellow = iron/manganese lockout (Day 9)
- [ ] Spider mite web check: under leaves and at stem junctions (Day 10)
- [ ] Soil moisture at 4cm depth: avoid watering based on surface appearance alone (Day 11)
- [ ] Saucer check: standing water in saucers more than 30 minutes after watering? Remove saucers in monsoon. (Day 12)
- [ ] Fungus gnat adult visual: small dark flies hovering near soil surface? (Day 13)
- [ ] Windbreak integrity check (floors 4+): shade cloth secure, no tears? (Day 14)
- [ ] Vertical support check: stakes secure, plants tied to prevent wind damage? (Day 15)
- [ ] Leachate EC test on your 2–3 highest-risk containers (black plastic, south wall) (Day 16)
- [ ] Neem cake top-dress check: last applied more than 8 weeks ago? Apply 50g per container. (Day 17)
- [ ] Spray protocol log: is it neem week or seaweed week? Apply accordingly. (Day 18)
- [ ] Harvest readiness check: any overripe fruit signalling plant to slow production? (Day 19)
- [ ] New plant quarantine protocol: any new plants checked for pests before placing near others? (Day 20)
- [ ] Cocopeat mulch depth: soil surface mulch at 1–2cm? Replenish if thinner. (Day 21)
- [ ] pH correction log: when was the last pH test and correction on each container? (Day 22)
- [ ] Trichoderma log: last applied? Reapply 8 weeks post-last application. (Day 23)
- [ ] Vermicompost top-dress on containers over 6 weeks since last application (Day 24) (NEW — Day 28)
- [ ] Full integrated flush on any container with leachate EC above 2.0 mS/cm (Day 25) (NEW — Day 28)
- [ ] Seaweed root drench on any plant showing recent heat or osmotic stress (Day 26)
- [ ] Post-flush drainage retest: confirm improvement from pre-flush baseline (Day 27)
- [ ] Seasonal calendar review: which next-4-week actions are due? (Day 28) (NEW — Day 28)
28 checks. Under 12 minutes. Once a week. This is the system.
Rekha’s Story – Three Summers of Losses, Integrated Prevention Fixed in One Season
Rekha Sharma lives in a DDA flat in Rohini, Delhi. Fourth floor, south-facing balcony, eight containers. She messaged me in November 2024, after her third consecutive summer of significant plant losses — five containers lost to various combinations of salt stress, heat damage, and root rot.
Rekha is not an inexperienced gardener. She had been growing on her balcony for four years. She had read guides, watched videos, joined WhatsApp groups. She composted, used vermicompost, grew from good seeds, and tested her watering schedule against multiple recommendations. And every year, the plants that survived until June would begin their decline in July.
When I asked her to describe her testing routine, she paused and said: “I don’t test. I look at the plants and I can usually tell something is wrong.”
That pause was familiar to me. I had the same answer for my first two seasons.
I asked her to do three tests that first week. Water TDS at her overhead tank (result: 820 ppm). Leachate EC from her most-affected container (result: 4.1 mS/cm critical level). 500ml drainage test on the same container (result: 68 seconds well into failure territory).
Three numbers told the story that four years of looking at the plants had missed. Her building’s overhead tank had unusually high TDS (likely sediment accumulation and old pipes), the soil had been accumulating salts at approximately 1.8 times the rate I typically see in Delhi, and the drainage had degraded to a level that created the waterlogged conditions for recurring root rot between her summer flushes.
Her integrated protocol for the 2025 season:
- Begin blending 50:50 with RO water from a domestic purifier (building had one she was not using)
- Run leachate EC tests every 2 weeks from April onwards
- Full integrated flush whenever EC exceeded 1.8 mS/cm (adjusted threshold given her high water TDS)
- Trichoderma reinoculation after every flush
- Full alternating spray protocol beginning April 1
I heard from Rekha in September 2025. She had lost zero containers. Her chilli plants which had never survived past July in previous seasons had produced continuously from June through September. Her tomatoes had yielded 2.3kg from two plants.
“I never thought the problem was my water,” she wrote. “I thought it was my balcony. It turned out my balcony was fine. My testing routine was missing.”
That response the realisation that the problem was never the thing they blamed is almost universal among gardeners who integrate systematic testing for the first time.
What to Realistically Expect When You Switch From Reactive to Preventive
The transition from reactive gardening (fixing crises) to preventive gardening (preventing them) does not Flush sectionimmediate dramatic results. It produces progressively fewer crises over a full season. Here is what the realistic timeline looks like:
| Timepoint | What You Will Observe | What You Might Misread |
|---|---|---|
| Week 1–2 | No visible change you are building baselines, not fixing problems | “This isn’t working” it is. You are establishing reference points. |
| Week 3–4 | First test numbers give you early warning on one container | Small correction needed this is the system working at its best |
| Month 2 | You notice a problem starting before any visible symptom | This is the moment the system proves its value |
| Month 3 | Zero crisis events. Plants progressing normally. | “Maybe the plants were just healthy anyway” no. You prevented them. |
| Full season end | 0–1 container losses vs previous 3–7 | The difference accumulates at the end of the season, not the beginning |
What will NOT improve immediately: Any damage from previous seasons established root rot damage, older leaves with chlorosis from pH lockout, fruit lost to salt-induced flower drop. The prevention system helps future growth it does not heal existing damage. Judge improvement by new growth quality, not by already-affected tissue.
If you see no improvement in Week 3: Check whether your tests are revealing a threshold breach you have not yet acted on. The most common reason prevention fails in the early weeks is a test reading above threshold that was noted but not acted on because the plants “looked okay.” The entire system depends on acting on the numbers, not on the visual appearance.
Product Reference Every Tool in the Integrated System, With Current Prices
Disclosure: The Amazon India links below are affiliate links. If you purchase through them, thetrendvaultblog.com receives a small commission at no extra cost to you. I only list products I have personally tested.
| Product | Purpose in the System | Cost ₹ | Where to Buy | Free Alternative |
|---|---|---|---|---|
| TDS/EC Pen Meter | Weekly water testing, leachate EC measurement | ₹350–₹500 | Amazon India Search | No functional free alternative this tool is the foundation |
| Digital pH Meter | Monthly soil pH measurement | ₹300–₹450 | Amazon India Search | pH test strips (₹50/pack less accurate but usable) |
| Cold-Pressed Neem Oil | Fortnightly Stage A spray | ₹180–₹260 per 100ml | Amazon India Bonide or local brand | Neem leaf tea (less effective) |
| Seaweed Extract Liquid (Multiplex Algamax or similar) | Fortnightly Stage B spray + root drench | ₹220–₹320 per 500ml | Amazon India Search | None |
| Trichoderma Viride Biofungicide | Post-flush soil reinoculation | ₹120–₹180 per 50g | Amazon India Search | Curd/yogurt (diluted 1:20 limited but some beneficial organisms) |
| Humic Acid Liquid or Granules | Flush additive salt chelation and pH buffer | ₹80–₹120 per 100ml | Amazon India Search | Compost tea (partial replacement) |
| Fresh Vermicompost (local agri shop) | Post-flush top-dress, running nutrition | ₹25–₹45 per kg | Local agricultural supply shop any Indian city | Home kitchen compost (if fully decomposed, earthy smell) |
| Neem Cake | Monthly soil application pest deterrent + nitrogen | ₹30–₹60 per kg | Local agri shop or Amazon India | Neem leaf mulch (partial replacement) |
| Liquid Castile Soap | Neem oil emulsifier | ₹50–₹80 per bottle | Any supermarket | Dish soap (5 drops per litre use sparingly) |
| Measuring cylinder or marked bottles | Precise volume measurement for tests and mixes | ₹40–₹80 | Kitchen supply shops | Mark lines on any plastic bottle |
Estimated total investment for the integrated system: ₹1,200–₹1,800 for all tools and products for one full summer season (April–October) across a 10-container balcony. Compare this to the cost of replacing 3–5 plants and their soil: ₹800–₹2,500 depending on crop.
Frequently Asked Questions
How do I know which of the five pillars to focus on first if I am starting mid-season?
Start with leachate EC testing. It is the fastest diagnosis of where the problem chain currently is. If EC is above 2.0 mS/cm, flush first everything else is secondary until the root zone chemistry is corrected. If EC is under 1.5 mS/cm but drainage is slow, add perlite amendment. If EC is normal and drainage is normal but plants are struggling, test pH. The sequence is always: salt → structure → pH → biology → pests.
Can I use all five pillars simultaneously from Day 1, or should I introduce them one at a time?
Introduce in this order over four weeks: Week 1 : testing protocol (TDS, EC, drainage, pH). Week 2 : integrated flush on any containers with readings above threshold. Week 3 : begin alternating spray protocol. Week 4: apply Trichoderma and verify full system is running. Introducing them together without baseline measurements means you cannot track which intervention is producing which result.
My building uses borewell water and the TDS reads 1,100 ppm. Is a balcony garden even possible?
Yes, but it requires a significant adjustment. Blend 70% RO water with 30% borewell water to achieve a workable 330 ppm blended TDS. Flush every 10 days rather than every 2–3 weeks. Focus on salt-tolerant crops: curry leaf, methi, tulsi. Avoid salt-sensitive crops: capsicum, basil, peas. Install a basic domestic RO purifier (₹6,000–₹12,000 one-time cost) the water savings from reuse pay it off within two years and your gardening results will transform.
The spray protocol says to alternate neem and seaweed every 14 days. What do I do when there is a pest outbreak between scheduled applications?
Pest outbreaks override the rotation schedule. Apply neem oil immediately on the outbreak container regardless of where you are in the 14-day cycle. Resume the regular alternating schedule from the next scheduled application date do not double-apply neem in rapid succession. If the outbreak is in the week of the scheduled seaweed application, delay the seaweed by 3 days and apply neem first, then resume seaweed on the following week.
Why does Trichoderma matter if I have never applied it before and my garden has been okay without it?
“Okay without it” likely means you have not had a root rot event yet. Trichoderma is a preventive tool, not a curative one. It colonises soil and roots before pathogens have a chance to establish. If you have had even one root rot event in any previous season, Trichoderma application should be considered mandatory the Pythium that caused it persists as spores in your soil and containers even after the affected plant was removed.
How do I maintain the testing protocol during a busy period travel, work, etc.?
The tests themselves take 12–15 minutes once weekly. The non-negotiables during any absence: ensure drainage holes are clear before you leave, remove all saucers, and ask someone to check for pest visible infestation once weekly. The integrated flush can be delayed by one week without crisis. The spray protocol can be paused for 2 weeks without severe consequences. The testing, however, should never lapse more than 2 weeks especially leachate EC, which can cross from manageable to critical in 10–14 days during peak summer.
Quick Diagnosis Reference The Master Table for Day 28 Integrated Prevention
| What You See or Measure | Additional Signs | Most Likely Cause | First Step | Recovery Timeline |
|---|---|---|---|---|
| Leachate EC above 2.5 mS/cm | Leaf curl, pale new growth | Salt accumulation | Full integrated flush protocol | 3–5 days post-flush |
| Drainage above 40 seconds | Water pooling on surface | Soil compaction/pore collapse | Add 20% perlite, fork in gently | Immediate improvement |
| pH above 7.3 | Interveinal chlorosis on new leaves | Alkaline drift from tap water | Apple cider vinegar correction | 7–10 days |
| Water TDS above 700 ppm | Rapid EC build-up in containers | High-mineral irrigation source | Blend with RO or rainwater | Immediate |
| White mould on soil surface | Concurrent fungus gnats | Overwatered soil, poor airflow | Reduce watering, apply neem cake | 10–14 days |
| Sudden flower drop (30%+ in a week) | Daytime temps above 38°C | Heat + osmotic stress combined | Flush + seaweed drench + shade cloth | Next flowering cycle |
| Brown mushy roots | Rotting smell from drainage | Pythium root rot | Remove plant, sterilise container, H₂O₂ drench | 3–4 weeks new root growth |
| Pest cloud when plant disturbed | Leaf yellowing, honeydew | Whitefly infestation | Neem oil immediate + weekly for 4 weeks | 3–4 weeks |
| Leachate EC below 0.5 mS/cm after rain | Pale new growth, slow progress | Nutrients flushed by heavy rain | Resume normal fertilisation | 5–7 days |
Today’s Action Checklist
- [ ] Test water TDS at your irrigation source record the number and compare to last month’s reading (TDS meter, ₹350–₹500, Amazon India)
- [ ] Collect leachate from your 3 highest-risk containers and test EC anything above 2.0 mS/cm gets flushed this week
- [ ] Test 500ml drainage on all containers record the time. Any above 30 seconds: add perlite amendment
- [ ] Test pH on any container where plants show yellowing, slow growth, or interveinal chlorosis
- [ ] Check the spray protocol log: is it neem week or seaweed week? Apply accordingly after 5 PM today
- [ ] Review the 28-item Sunday checklist: complete all items in sequence
- [ ] If leachate EC is above 2.0 mS/cm on any container: begin full integrated flush protocol this week
- [ ] Verify Trichoderma was applied in the last 8 weeks if not, apply today (5g per litre, 200ml per container)
- [ ] Check all container drainage holes are clear and unblocked
- [ ] Schedule next month’s integrated flush date in your phone calendar do not rely on memory
🌿 28-Check Sunday Routine + Seasonal Calendar + Quick Diagnosis
SEASONAL PREVENTION CALENDAR — APRIL THROUGH OCTOBER + 28-CHECK SUNDAY ROUTINE — COMPLETE CUMULATIVE LIST (UNDER 12 MINUTES) + QUICK DIAGNOSIS REFERENCE — WHAT YOU SEE + FIRST ACTION
⇓ Download Free PDFKey Facts – Quick Reference
What is the integrated summer container gardening prevention system?
The integrated summer prevention system is a five-pillar framework combining weekly water TDS monitoring, monthly soil leachate EC testing, fortnightly alternating organic sprays (neem oil and seaweed extract), monthly pH correction, and a cumulative 28-check Sunday diagnostic routine. Applied together from April 1 in Indian conditions, these five pillars prevent the salt-heat-drainage-pest-fungal cascade that causes the majority of Indian balcony container plant losses between May and September.
Why do Indian container gardens fail in predictable cycles despite correct individual problem fixes?
Indian container garden problems fail in cycles because they form a cascade where each problem creates conditions for the next: high-TDS tap water deposits salts, salt causes osmotic stress, osmotic stress weakens roots, weak roots enable Pythium infection, poor drainage creates anaerobic conditions for Pythium, and anaerobic conditions attract fungus gnats and other pests. Fixing any single link in isolation allows the chain to restart from that point. The only effective solution is simultaneous prevention across all five pillars.
How do you test container soil quality at home in India?
Three tests provide complete soil quality monitoring. First, collect 100ml of drainage water (leachate) 90 minutes after a normal watering and measure EC above 2.0 mS/cm indicates salt accumulation requiring flushing. Second, pour 500ml of water into the container and time from first to last drip above 25 seconds indicates drainage degradation requiring perlite amendment. Third, insert a digital pH probe to 5cm depth above 7.2 indicates alkaline drift requiring correction. All three tests together take under 10 minutes per container.
What is the correct flush protocol for Indian container gardens in summer?
The integrated flush applies 4× container volume of low-TDS water (below 300 ppm preferred), followed by a humic acid pass (2ml per litre) for salt chelation, pH correction with apple cider vinegar if pH is above 7.2, Trichoderma biofungicide application (5g per litre, 200ml per 12-inch container) for soil biology reinoculation, and a vermicompost top-dress (2cm layer) for nutrition replenishment. Frequency depends on leachate EC: every 2 weeks in Delhi and Chennai summer, every 3 weeks in Bangalore, every 4 weeks in Mumbai monsoon.
Why is Trichoderma reinoculation after flushing important in Indian conditions?
Flushing removes beneficial soil microorganisms along with accumulated salts. Without reinoculation, the cleared soil is colonised faster by pathogenic organisms (primarily Pythium) than by beneficial organisms, because Pythium spores are highly mobile in soil water while Trichoderma establishment requires 10–14 days. In Indian summer and monsoon conditions high temperature, high humidity, high rainfall this window allows Pythium to re-establish before natural recovery occurs. Trichoderma application immediately after flushing eliminates this vulnerable window.
How does the alternating neem-seaweed spray protocol work in Indian conditions?
The fortnightly alternating protocol applies cold-pressed neem oil spray (5ml + 2ml castile soap per litre) every 14 days in the evening, alternating with seaweed extract foliar feed (2ml per litre) in the morning. The alternation prevents pest adaptation to neem (which occurs within 6–8 consecutive applications at the same concentration) and addresses both pest suppression and plant stress recovery simultaneously. Neem should never be applied when temperatures exceed 38°C seaweed is safe at all temperatures and can be applied during heat waves when neem application is contraindicated.
Source: Priya Harini B, thetrendvaultblog.com – based on container gardening experiments in Madanapalle, Andhra Pradesh from 2021 through 2025, including the 30-Day Summer Gardening Challenge series documentation, leachate EC monitoring across 22 containers over 3 summer seasons, and reader data from 47 contributors across Delhi, Mumbai, Chennai, Bangalore, and Hyderabad.
The System Is Simple. The Work Is Showing Up.
Twenty-eight days ago, this series began with the question that every Indian balcony gardener has asked themselves at some point: why do my plants keep failing despite everything I do right?
The answer which took me two full seasons and a conversation with Suresh to understand is that the right actions applied reactively and individually cannot prevent a cascade that forms systemically and silently. Salt accumulation does not announce itself with a symptom. Drainage degradation does not post a warning. Pythium does not knock before it colonises. By the time you can see the problem with your eyes, it has been building in your soil for weeks.
Rekha in Delhi lost five containers per summer for three years while doing everything the guides said. The guides were not wrong about the individual fixes. They were incomplete about the integrated system. One leachate EC measurement revealed the root cause of four years of failures. The integrated protocol replaced three seasons of losses with a harvest season.
The system I have described in this article is not complicated. Five tests, two sprays, one weekly routine, one monthly flush when tests say it is needed. Any gardener can implement it. The only obstacle is the habit of waiting for visible symptoms before taking action which is the habit that every growing season will eventually punish.
Test the water. Test the soil. Spray on schedule. The plants do the rest.
Coming Up – Day 29
Your Personalised 30-Day Action Plan Going Forward
Tomorrow, we build your individual action plan not a template, but a structured framework for your specific balcony, your specific city’s water quality, your specific crops, and your specific seasonal calendar. Inside your plant’s cells right now, the data you have collected over 28 days is ready to be translated into the exact system your balcony needs. Day 29 shows you exactly how to do that.
Have you run a leachate EC test on your containers yet? Share your reading in the comments below I want to know what Indian balconies are actually holding in their soil. Or find me on Instagram @thetrendvaultblog where I post weekly testing updates from my Madanapalle terrace.
— Priya Harini B, Madanapalle, Andhra Pradesh
Priya Harini B has been container gardening on her terrace in Madanapalle, Andhra Pradesh for over four years, growing 40+ varieties of vegetables, herbs, and fruit trees in containers. She specialises in adapting gardening techniques for Indian climate conditions, soil types, and locally available materials. Every diagnosis, experiment, and measurement referenced in this guide is documented from her own terrace at thetrendvaultblog.com.
Day 28 of the 30-Day Summer Gardening Challenge From Crisis to Control in One Season