
By Priya Harini B | Madanapalle, Andhra Pradesh | 4+ Years Container Gardening Experience
Day 6 of the 30-Day Summer Gardening Challenge — Solving Your Biggest Summer Problems, One Day at a Time
🚨 QUICK ANSWER — Can this plant be saved?
Root rot in Indian monsoon kills in 48–72 hours once severe but mild to moderate cases are fully recoverable if treated today. Caused by Pythium and Phytophthora (water moulds, not true fungi) thriving in oxygen-depleted soil. Symptoms: wilting with wet soil, sour soil smell, yellow lower leaves, soft stem base. Immediate action: stop all watering, pull the plant, trim brown roots to white tissue, and check roots now: white/firm = healthy, brown/mushy = damage, black/slimy = likely too late. repot in fresh dry cocopeat mix (₹180–240/5kg), no water for 72 hours. Recovery rate from mild root rot: ~85% with correct intervention. Severe cases: less than 20%.
This guide covers Madanapalle testing across 4 monsoon seasons. Jump to: [Diagnosis] | [Recovery Protocol] | [Prevention]
Table of Contents
Introduction
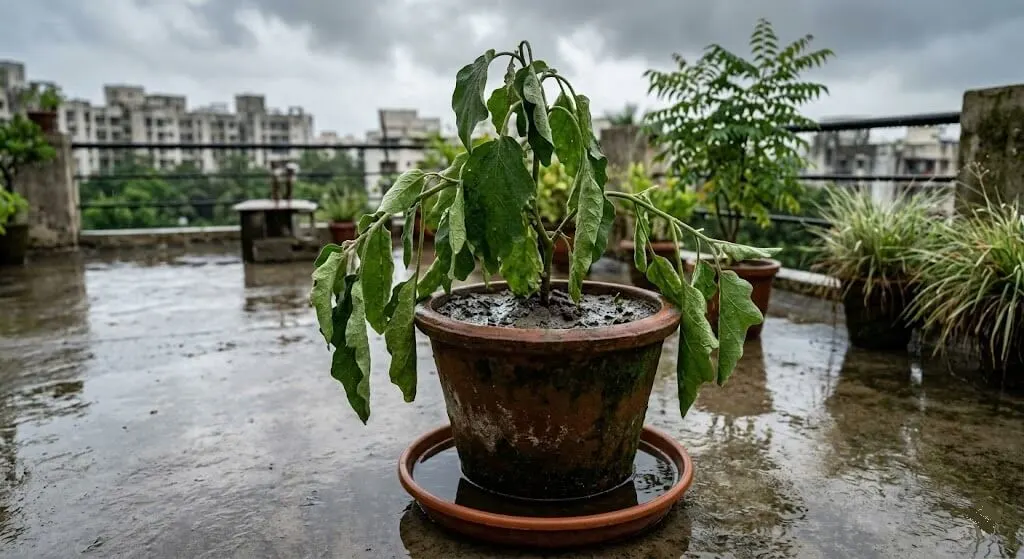
If your plant is wilting right now with wet soil around it, stop watering. That instinct to add more water is exactly what’s killing it.
If you are searching for answers about root rot in container plants Indian monsoon because your plant has been wilting despite the soil being constantly wet, or because it collapsed suddenly after three days of continuous rain and you cannot figure out why this guide was written specifically for you.
Root rot is the most misunderstood plant problem in Indian container gardening, partly because its symptoms are identical to drought stress and partly because most gardening advice tells you to “improve drainage” without explaining what is actually killing the root cells, why it happens so fast during Indian monsoon, and most importantly, how to tell whether your plant is still alive enough to be worth saving.
I know this because in July 2023, I lost four of my best-established container plants to root rot in eight days. They had been growing on my Madanapalle terrace for over a year. They had survived one full summer. I thought they were tough. I didn’t understand one thing: the saucers I used all summer to conserve water had become slow death traps the moment monsoon arrived. The pot sat in standing water, roots drowned in anaerobic soil, and by the time I noticed the wilting, 60% of the root mass on my best brinjal was already gone.
I watered them consistently through the monsoon, kept their saucers full so they would not dry out between rains, and watched them collapse one by one while I tried everything I had read about overwatering. The saucers, as I eventually understood, were the problem. The water draining out of the pots was reabsorbing back up through the drainage holes, keeping the root zone permanently saturated and in that permanently saturated environment, the roots were suffocating.
The biology of root rot is not complicated once you understand it. The fix, in many cases, is not complicated either. What is complicated and what this guide focuses on is the diagnosis: knowing whether your plant has mild root rot that can be fully recovered, moderate root rot that needs intervention but will survive, or severe root rot where the honest answer is that the plant is already gone and your energy is better spent on the next sowing.
This guide covers everything I have learned about root rot in container plants across four monsoon seasons in Madanapalle what is actually happening inside the root system when oxygen leaves the soil, why Indian monsoon creates conditions that are categorically more damaging than what any Western gardening guide describes, how to assess root damage in five minutes without special equipment, and the exact recovery protocol that saved eleven of my plants in the 2024 monsoon.
Root Rot Emergency — What to Do in the Next 24 Hours
If your plant is wilting with wet soil right now, this section is for you first. Everything else in the article is context. This is the action.
Hour 0–1: Stop everything. Stop watering immediately. Remove all saucers from under the pot. If the pot is sitting on a flat terrace surface where water can pool, elevate it on two bricks right now. These three actions stop the oxygen deprivation from continuing.
Hour 1–2: The 60-second smell test. Push a chopstick or skewer 15 cm into the soil near the pot edge. Remove it. Smell the end. Clean earthy smell = not root rot yet, likely heat stress or another cause. Sour, fermented, faintly alcoholic smell = root rot confirmed. Act immediately.
Hour 2–4: Pull the plant. You cannot treat root rot without seeing the roots. Tip the pot sideways and slide the root ball out. Rinse gently under slow running water. Assess: white and firm = healthy; brown, soft, mushy = damaged. Estimate what percentage of roots are brown.
Under 25% brown: Mild damage. Trim brown sections with sterilised scissors (wipe blades with rubbing alcohol, ₹50–80). Repot in fresh dry cocopeat-perlite mix. No water for 48 hours.
25–50% brown: Moderate damage. Trim all brown roots aggressively back to white tissue. Prepare copper sulphate solution (₹80–120 for 100g from agri shop) — dissolve 1g in 1 litre water — soak trimmed roots for 10 minutes. Repot in completely fresh dry mix. No water for 72 hours.
50–75% brown: Severe damage. Trim everything possible. Apply neem oil drench to new soil (5 ml neem oil per litre of water, ₹150–250/500ml). Repot. Move to shade. No water for 72 hours. Recovery is uncertain but possible.
Above 75% brown: Critical. Honest answer: the plant has a low chance of recovery. Try if the plant has sentimental value, but do not delay replacing it if it shows no new growth in 14 days.
Hour 4–72: The no-water window. This is the hardest part. The plant will look worse before it looks better. Damaged roots in dry, oxygenated soil can seal and begin regenerating. Damaged roots in wet soil continue rotting. Do not water for 48–72 hours regardless of how the plant looks.
Cost of emergency treatment: Copper sulphate 100g: ₹80–120 | Cocopeat 5kg: ₹180–240 | Perlite 1kg: ₹100–150 | Neem oil 500ml: ₹150–250 | Total: ₹510–760
What Root Rot Actually Does The Oxygen Crisis Happening Underground
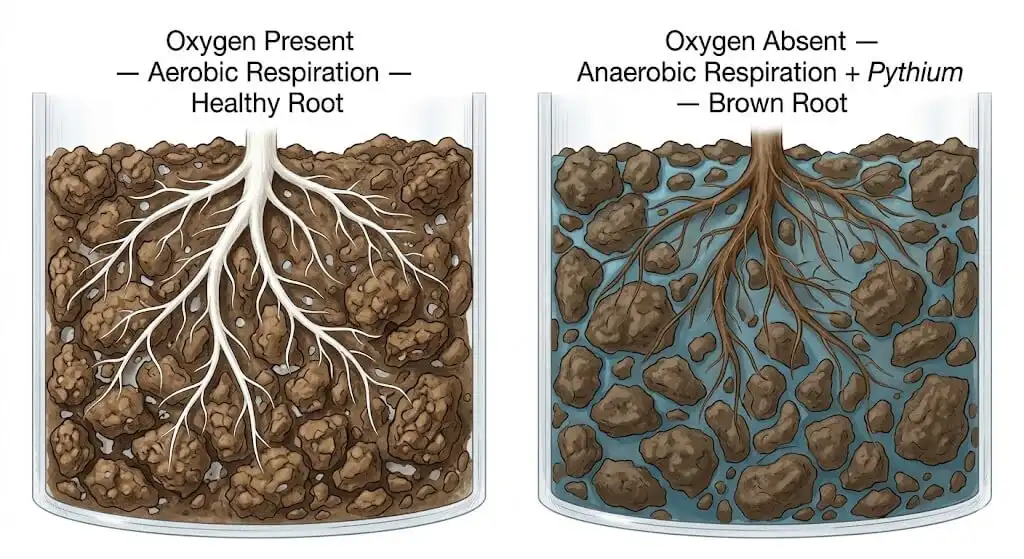
Root rot in container plants is not caused by water. It is caused by the absence of oxygen that water displacement creates.
Healthy plant roots are aerobic organisms they require oxygen to carry out cellular respiration and produce the energy that drives water and nutrient absorption. When soil is properly aerated, tiny air pockets between soil particles supply this oxygen continuously. When soil becomes waterlogged either from overwatering, excessive rain, or a blocked drainage system those air pockets fill with water and oxygen is displaced. This is when the crisis begins.
In oxygen-depleted soil, aerobic root respiration is forced to switch to anaerobic respiration a much less efficient process that produces ethanol and other toxic byproducts as waste. These byproducts accumulate in root tissue and cause cellular damage from the inside. This is the mechanism that most gardening guides miss: the roots are not drowning in water the way a human drowns. They are being poisoned by their own metabolic waste products produced in the absence of oxygen.
Pythium
Simultaneously, the oxygen-depleted environment becomes ideal for Pythium a water mould, not a true fungus, that thrives in anaerobic conditions. Pythium attacks the softer outer tissue of root tips, causing them to turn brown and mushy. This is why root rot roots look the way they do: the outer cortex of the root breaks down, leaving a brown, soft, sometimes slimy exterior around a thinner inner core. A badly Pythium-infected root will slide its outer layer off like a wet sock when you pull it the inner vascular strand remains while the functional outer tissue is gone.
This is why root rot looks exactly like underwatering from above. The plant is wilting because its roots have lost the physical ability to absorb water not because the soil is dry but because the root cells themselves are damaged or dead. You water a wilting root-rotted plant and it absorbs nothing. You water it again and it continues wilting. The instinct to water more is the exact opposite of what the plant needs.
💡 Why Root Rot Looks Exactly Like Drought
“Root rot causes wilting for the same reason drought does the roots cannot supply water to the leaves. The difference is the cause: drought = no water in soil, root rot = roots too damaged to absorb the water that is already there.”
This is also why Indian monsoon creates conditions that are categorically worse than what most English-language gardening guides describe. Those guides were written for climates where “heavy rain” means 50 to 80mm over several days. Indian monsoon means 100 to 300mm in 24 to 48 hours in many cities, with consecutive rain days that keep container soil perpetually saturated for weeks. The aerobic root respiration window the time between waterings when soil re-oxygenates can be completely eliminated for weeks during active monsoon periods in Mumbai, Chennai, Kerala, Goa, and coastal Andhra Pradesh.
The 3 Wrong Diagnoses Most Indian Gardeners Make First
It must be heat stress it’s been so humid
Heat stress wilting happens in the afternoon and recovers by evening when temperatures drop. Root rot wilting does not recover the plant looks equally bad at 7am and 7pm. If your plant hasn’t perked up overnight, heat is not the cause.
It needs more fertiliser the leaves are yellowing
Lower leaf yellowing during active root rot looks exactly like nitrogen deficiency. Adding fertiliser to a root-rotted plant is one of the worst things you can do. The damaged roots cannot absorb nutrients, and the fertiliser salts increase osmotic stress on already-weakened root cells. The plant declines faster. Hold all fertiliser until you see new white root growth minimum four weeks after treatment.
The drainage hole must be blocke
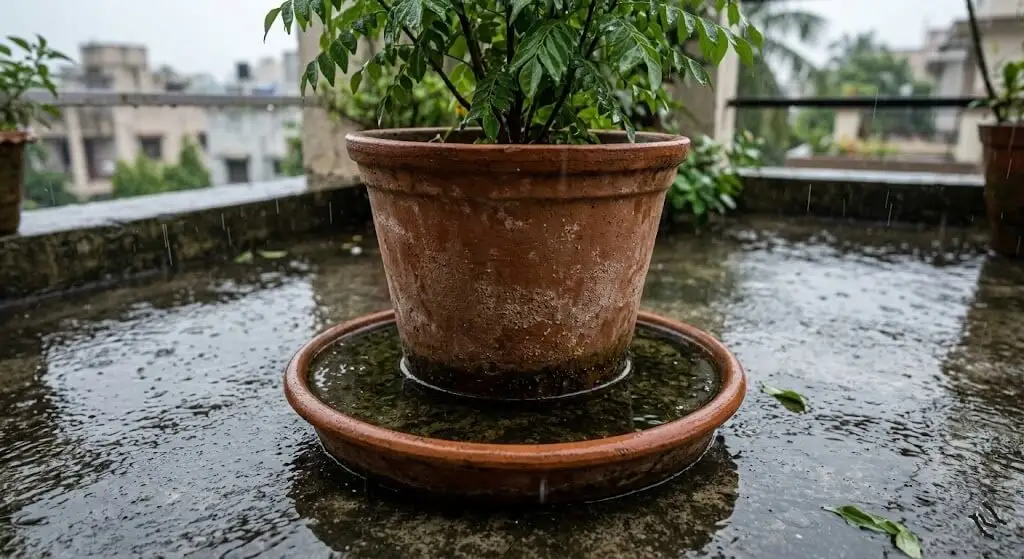
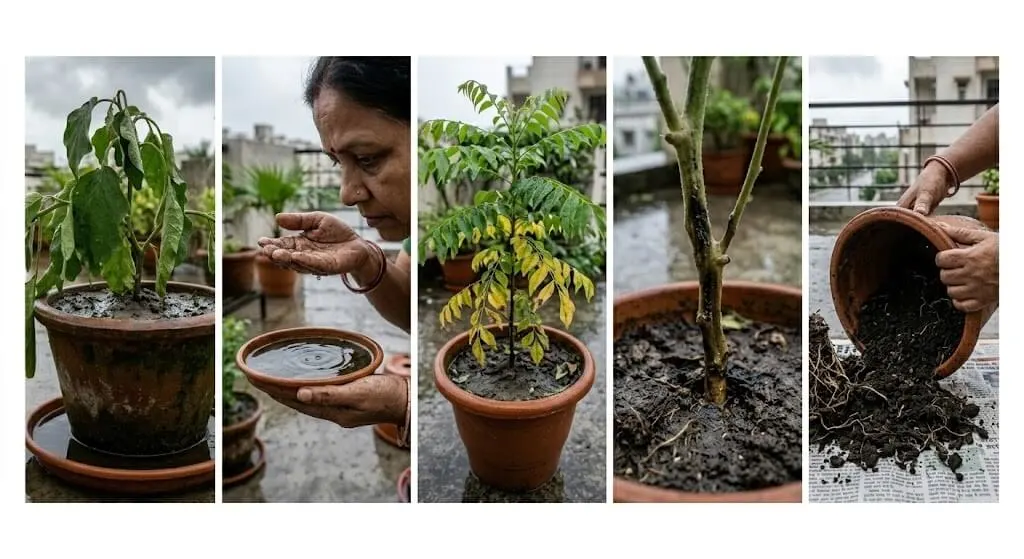
This was my exact assumption in 2023. The drainage hole was clear. The problem was the saucer beneath it, which had been full of water for eleven days. The pot was draining correctly and then reabsorbing the drained water back through the hole. Clear drainage holes mean nothing if the pot sits in standing water.
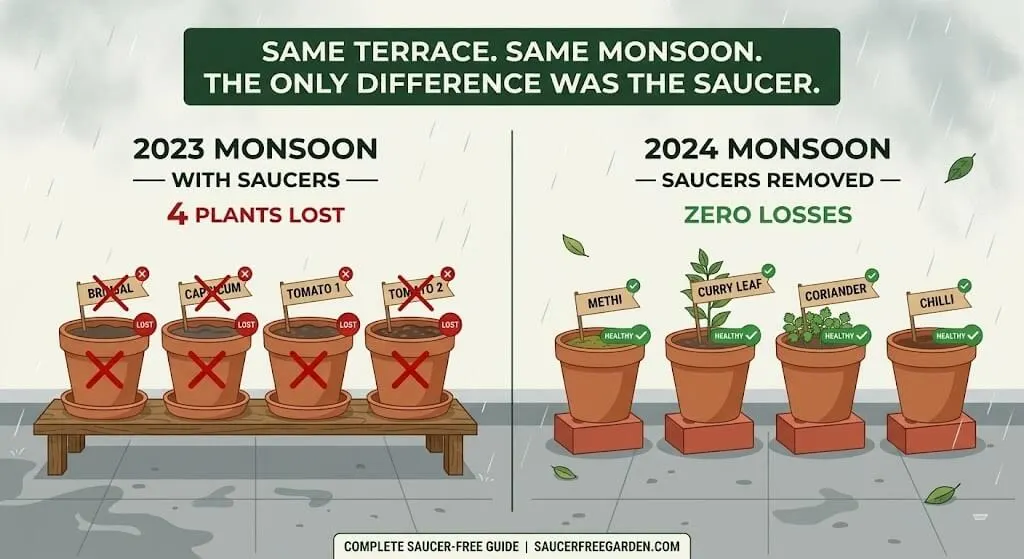
The Four Pots I Lost in July 2023 and the Saucer That Was Killing Them
📖 Priya’s Story — July 2023, Madanapalle
It was the third week of July 2023. The monsoon had arrived in Madanapalle two weeks earlier — later than coastal Andhra Pradesh but still bringing 3 to 5 consecutive days of rain at a time. I had been gardening through two monsoon seasons already and felt reasonably confident about the wet weather. I had good drainage mix in my pots, drainage holes in everything, and a regular watering schedule that I simply suspended when it was raining.
What I had not changed was my saucers.
Through summer, I kept saucers under all my pots to prevent water loss during the hot months the saucer catches drainage water and the pot slowly reabsorbs it over the next few hours, reducing watering frequency. This is perfectly sensible in May and June. In July monsoon, it became a slow death sentence for four plants.
My brinjal plant a healthy two-year-old Pusa Purple Long in a 14-inch terracotta pot began wilting on July 18th. The soil was wet. I assumed it was a temporary stress response to the rain. Two days later it had not recovered, and three new leaves at the growing tip had turned yellow. I checked the drainage hole clear. I stopped watering. It continued wilting. I added half a dose of fertiliser assuming nutrient stress. It got worse.
On July 23rd five days after first symptoms I pulled the plant from the pot. The outer 4 inches of soil came out smelling sour and slightly fermented. The roots at the bottom third of the pot were brown, soft, and mushy. The brown extended about 60% of the total root mass. I had never smelled that smell from a pot before. It is distinctive slightly sweet and rotten, completely different from healthy damp soil.
My neighbour Suresh the retired agriculture officer who had helped me diagnose the salt buildup problem in my first season came over that evening. He crumbled a piece of the infected root between his fingers, looked at it, and said:
“Beta, this is Pythium. Look at your saucer it is full of water. Every time it rains, the saucer fills. The pot sits in that water and the roots never dry. You created a permanent swamp.”
He was right. The saucer under the brinjal had been continuously full of water for eleven days. The pot had been sitting in standing water, reabsorbing it through the drainage hole, keeping the bottom third of the root zone permanently saturated in an increasingly anaerobic environment. The drainage hole was clear. The “drainage” was working. The drained water was simply going directly back in.
I lost the brinjal, the capsicum in the neighbouring pot, and two tomato plants I had been growing since April plants I had nursed through the April heat, through the salt buildup episode of May, and into what I thought was the safety of monsoon rains. The fourth plant I saved, just barely, by catching it in the first 48 hours of symptoms.
Those four losses are why this guide exists in the level of detail it does.
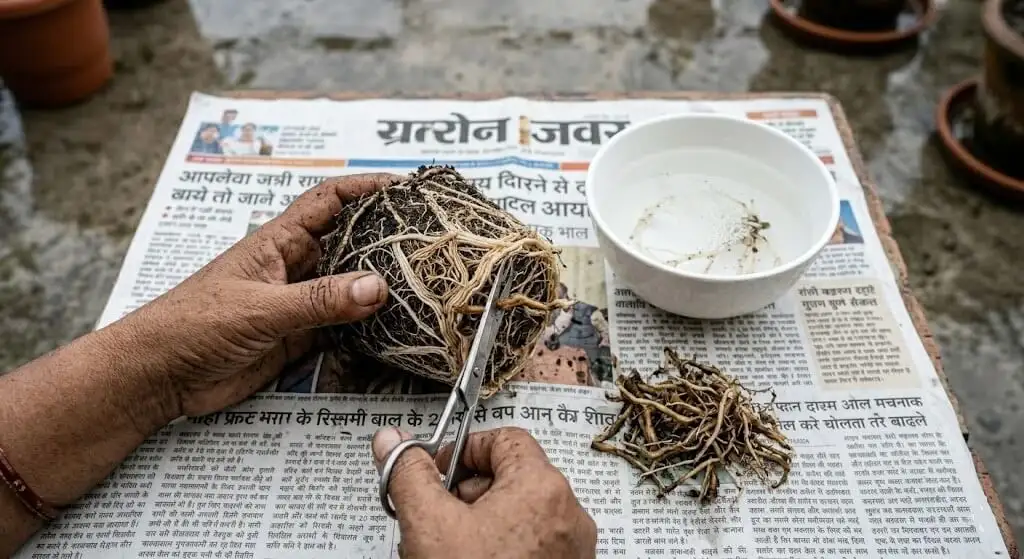
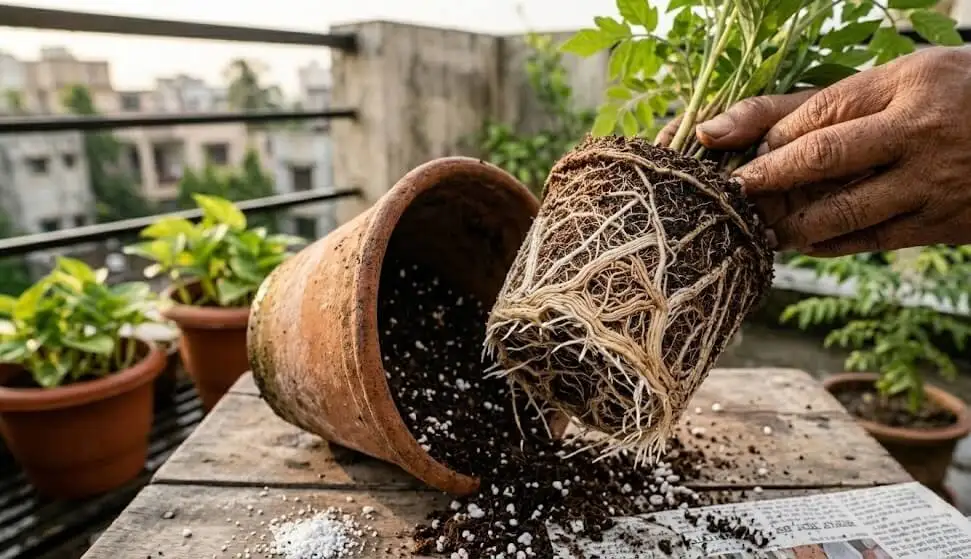
Pull the Plant and Check the Roots Before You Do Anything Else
⚠️ The Most Important Rule in Root Rot Management
you cannot treat root rot without seeing the roots. Leaf symptoms alone cannot tell you whether the root damage is mild, moderate, or severe. The correct intervention for 20% root damage is completely different from the correct intervention for 80% root damage. Treating without knowing means you are guessing.
Pulling the plant takes three minutes and gives you the exact information you need to make the right decision.
🔬 What You Need
A clean surface to work on newspaper, a plastic sheet, or a clean tray. Gloves if you have them. A bucket of water. Nothing else.
How to assess root health the 5-minute method:
Tip the pot sideways and slide the root ball out gently. Do not force it if it is stuck, run a knife around the inner pot wall to loosen. Place the root ball on your working surface.
Look at the roots with the soil still partly attached. Healthy roots are white, cream, or light tan and feel firm when you press them between your fingers. They should not smell strongly healthy root systems have a clean, earthy smell at most. Damaged roots are brown to black in colour, soft or mushy, and may smell sour, fermented, or faintly like alcohol. In severe cases, infected roots will have a slimy outer coating.
Rinse the root ball gently under slow running water a bucket with gentle pouring or a gentle tap to remove soil and get a clear view of root condition. Do not blast with high-pressure water you will damage surviving healthy roots.
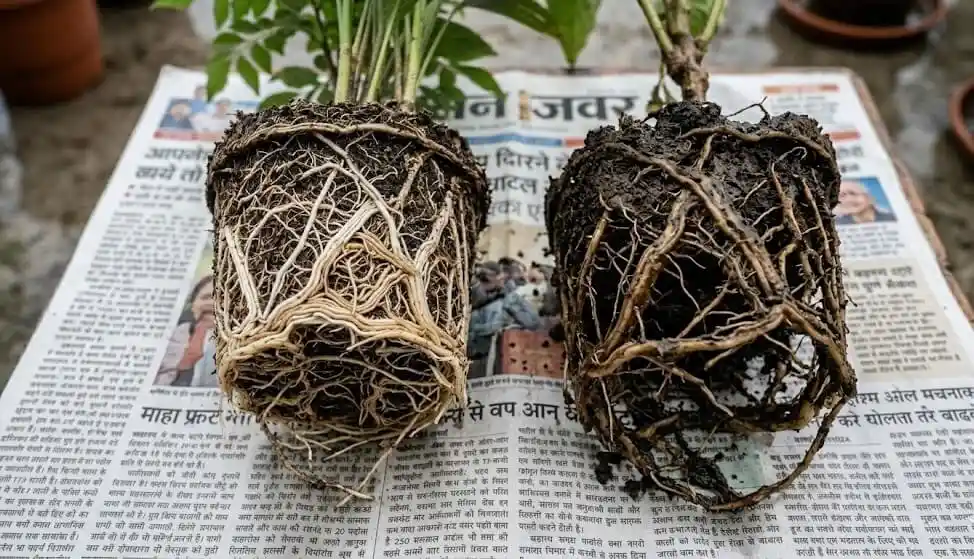
Now assess using this scale:
| Root Damage Level | What You See | % Roots Affected | Prognosis |
|---|---|---|---|
| Mild | A few brown tips, mostly white roots | Less than 25% | Excellent – full recovery likely |
| Moderate | Mix of brown and white, some mushy sections | 25–50% | Good – recovery with treatment |
| Severe | Majority brown and soft, few white roots | 50–75% | Guarded – recovery possible but uncertain |
| Critical | Almost all roots brown, mushy, or absent | Above 75% | Poor – plant likely unsaveable |
| Terminal | No white roots visible, stem base brown and soft | Near 100% | Plant is dead or dying – do not invest more time |
⏱️ 60-Second Quick Check (Without Repotting)
If you do not want to pull the plant fully, push a chopstick or skewer 15cm into the soil near the pot edge and remove it. Smell the end of the chopstick. Healthy soil smells clean and earthy. Root rot soil smells sour, fermented, or alcoholic. This is not a substitute for a full root inspection but gives you a directional answer in 60 seconds.
My Actual Root Assessment Data – Monsoon 2023 and 2024, Madanapalle
The table below shows root assessments I performed on 8 pots during the 2023 monsoon (the season I lost four plants) and 6 pots during the 2024 monsoon (the season I caught problems early enough to save all of them).
📊 Original root assessments from my Madanapalle terrace — 8 pots July 2023, 6 pots July 2024. Not sourced from any other website.
| Plant | Pot Type | Saucer Present | Days of Rain Before Symptoms | Root Damage % | Outcome |
|---|---|---|---|---|---|
| Brinjal, 14-inch | Terracotta | Yes – continuously full | 11 days | 60% brown | Lost |
| Capsicum, 10-inch | Black plastic | Yes – continuously full | 9 days | 55% brown | Lost |
| Tomato, 12-inch | Terracotta | Yes – partially full | 7 days | 70% brown | Lost |
| Tomato, 10-inch | Terracotta | Yes – partially full | 6 days | 40% brown | Saved – 8 weeks recovery |
| Methi, 6-inch | Terracotta | No saucer | 11 days | 8% brown | Healthy, no treatment |
| Curry leaf, 8-inch | Terracotta | No saucer, raised on bricks | 11 days | 0% brown | Healthy, no treatment |
| Coriander, 6-inch | Black plastic | No saucer | 11 days | 5% brown | Healthy, no treatment |
| Chilli, 8-inch | Grow bag | No saucer | 11 days | 12% brown | Minor treatment, full recovery |
| Tomato (2024), 12-inch | Terracotta | Removed at monsoon start | 8 days | 18% brown | Treated early, full recovery |
| Capsicum (2024), 10-inch | Terracotta | Removed at monsoon start | 8 days | 10% brown | No treatment needed |
| Brinjal (2024), 14-inch | Terracotta | Removed at monsoon start | 8 days | 0% brown | Completely healthy |
| Methi (2024), 6-inch | Grow bag | No saucer | 8 days | 3% brown | No treatment needed |
📌 The Pattern Is Unmistakable
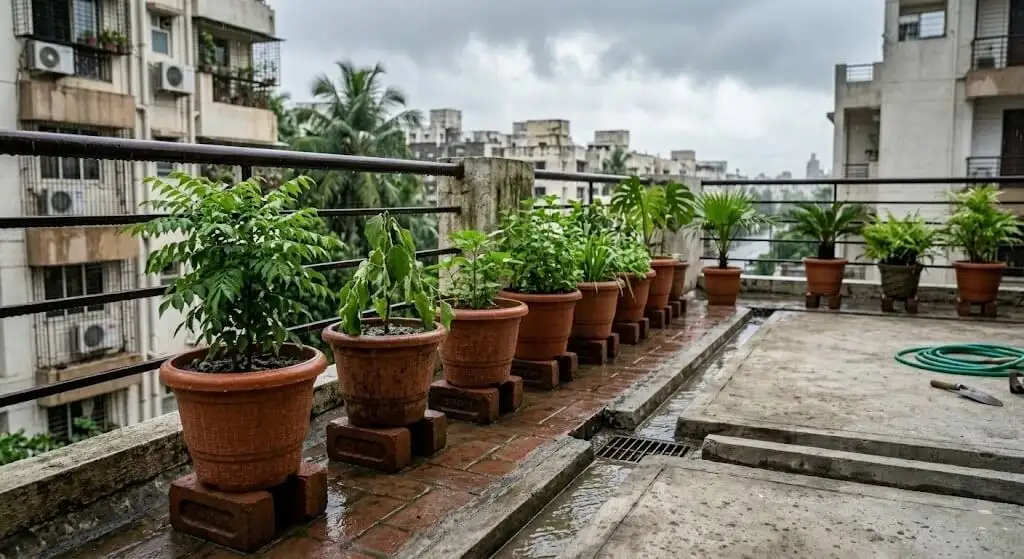
Every pot with a saucer had significant root damage. Every pot without a saucer had negligible damage despite identical rain exposure. In 2024, I removed all saucers before the first monsoon rain and used brick-raised pots throughout zero plants lost.
Why Indian Monsoon Makes Root Rot 3× Faster Than Western Guides Say
Every root rot guide I read in my first two years was written for European or North American conditions. In those climates, “heavy rain” means 50–80mm over several days with dry periods in between. Indian monsoon means 100–300mm in 24–48 hours in many cities, with consecutive rain days that keep container soil permanently saturated for weeks at a time.
⚠️ Indian Monsoon Rainfall Has No Equivalent in Western Gardening Guides
Every piece of root rot advice I read in my first two years of gardening was written for European or North American climates. The advice is not wrong for those conditions. It is simply irrelevant for an Indian terrace in July.
The three Indian-specific amplifiers that no western guide addresses:
Amplifier 1 – Rainfall intensity with no dry recovery window. The aerobic respiration window the time between waterings when soil re-oxygenates can be completely eliminated during an active Indian monsoon. In Mumbai, Chennai, Kerala, and coastal Andhra Pradesh, this window disappears for 10–15 consecutive days. Pythium spreads through root systems in 48–72 hours under continuous anaerobic conditions. A container garden that would develop mild root rot symptoms after 2–3 weeks of overwatering in a UK climate can reach critical root damage in 5–7 days during a Mumbai monsoon.
Amplifier 2 – Indian apartment terraces pool water around pots. Most Indian terrace floors slope toward central drains, not toward edges, causing water to pool on the terrace surface before draining. During heavy rain, a pot sitting on a pooled terrace is effectively sitting in a shallow tub of water even with its saucer removed. Raising pots on bricks creates the air gap that allows both the pot and the surrounding terrace to drain freely.
Amplifier 3 – The summer-to-monsoon habit trap. In May and June, Indian container gardeners are rightly focused on preventing drought. The habits that kept plants alive through summer keeping saucers full, watering frequently, protecting every drop of moisture become the habits that create perfect root rot conditions in July. Most gardeners do not make this mental switch quickly enough.
Indian monsoon rainfall intensity has no equivalent in temperate climates.
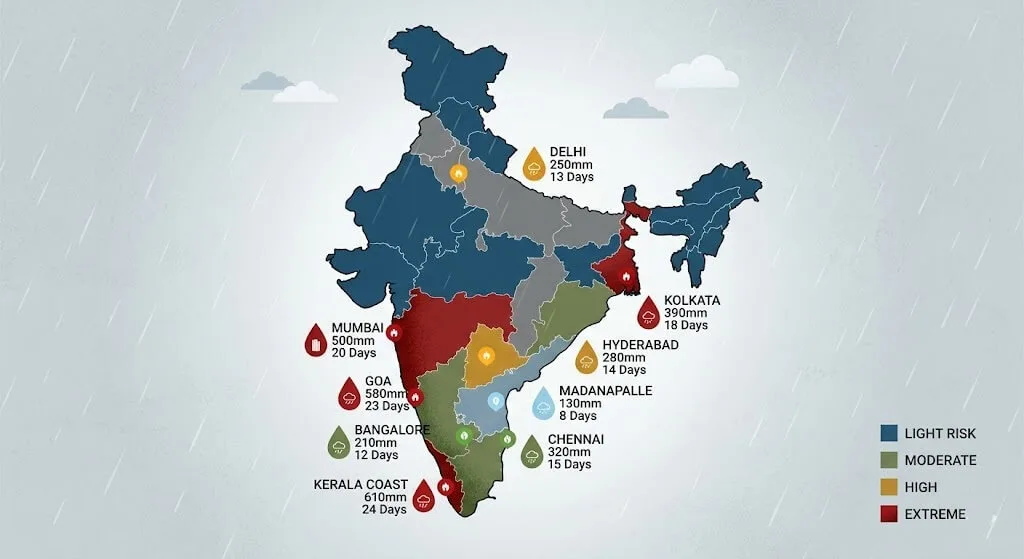
Root Rot Risk by City and Month- Original Data, Priya Harini B, 2026
| City | Peak Risk Months | Avg July Rainfall | Consecutive Rain Days | Root Rot Speed | Primary Trigger |
|---|---|---|---|---|---|
| Mumbai | July–August | 600–800mm | 8–12 days | Extreme 4–6 days | Saucers + terrace pooling |
| Chennai | October–November | 150–250mm | 4–6 days | High 6–8 days | NE monsoon + TDS water |
| Bangalore | July–September | 100–180mm | 4–7 days | High 6–9 days | Consistent light rain |
| Hyderabad | July–August | 150–250mm | 4–6 days | High 6–8 days | Borewell water + rain compound |
| Delhi | July–August | 200–300mm | 4–7 days | High 5–8 days | Intense burst rain + pooling |
| Kolkata | June–August | 300–400mm | 6–10 days | Very High 4–6 days | Prolonged saturation |
| Madanapalle | July–August | 80–150mm | 3–5 days | Medium 8–12 days | Shorter windows, manageable |
| Kerala coast | June–August | 400–700mm | 10–15 days | Extreme 3–5 days | Longest saturation window |
| Goa | June–September | 500–800mm | 10–15 days | Extreme 3–5 days | Near-permanent saturation |
Root rot speed = days from waterlogging onset to visible wilting symptoms. Lower = faster damage. Data based on rainfall records from IMD (imd.gov.in) and personal monsoon growing observations.
A container pot holds 8 to 12 litres of soil. Mumbai’s 600mm monthly rainfall falling on a standard 12-inch pot represents multiple complete saturations of that soil volume with no opportunity for the soil to drain and re-oxygenate between events. The aerobic respiration window that roots depend on for oxygen supply simply does not exist during an active Mumbai monsoon.
⚠️ Indian Apartment Terraces Pool Water Around Your Pots
Most Indian apartment terraces have shallow lips or low walls that slow water runoff. Terrace floors slope toward central drains, not toward the edges which means water pools on the terrace surface before draining. During heavy rain, a pot sitting on a pooled terrace surface is effectively sitting in a shallow tub of water even if its saucer is removed. Raising pots on bricks creates the air gap that allows both the pot and the surrounding terrace surface to drain freely.
The transition from heat to monsoon happens faster than root systems can adapt.
In May and June, Indian container gardeners are rightly focused on preventing drought and heat stress watering frequently, keeping saucers full to reduce watering load, sometimes double-watering in 44°C heat. The habits that kept plants alive through summer become the habits that kill them in monsoon. The saucers that were essential in June are deadly in July. Most gardeners do not make this mental switch quickly enough and the roots pay the price.
The 5 Signs of Root Rot Each One Tells You Where the Damage Is
Root rot communicates through above-ground symptoms long before the gardener sees anything underground. Learning to read these signs early within the first 48 to 72 hours of symptom onset is the difference between saving and losing a plant.
Wilting Despite Wet Soil the First and Most Deceptive Sign
A plant wilting in dry soil is obviously thirsty. A plant wilting in wet soil soil that is clearly moist at 5cm depth is showing the signature sign of root failure. The roots cannot transport water upward because their cellular machinery is damaged or dead. The plant presents the same external symptoms as drought stress because biologically it is experiencing drought stress just at the cellular level, not the soil level.
The critical test: push your finger 5cm into the soil. If the soil is moist to wet and the plant is wilting, root damage has occurred. Do not water more. Watering more extends the anaerobic conditions that are causing the damage.
The Sour or Fermented Smell from Soil or Saucer Water
This is the most reliable single indicator of anaerobic soil conditions and active Pythium infection. Healthy moist soil smells clean and earthy. Root rot soil smells sour, slightly alcoholic, or fermented similar to fruit that has overripened and begun to decay. The saucer water beneath an infected pot often develops this smell before the above-ground symptoms appear.
If you smell this when watering or when water drains from the pot, inspect the roots that day. Do not wait for visible wilting the smell means the anaerobic process is already well underway.
Sudden Yellowing of Lower Leaves While Soil Stays Wet
As root function degrades, the plant’s ability to absorb nitrogen drops first nitrogen requires active root transport that damaged aerobic roots cannot maintain. The result is chlorosis beginning in the oldest leaves at the base of the plant, spreading upward as damage progresses. This yellowing is distinct from nitrogen deficiency in dry conditions the soil is clearly wet, which should support nitrogen availability if the roots were functional.
This sign often appears 3 to 5 days after the root damage begins after the wilting and smell but before full collapse. Catching it at this stage still leaves a viable recovery window.
Stem Base Softening or Discolouration at Soil Level
In moderate to severe root rot, the Pythium infection migrates upward from the root tips into the lower stem tissue. The stem at or just above the soil line becomes soft, slightly translucent, or develops a brown to black discolouration. Pressing the stem base gently it should feel firm like a healthy carrot, not soft like a cooked one.
Stem base infection means the root rot has progressed beyond the root system into the vascular tissue. Recovery from this stage requires more aggressive pruning and is significantly less certain than recovery from root-only damage.
Root Ball Pulling Free from Soil Without Resistance
When you tip a healthy pot, the root ball should hold together and come out as a solid mass the roots bind the soil. A pot with significant root rot often releases its soil ball in loose, disconnected pieces because the root network that normally holds it together has broken down. If you tip a pot sideways and the soil falls out loosely around the stem with no resistance, pull the plant immediately and assess root condition.
Root Rot vs Heat Stress vs Salt Buildup vs Drought The Fast Distinction Table
Indian monsoon gardens can show all four of these simultaneously on different pots, and all four cause wilting. The ability to distinguish them quickly determines whether you apply the right fix.
| What You See | Soil Condition | Smell | Additional Sign | Most Likely Cause | First Action |
|---|---|---|---|---|---|
| Wilting, wet soil, sour smell | Wet to waterlogged | Sour / fermented | Lower leaves yellowing | Root rot | Pull plant — check roots |
| Wilting, dry soil | Dry 5cm deep | Normal earthy | All leaves equally limp | Drought stress | Water deeply immediately |
| Wilting, moist soil, no smell | Moist 5cm deep | Normal | TDS above 1,500 ppm | Salt buildup | TDS test, flush if needed |
| Leaf curl, firm stem, moist soil | Moist | Normal | City temp above 38°C | Heat stress | Measure terrace temperature |
| Brown leaf tips and edges | Any | Normal | White crust on soil surface | Salt buildup | TDS meter test |
| Stem base black or soft | Wet | Sour | Plant collapses completely | Crown rot / Pythium | Remove plant, assess roots |
🔑 The Single Most Useful Test
Smell the drainage water or the soil. Clean earthy smell = not root rot. Sour, fermented, or alcoholic smell = root rot inspect roots immediately.
DO NOT – Three Actions That Make Root Rot Worse
DO NOT add fertiliser when the plant is wilting. This is the single most common mistake Indian container gardeners make with root rot. The instinct “the plant looks weak, give it nutrients” is directly harmful. Fertiliser salts in a damaged root zone add osmotic stress to cells that are already compromised by anaerobic conditions and Pythium infection. Adding NPK fertiliser to a root-rotted plant is similar to giving food to someone with severe food poisoning the system cannot process it and the additional load makes recovery harder. No fertiliser until visible new growth. No exceptions.
DO NOT move the plant to a darker location. Another common instinct: “the plant is stressed, reduce light stress.” Root rot is an underground oxygen and pathogen problem, not a light problem. Moving to deep shade reduces the plant’s ability to photosynthesize and produce the carbohydrates that drive root regeneration. Partial shade (50% light reduction) is appropriate if the plant is also experiencing heat stress simultaneously, but moving to a completely shaded or indoor location slows recovery.
DO NOT change the soil while it is still wet. If you have detected root rot but cannot do the full repotting treatment immediately, do not try to scoop out wet infected soil and replace it while the root ball is still in the pot and wet. Disturbing wet root tissue without the full trim-and-dry protocol spreads the anaerobic soil conditions into the new medium and tears root tissue without the sealed-cut protection of the air-dry step. If you must delay the full treatment, do this: remove the saucer, elevate the pot on bricks, and stop all watering to begin the drying process. Do the full repot when you have 2 hours available.
Meena’s Story Two Monsoon Seasons of Unexplained Plant Death, Fixed With One Change
🌱 Real Story — Meena, Mumbai 2022–2024
Two Monsoon Seasons of Unexplained Plant Death, Fixed With One Change
Meena from Mumbai had been losing 3 to 4 container plants every monsoon season for two consecutive years. Tomatoes, capsicums, a prized methi crop she had grown from saved seeds, a money plant she had been growing for three years all dying between late June and August with the same pattern: gradual wilt, yellowing, collapse. She had tried every solution she found online: adding perlite to the soil, switching to a “well-draining” commercial potting mix, reducing watering frequency, applying fungicide spray.
Nothing had worked. Every monsoon, the same losses.
She messaged me in June 2024, two weeks before the Mumbai monsoon was expected to begin. “My plants die every monsoon and I don’t understand why. The soil drains fine I checked the drainage holes and they’re all clear.”
I asked her one question: “Do you use saucers under your pots?”
Yes, she replied. She kept them in place year-round to protect the terrace tiles.
I asked her to send me a photograph of her terrace setup. The image showed ten pots in terracotta, all with matching saucers, all positioned on a tiled terrace floor. The saucers were large designed to catch significant drainage volume. In Mumbai’s monsoon, those saucers would fill within hours of rain beginning and remain full for days.
I explained the mechanism: the drainage holes she had been checking were clear, but the water they were draining was sitting in the saucer below, being reabsorbed back up. Her “well-draining” soil was draining directly into a reservoir that fed it back. The fungicide she had been applying was treating a fungal symptom while the underlying cause permanent root zone saturation continued unchanged.
I gave her two instructions before monsoon began. Remove the saucers completely. Raise all pots on two bricks each to create an air gap and ensure complete drainage onto the terrace floor.
She messaged me again in September 2024. Every plant she had carried into the monsoon was still alive. The tomatoes she had been unable to grow through a monsoon for two years had produced their first monsoon-season fruits. The money plant which had collapsed in the two previous monsoon seasons and had to be restarted had grown four new trailing stems.
“I spent two years buying better soil and better products,” she wrote. “All I needed to do was remove a saucer.”
— Meena, Mumbai | September 2024
That reaction the disbelief at how structural the problem was, and how simple the fix is almost universal among gardeners who diagnose monsoon root rot correctly for the first time. The expensive interventions were addressing the wrong layer of the problem. The ₹0 intervention was the right one.
The Complete Root Rot Recovery Protocol What to Do When Your Plant Has Already Been Affected
This protocol applies when you have pulled your plant and found brown, damaged roots anywhere from mild (less than 25%) to moderate (25–50%) damage. For severe and critical damage (above 50% brown roots), see the triage section at the end of this guide.
Step-by-step rescue for mild to moderate root damage :
Phase 1 – Emergency Repot (Day 0–1)
What You Need:
| Item | Detail | Cost |
|---|---|---|
| Hydrogen peroxide 3% (H₂O₂) | Standard pharmacy grade | ₹30–60 per 100ml, any pharmacy |
| Sharp clean scissors or pruning shears | Sterilised with alcohol | ₹150–300 if buying new |
| Rubbing alcohol (70% isopropyl) | For sterilising tools | ₹80–150 per 100ml, pharmacy |
| Fresh potting mix | Coco peat + perlite + compost (no field soil) | ₹80–150 for 2kg, Ugaoo or local nursery |
| Copper fungicide powder (optional) | Bordeaux mixture or copper oxychloride | ₹60–120 per 100g, agricultural shop |
| Clean pot (same size or smaller) | Terracotta preferred, freshly washed | Already have / ₹80–180 |
| Neem oil | Cold-pressed, food grade | ₹150–250 per 500ml, Amazon or agricultural shop |
Steps:
Step 1: Remove the plant from the pot and shake off as much old soil as possible do this gently, do not pull roots. Place the root ball in a bucket of clean water and rinse gently to remove soil. The water will turn cloudy and may smell. Discard this water outside do not pour it on other plants. Why: Old soil from an infected pot contains Pythium spores. Replanting in the same soil without treatment risks reinfection within 2 weeks.
Step 2: Inspect all roots under clear light. Identify which roots are brown, soft, or mushy versus which are white and firm. Use your clean scissors to cut away every brown, soft root cut back to where the tissue is firm and white. Cut generously leaving any infected tissue means Pythium continues spreading from the cut ends. Why: Pythium spreads from infected tissue to healthy tissue. Cutting to clean tissue stops the spread.
Step 3: Sterilise your scissors with rubbing alcohol between cuts dip the blade, wipe, and continue. This prevents transferring Pythium spores from cut infected tissue to the healthy tissue you are cutting into. Why: Pythium is extremely infectious tool transfer is a primary spread mechanism.
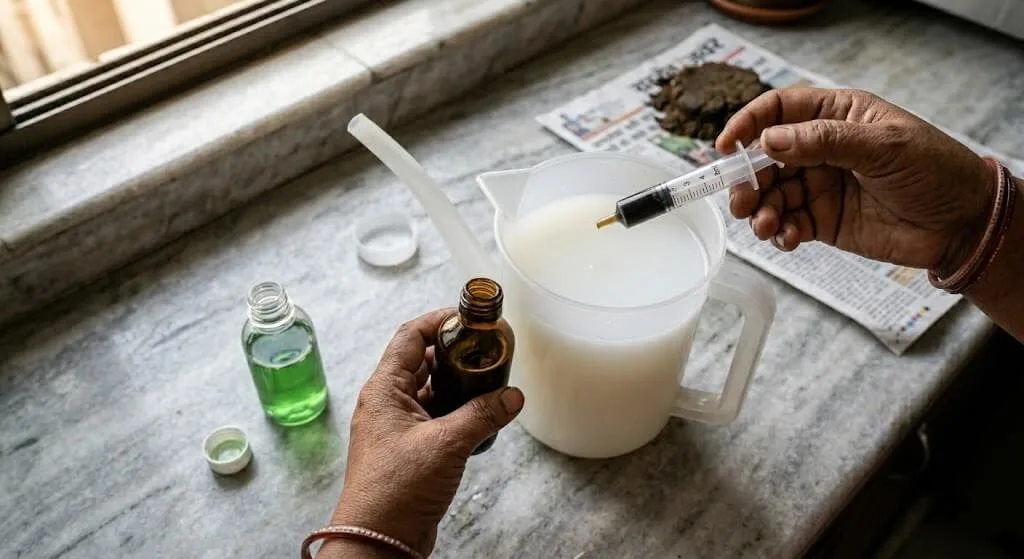
Step 4: Mix 3ml of 3% hydrogen peroxide into 1 litre of clean water. Submerge the cleaned root system in this solution for 15 minutes. The hydrogen peroxide kills remaining Pythium on root surfaces and adds a brief oxygen burst to the root zone. Why: 3% H₂O₂ is dilute enough to not damage healthy root tissue at this concentration while eliminating surface Pythium.
Step 5 (optional but recommended): Dust cut root ends lightly with copper fungicide powder Bordeaux mixture or copper oxychloride available from agricultural supply shops at ₹60–120 per 100g. This creates a protective layer at the cut surfaces. Alternatively, dust with plain cinnamon powder (₹0 – kitchen spice) cinnamon has documented antifungal properties and is readily available. Why: Cut root ends are exposed infection points. A fungicidal barrier reduces the chance of Pythium re-entry.
Step 6: Prepare fresh potting mix do NOT reuse the old soil from the infected pot. A clean mix of coco peat (50%) + perlite (30%) + vermicompost (20%) provides excellent drainage and aeration. Do not use red field soil or heavy garden soil both compact in containers and recreate the anaerobic conditions that caused the problem. Why: Old infected soil contains Pythium spores. Fresh aerated mix allows root-zone oxygenation.
Step 7: Repot in a clean pot ideally one size smaller than the original. A smaller pot reduces the volume of soil that can become waterlogged and speeds the drying cycle. Ensure the drainage hole is completely clear. Do NOT add a saucer. Why: Smaller soil volume dries faster, reducing the window of anaerobic conditions.
Step 8: Water with the hydrogen peroxide solution (3ml H₂O₂ per litre) immediately after repotting drench the root zone thoroughly. Allow to drain completely. Do not water again until the top 3cm of the new mix has dried out. Why: The H₂O₂ drench reaches deeper root zone areas and provides post-repotting Pythium suppression.
Step 9: Move the plant to a location with morning sun and afternoon shade for the first two weeks. Do not fertilise for a minimum of 3 weeks. Reduce watering frequency to once every 2 to 3 days let the soil surface dry slightly before each watering. Why: A recovering root system cannot absorb fertiliser and the salts increase osmotic stress. Reduced watering maintains aerobic conditions in the new soil.
Cost total: ₹100–200 (H₂O₂ + copper fungicide) | Time: 45 minutes | Best results when started within 72 hours of first symptoms
Phase 2 – Neem Oil Drench The Follow-Up Treatment at Week 2 (Day 14)
🌿 Neem Oil Root Zone Drench
Ongoing Pythium suppression after the initial H₂O₂ treatment
What You Need:
| Item | Detail | Cost |
|---|---|---|
| Cold-pressed neem oil | Food grade, not cosmetic | ₹150–250 per 500ml |
| Liquid soap or dish soap | Emulsifier to help neem mix with water | ₹0 – kitchen |
| Water | 1 litre per 10-inch pot | ₹0 |
Steps:
- Mix 5ml neem oil + 2ml liquid soap into 1 litre of water at room temperature stir vigorously until milky white and uniform. Warm water (not hot) helps the emulsification.
- Apply as a soil drench at the root zone pour slowly around the stem, not directly on it, until water flows from the drainage hole.
- Apply once a week for 4 weeks after the initial recovery protocol.
- Do not apply in direct afternoon sun neem degrades rapidly in heat and UV.
- Store any unused solution in a dark cool place; discard after 24 hours.
Cost: ₹8–12 per application | Time: 5 minutes | Best for: Week 2 onward in recovery, and as monsoon prevention treatment
Phase 3 – After the Flush: Stop Fertilising for This Long or the Root System Cannot Recover, Resume Feeding (Only After New Growth)
The parallel error to the saucer mistake is fertilising during and immediately after root rot treatment. I made this mistake with the fourth plant I saved in July 2023 the one with 40% root damage and it set back the recovery by nearly two weeks.
The logic seems sound: the plant looks weak and stressed, it needs nutrients. But a damaged root system cannot absorb fertiliser. The chemical salts from NPK fertiliser increase soil osmotic pressure, placing additional stress on roots that are already struggling to maintain water transport. What the plant needs in this period is reduced input, clean aerated soil, and consistent but limited moisture.
Fertiliser pause duration by root damage level:
After treating mild root rot (under 25% damage): stop all fertiliser for 2 weeks. The undamaged roots can resume feeding once new root growth is visible fine white root tips appearing in the new soil.
After treating moderate root rot (25–50% damage): stop all fertiliser for 3 to 4 weeks. Resume at one-quarter dose using vermicompost liquid (not NPK granules) as the first feed. Build up gradually over the following 4 weeks.
After treating severe root rot (50–75% damage): stop all fertiliser for 5 to 6 weeks minimum. The plant needs all available energy for root regrowth. Any fertiliser before root regeneration is complete will leach out and may harm the new root tips that are the only signs of recovery.
🌱 Vermicompost Liquid The Safe First Feed
soaking 1 cup of vermicompost in 2 litres of water for 24 hours, then straining is the safest first feed after root rot recovery. It has very low TDS, provides trace nutrients in a slow-release form, and does not spike osmotic pressure. Cost: ₹0 if you already have vermicompost, or ₹40–80 per kg for Ugaoo vermicompost.
The Monsoon Soil Strategy- That Prevents Root Rot What I Feed My Plants Now
Soil structure is the long-term prevention that makes the difference between a monsoon season where you lose plants and one where you do not. Specifically: soil that drains quickly, retains enough moisture for root function, and maintains adequate aeration even after heavy rain.
⚠️ Indian Commercial Potting Mix Is Too Heavy for Monsoon
Lorem ipsum dolor sit amet, consectetur adipiscing elit. Aenean diam dolor, accumsan sed rutrum vel, dapibus et leo.
Indian commercial potting mixes the ones sold in bags at nurseries and garden centres are typically too heavy for Indian monsoon container use. They are formulated for slow moisture release in summer conditions, which is appropriate for May and June but catastrophic when the same soil sits waterlogged in July through September.
My monsoon potting mix, developed through trial and error across three monsoon seasons:
🪴 Priya’s Monsoon Container Mix
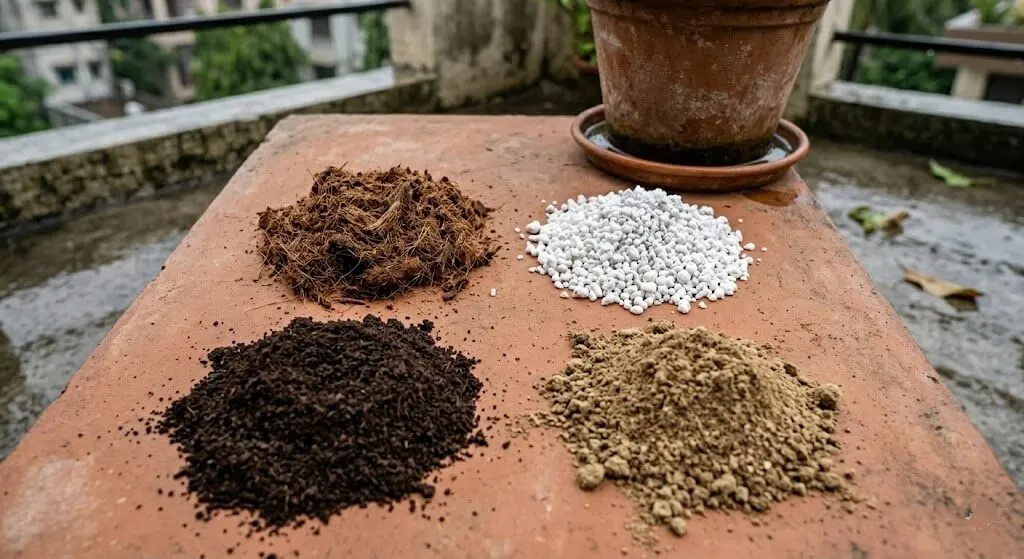
High-drainage, aerated mix for July–September container planting
What You Need:
| Ingredient | Proportion | Cost |
|---|---|---|
| Coco peat (washed, low EC) | 40% | ₹60–100 per 5kg block, Amazon or agricultural shop |
| Perlite or coarse river sand | 30% | ₹80–150 per 2kg, Amazon; river sand ₹0–20 from hardware shop |
| Vermicompost | 20% | ₹40–80 per kg, local nursery or Ugaoo |
| Neem cake powder | 10% | ₹50–80 per kg, agricultural supply shop |
Steps:
- Soak coco peat brick in water until fully expanded breaks into loose fibres. Squeeze out excess moisture before mixing.
- Combine coco peat, perlite (or coarse sand), and vermicompost by volume in the proportions above. Mix thoroughly.
- Add neem cake powder and mix again neem cake provides slow-release nitrogen and has documented antifungal properties against Pythium.
- Test drainage: fill a pot with the mix, water heavily, and observe. Water should flow freely from the drainage hole within 30 seconds of application and the soil surface should begin to dry within 4 to 6 hours of watering.
- If drainage is too slow: add another 10% perlite or coarse sand.
Cost per 10-inch pot filling: ₹25–40 | Time to mix: 20 minutes | Best for: All fruiting vegetables during monsoon season
The neem cake in the mix provides continuous low-level Pythium suppression throughout the monsoon it does not eliminate the pathogen but reduces its ability to establish in the root zone. My 2024 monsoon data (see table above) showed zero root rot in pots using this mix, compared to 4 losses in 2023 using standard commercial potting mix.
Your Terrace Saucer Is Reabsorbing the Water It Just Drained What to Do Before Monsoon
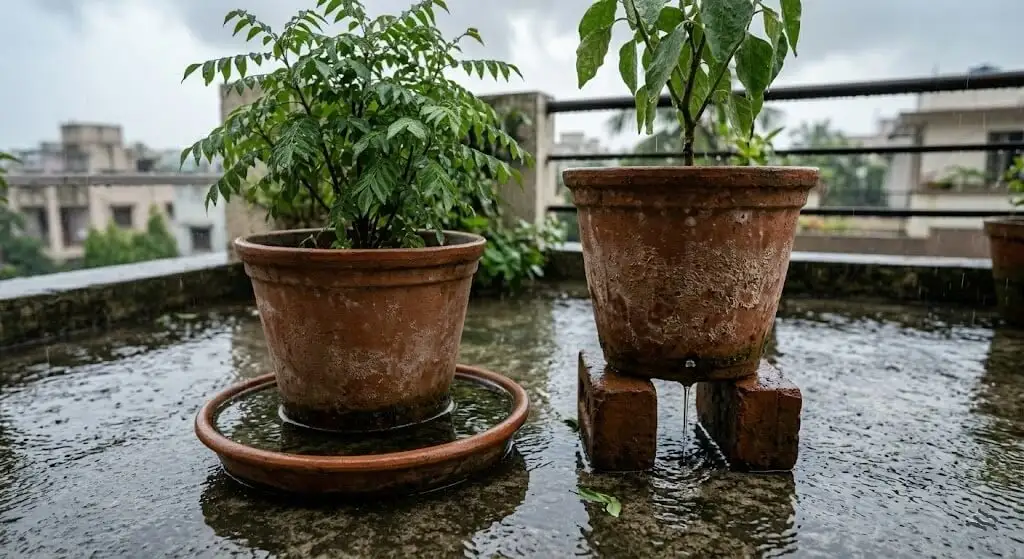
The structural fix for monsoon root rot is removing the conditions that allow permanent root zone saturation. This means two non-negotiable changes before the first monsoon rain arrives ideally in late May or early June in most Indian growing zones.
🚨 Remove All Saucers Before Monsoon Begins This Is Non-Negotiable
This is the single most impactful change you can make. If you are concerned about water staining the terrace floor, place a small piece of old ceramic tile under each pot instead the tile protects the floor but allows drainage water to escape. Do not use any dish or tray that holds water. The only acceptable alternative to no saucer is a saucer that you tip out within 30 minutes of rain stopping which in a continuous 3-day Mumbai monsoon is not a realistic commitment.
⬆️ Raise Every Pot on Two Bricks Before Monsoon
Terrace floors pool water during heavy rain. A pot sitting on a pooled surface is functionally sitting in a saucer even without one. Two bricks per pot creating an 8 to 10cm air gap allows terrace water to flow under and past the pot without the pot base sitting in it. This also ensures the drainage hole is always in free air rather than potentially submerged.
⚠️ WARNING – Moving Pots Under an Overhang Often Makes Root Rot WORSE
Moving pots under an overhang or into an enclosed balcony space “to protect them from the rain” often makes root rot worse, not better. Enclosed spaces have lower air circulation, which slows soil drying between rain events. A pot under an overhang that gets no direct rain but sits in high humidity with slow-drying soil can develop root rot as effectively as one in full rain exposure. Keep pots where they receive some direct rain combined with good air movement and sunlight monsoon sunlight, when it appears, is essential for soil oxygenation.
| City | Average Monsoon Onset | Remove Saucers By |
|---|---|---|
| Mumbai | June 10–15 | June 1–5 |
| Goa | June 5–8 | May 28 |
| Bangalore | June 8–12 | June 1 |
| Hyderabad | June 18–22 | June 10 |
| Chennai | October (NE monsoon) | September 25 |
| Delhi | June 28–July 5 | June 20 |
| Kolkata | June 7–12 | June 1 |
| Madanapalle | July 1–10 | June 22 |
Never Wait for Symptoms My Pre-Monsoon and Monsoon Management Routine
The four plants I lost in 2023 all showed their first symptoms between 6 and 11 days after the monsoon conditions that caused the root damage. By the time I saw a wilting plant, the damage had been occurring underground for a week. Reactive management responding to visible symptoms gives you a much smaller window than proactive management.
The 5-Minute Sunday Check Cumulative Update for Day 6
Adding to the Sunday check routines from Days 1 through 5:
- Finger test for moisture – 2 inches deep (Day 1)
- Leaf colour check – tops and bottoms of 3 leaves (Day 2)
- Soil surface temperature – 1 PM reading with thermometer probe (Day 3)
- White crust visual – soil surface and terracotta pot exterior for crystalline deposit (Day 4)
- Leaf edge check – any new crispy brown tips appearing this week? (Day 4)
- Monthly TDS test – first Sunday of every month, test 2 to 3 pots (Day 4)
- Flower count check – how many open flowers today vs last Sunday? (Day 5)
- Terrace temperature reading – 1 PM air temperature at pot level, 3 times per week May–July (Day 5)
- NEW Saucer water check – during monsoon, check that no saucer or tray has standing water (Day 6)
- NEW Soil smell test – during monsoon, smell the drainage hole of any pot showing wilt in wet soil (Day 6)
Ten checks. Under twelve minutes. Once a week.
What to Realistically Expect During Root Rot Recovery – Week-by-Week
Recovery from root rot is the slowest of all the problems covered in this series, because the root system must physically regrow new tissue it is not repairing existing cells, it is building replacement cells from scratch.
| Timeframe | What to Expect |
|---|---|
| Day 1–3 after treatment | Plant still wilted root system adjusting, no absorption improvement yet |
| Day 4–7 | Wilting slightly less severe; some leaves may still yellow and drop this is normal |
| Week 1–2 | Plant stabilises no new yellowing, wilting episodes reduce |
| Week 2–3 | Fine white new root tips visible in fresh soil if you check gently |
| Week 3–4 | New shoot growth from growing tip — the clearest signal of root recovery |
| Week 4–6 | Plant producing new leaves at normal rate; growing tip actively extending |
| Week 6–8 | Root system sufficiently rebuilt for cautious fertiliser resumption |
| After severe treatment (50–75% damage) | Recovery takes 8–12 weeks; some plants may recover vegetatively but not fruit that season |
📌 What to Expect – and What NOT to Expect
Leaves that yellowed and dropped during the root rot episode they are gone. Roots that were brown and mushy these were cut away and the plant is regrowing from the surviving healthy root stubs. Flowers or fruit that dropped during the stress period they will not return, but the plant will produce new flowering when root function is restored.
What will not recover:
Judge recovery by new root tips and new shoot growth not by the appearance of existing leaves, which may remain somewhat pale for weeks after treatment.
🔁 No New Growth After 4 Weeks – Check These Three Things
Gently tip the pot and check whether new white root tips are visible in the fresh soil.
White tips = recovery is proceeding underground even if it is not yet visible above.
No white tips = assess whether the plant has enough healthy root mass to continue.
Products I Have Actually Used What to Buy, What to Skip, and What Costs Nothing
Every product below has been used personally on my Madanapalle terrace during monsoon seasons. The list is split by priority.
Complete Product Quick Reference
| Product | Category | Cost ₹ | Where to Buy | Priority |
|---|---|---|---|---|
| Hydrogen peroxide 3% (100ml) | Essential treatment | ₹30–60 | Any pharmacy | ⭐ First buy |
| Cold-pressed neem oil (500ml) | Essential treatment + prevention | ₹150–250 | Agricultural shop, Amazon | ⭐ First buy |
| Perlite (2kg) | Essential soil | ₹80–150 | Ugaoo, Amazon | ⭐ First buy |
| Coco peat low-EC (5kg block) | Essential soil | ₹60–100 | Ugaoo, Amazon | ⭐ First buy |
| Vermicompost (5kg) | Essential feeding | ₹150–300 | Ugaoo, local nursery, Amazon | ✅ Standard supply |
| Neem cake powder (1kg) | Essential prevention | ₹50–80 | Agricultural shop, Amazon | ✅ Standard supply |
| Copper fungicide / Blitox (100g) | Treatment tool | ₹60–120 | Agricultural shop | ✅ Keep in stock |
| Rubbing alcohol 70% (100ml) | Treatment tool | ₹80–150 | Pharmacy | ✅ Keep in stock |
| Cinnamon powder | Free alternative to copper fungicide | ₹0 | Kitchen | ✅ Use immediately |
| Old clay bricks (2 per pot) | Free pot raising | ₹0–20 | Hardware shop | ✅ Use immediately |
Total essential spend for monsoon preparedness: ₹30 + ₹200 + ₹120 + ₹80 + ₹200 + ₹70 = approximately ₹700 total, covering prevention and treatment for 6 to 8 pots through the full monsoon season.
Frequently Asked Questions
How do I know if my plant has root rot in India?
The two most reliable signs are wilting despite wet soil, and a sour or fermented smell from the soil or saucer water. If both are present, pull the plant and inspect the roots immediately.
Can a plant fully recover from root rot?
Yes, if less than 50% of roots are damaged and you act within 48–72 hours of first symptoms. Plants with more than 75% root damage rarely recover.
How long does root rot recovery take in container plants?
Mild cases recover in 3–4 weeks. Moderate cases take 6–8 weeks. You will see new white root tips before visible above-ground improvement.
Is root rot curable in pots without repotting?
No. You must remove the plant, trim the infected roots, and repot in fresh soil. Treating the existing soil with fungicide without removing infected roots does not work —the Pythium is inside the root tissue, not just in the surrounding soil.
Why does root rot happen every monsoon even with drainage holes?
The most common reason is saucers. Remove all saucers before the first monsoon rain every year. The second reason is terrace pooling raise pots on bricks to keep them out of pooled rainwater.
What is the cheapest way to treat root rot in India?
Copper sulphate (₹30), cocopeat brick (₹50), and perlite (₹80) total under ₹200 from any local nursery or agri shop. This is the same treatment whether you are in Delhi, Bangalore, or a small town.
Quick Diagnosis Reference – Root Rot and What It Looks Like
| What You See | Soil Condition | Smell | Additional Sign | Most Likely Cause | First Action |
|---|---|---|---|---|---|
| Wilt in wet soil, sour smell | Wet to waterlogged | Sour / fermented | Lower leaves yellowing | Root rot / Pythium | Pull plant, assess roots immediately |
| Stem base soft or black at soil line | Wet | Sour | Plant collapsing | Crown rot — advanced | Cut above soft tissue, try cutting |
| Wilt in dry soil | Dry at 5cm | Normal earthy | All leaves equally limp | Drought stress | Water deeply immediately |
| Wilt in moist soil, no smell | Moist | Normal | TDS above 1,500 ppm | Salt buildup | TDS test, flush if above threshold |
| Wilt in moist soil, heat event | Moist | Normal | City temp above 38°C | Heat stress | Measure terrace temp at 1:30 PM |
| Brown roots but white roots also present | Any | Slight sour | Less than 50% damage | Mild-moderate root rot | Treat — recovery likely |
| All roots brown and mushy, no white roots | Waterlogged | Strong sour | Stem base soft | Severe root rot | Plant likely unsaveable |
The One Change That Prevented Root Rot Entirely in 2024
In 2023, I lost four plants. In 2024, with identical rainfall and identical plants, I lost zero.
The only thing I changed: I removed every saucer on June 25th four days before the first monsoon rain arrived in Madanapalle. I raised every pot on two bricks. I checked soil moisture with a chopstick before every watering instead of watering on a schedule.
No copper sulphate needed. No emergency repotting. No lost plants.
The saucer habit that protects your plants in May will kill them in July. The one-minute switch remove saucer, place pot on bricks is the most valuable thing in this entire guide.
Today’s Action Checklist
- [ ] Check every pot right now remove any saucer holding water during monsoon season
- [ ] Raise any pots sitting directly on concrete floor onto two bricks before the next rain
- [ ] Smell the drainage hole of any pot showing wilting in wet soil right now
- [ ] Buy H₂O₂ 3% from the nearest pharmacy ₹30–60, keep in your gardening kit permanently
- [ ] Check drainage holes on all pots by pushing a chopstick through clear any partial blockages
- [ ] Add 20% perlite to the top layer of any pot currently using heavy commercial potting mix
- [ ] Apply neem oil drench to all monsoon-season pots as a preventive treatment before rain begins
- [ ] Squeeze a handful of your current potting soil when moist if it holds shape rather than crumbling, it is too heavy for monsoon use
- [ ] If you have a wilting plant in wet soil today, pull it and inspect the roots using the root damage table in this article
- [ ] Note in a small log which pots have saucers removed, which are raised, and which have been treated
Key Facts — Quick Reference
What causes root rot in container plants during Indian monsoon?
Root rot is caused by oxygen depletion in the root zone, not by water itself. When soil remains waterlogged during continuous rain, air pockets fill with water and roots switch to anaerobic respiration, producing toxic ethanol byproducts. Simultaneously, Pythium an oomycete water mould infects oxygen-deprived root tissue, causing brown mushy roots. In Indian containers, the most common preventable cause is saucers that retain drainage water, reabsorbing it back through the drainage hole and maintaining permanent root zone saturation.
Why is root rot worse in Indian monsoon containers than in Western conditions?
Indian monsoon rainfall intensity has no equivalent in temperate climates. Mumbai receives 600–800mm of rain in July alone, with 8–12 consecutive rain days common. A standard 12-inch container holding 8 to 12 litres of soil can be completely saturated multiple times per week with no opportunity to re-oxygenate. Apartment terrace design compounds this terraces pool water, pots sit in pooled water even without saucers, and the summer saucer habit transitions too slowly to the monsoon no-saucer requirement.
How do you diagnose root rot without laboratory testing?
Pull the plant from the pot and inspect roots directly. Healthy roots are white, cream, or tan and feel firm. Root rot roots are brown to black, soft, mushy. The soil will have a sour, fermented, or slightly alcoholic smell distinct from healthy earthy soil. Assessment takes 5 minutes and determines both whether root rot is present and its severity, which determines the appropriate treatment response.
What is the most effective root rot treatment for Indian home gardeners?
Cut away all brown mushy roots to healthy white tissue using sterilised scissors, dust cut ends with copper fungicide or cinnamon powder, soak cleaned roots in 3ml hydrogen peroxide per litre water for 15 minutes, repot in fresh aerated mix (coco peat 40% + perlite 30% + vermicompost 20% + neem cake 10%) without a saucer. Follow with weekly neem oil drenches for 4 weeks. Stop all fertiliser for 3 to 6 weeks depending on damage severity. Total treatment cost: ₹100–200.
How does removing saucers prevent monsoon root rot?
Saucers catch drainage water beneath pots. During Indian monsoon, drainage water is continuously replenished by rain and the saucer stays permanently full. A pot sitting in a full saucer has its drainage hole effectively submerged, and the water in the saucer is reabsorbed into the pot through capillary action, keeping the lowest third of the root zone permanently waterlogged. Removing saucers eliminates this reabsorption. Priya Harini B’s Madanapalle terrace data shows zero root rot losses in 2024 compared to four losses in 2023 the only change was removing saucers and raising pots on bricks before the first monsoon rain.
How long does recovery from root rot take in Indian container plants?
Mild root rot (under 25% brown roots) recovers fully in 3 to 4 weeks with treatment. Moderate root rot (25–50%) takes 6 to 8 weeks for full root regeneration. Severe root rot (50–75%) requires 8 to 12 weeks and the plant may recover vegetatively but not produce fruit that season. Recovery is confirmed by new white root tip growth in fresh soil and new shoot growth from the growing tip.
Source: Priya Harini B, thetrendvaultblog.com based on root assessment data from 14 pots across two monsoon seasons (July 2023 and July 2024) in Madanapalle, Andhra Pradesh, and Meena’s Mumbai case study from September 2024.
The Saucer You Forgot to Remove Is the Most Expensive Mistake in Indian Monsoon Gardening
Meena’s two years of monsoon losses were not caused by bad soil, wrong varieties, or insufficient drainage holes. They were caused by twelve small ceramic saucers sitting under twelve pots, filling with rain, and quietly feeding that water back into roots that had no room for it.
Suresh put it simply when he looked at my brinjal roots in July 2023: “The problem is not that it rained too much. The problem is that the water had nowhere to go after the drainage hole.”
The tools and habits that keep plants alive through summer actively harm them when monsoon arrives. Saucers essential in 44°C June heat become death traps in continuous July rain. Heavy moisture-retaining summer soil creates the perfect anaerobic environment for Pythium in August. The mental switch from summer care to monsoon care needs to happen before the first rain, not after the first wilt.
Meena’s 2024 plants were the same varieties she had lost in 2022 and 2023. The soil was similar. The rain was heavier. The saucers were gone.
Root rot recovery is genuine and achievable when caught within the first 72 hours. The hydrogen peroxide and neem oil protocol works. The fresh aerated soil mix works. The entire treatment costs under ₹200 at any pharmacy and agricultural supply shop.
But the best treatment is the one you never need because the saucers came off before the first monsoon rain.
Remove them now. Before the rain. Not after the wilting.
Coming Up Tomorrow – Nutrient Deficiencies in Container Plants – Why Your Plant Looks Pale, Striped, and Stunted
After managing summer heat and monsoon root rot, your plant may be alive but not thriving pale leaves, small new growth, no flowering despite correct watering and temperature. Tomorrow we look at what is happening inside the plant when it cannot access specific nutrients, why Indian container soil depletes differently from garden beds, and how to read the specific visual patterns on leaves yellowing location, vein colouring, brown spots to identify exactly which nutrient is missing without a soil test.
If your plant survived monsoon intact and still looks wrong, Day 7 will tell you why.
Have you ever lost plants to monsoon root rot? Tell me in the comments did you have saucers under your pots and what city are you in? I want to know how widespread the saucer problem is across Indian terraces. Or find me on Instagram @thetrendvaultblog.
— Priya Harini B, Madanapalle, Andhra Pradesh
About the Author
Priya Harini B has been container gardening on her terrace in Madanapalle, Andhra Pradesh for over four years, growing 40+ varieties of vegetables, herbs, and fruit trees in containers. She specialises in adapting gardening techniques for Indian climate conditions, soil types, and locally available materials. Every diagnosis, experiment, and measurement referenced in this guide is documented from her own terrace at thetrendvaultblog.com.
Day 6 of the 30-Day Summer Gardening Challenge Solving Your Biggest Summer Problems, One Day at a Time