By Priya Harini B | Madanapalle, Andhra Pradesh | 4+ Years Container Gardening Experience
Day 4 of the 30-Day Summer Gardening Challenge — Solving Your Biggest Summer Problems, One Day at a Time
Table of Contents
Introduction:
If you are searching for why your container plants look like they are underwatered even after you water them twice a day you may have found your answer. And unlike most gardening problems that arrive suddenly and visibly, this one builds up slowly, invisibly, over weeks of regular watering and careful feeding and then hits your plants all at once, mimicking four other problems so convincingly that most gardeners spend months treating the wrong thing.
I know this because I spent six weeks doing exactly that.
Here is what makes Salt Buildup in Container Soil so frustrating to diagnose: every single symptom it produces looks exactly like something else. Wilting leaves? Looks like underwatering. Yellow and brown leaf tips? Looks like heat scorch. Slow, stunted growth? Looks like nitrogen deficiency. Plants that wilt despite clearly moist soil? Looks like root rot or overwatering. The diagnosis tools that work for every other problem looking at the leaves, checking the soil moisture, assessing the light give you no useful information about salt buildup, because the soil can be perfectly moist and still be chemically hostile to your plant’s roots.
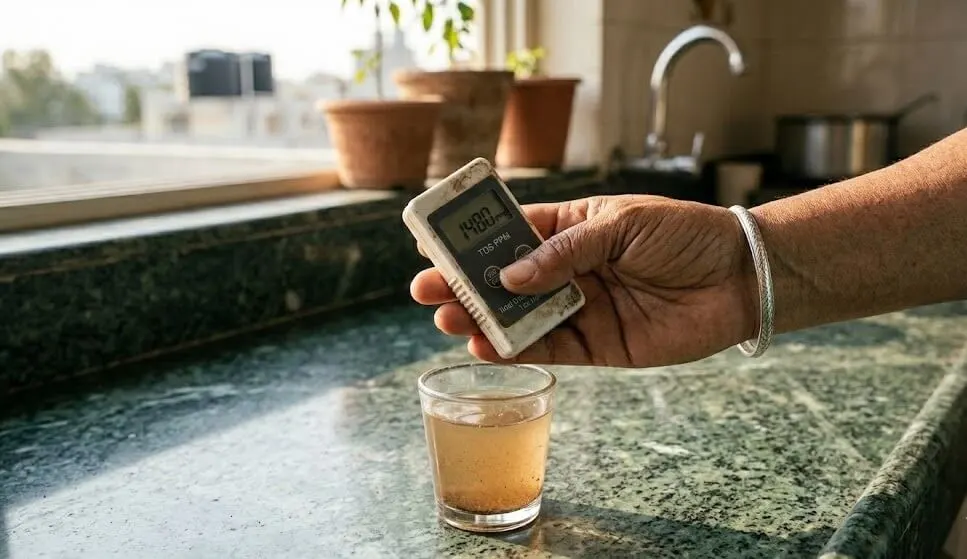
The only way to know for certain is to measure it. And the measuring tool costs ₹300 to ₹500 from Amazon.
This guide covers everything I have learned about salt buildup across four summers of container gardening in Madanapalle what it is, why Indian conditions make it dramatically worse than anywhere you will read about in Western gardening guides, how to test for it in five minutes, and the exact step-by-step flush protocol that brings soil back to a healthy state.
What “Salt Buildup” Actually Means The Chemistry in Plain Language
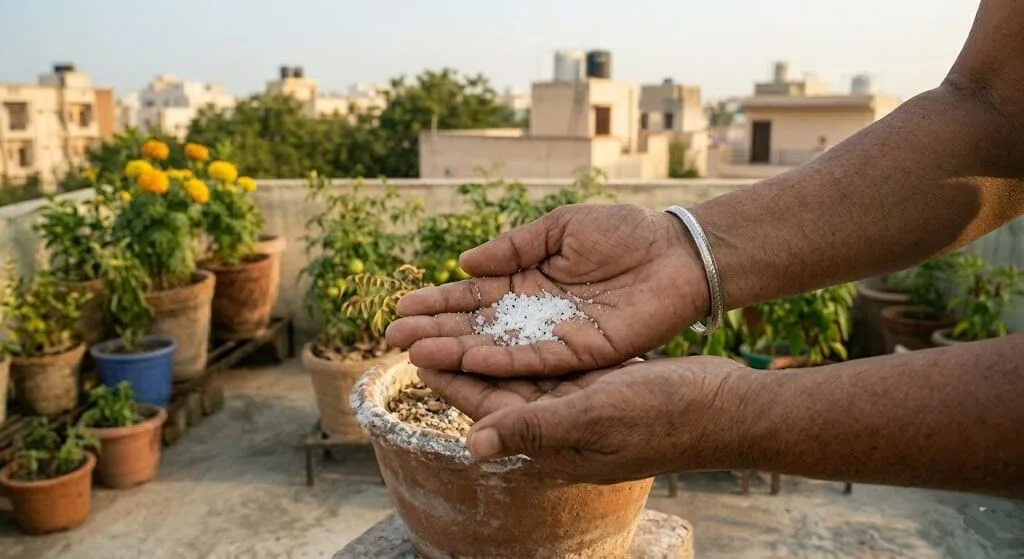
When gardeners talk about salt buildup in soil, we do not mean the salt you put on your food. In chemistry, a salt is any compound formed when an acid and a base react together and by that definition, most fertilisers are salts, most dissolved minerals in water are salts, and the calcium and magnesium in your tap water are salt compounds.
Here is how they accumulate in a container.
Every time you water a potted plant, you add dissolved minerals from the tap water. Indian municipal tap water typically carries a TDS Total Dissolved Solids of 200 to 600 ppm depending on your city, and borewell water can run 400 to 1,200 ppm. That mineral load enters your soil with every single watering.
Every time you fertilise, you add more. NPK fertilisers, urea, DAP, micronutrient mixes every granule leaves dissolved salt residue in the soil after the plant absorbs the nutrients it can use. The nutrients the plant cannot immediately absorb simply stay in the pot, contributing to an accumulating mineral concentration.
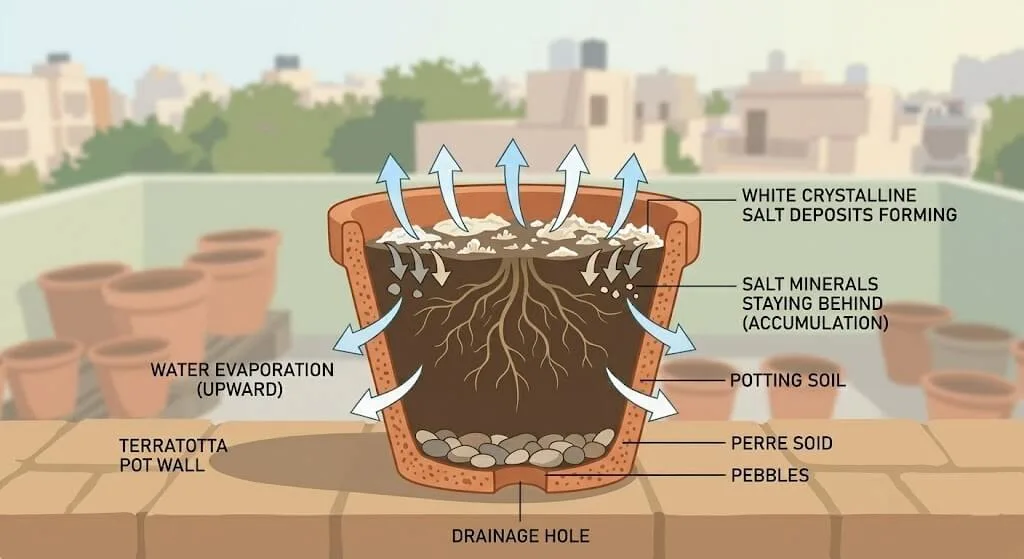
In a garden bed, rainfall flushes these salts downward through deep soil layers and away from root zones. In a 12-inch container holding 8 to 10 litres of soil, they have nowhere to go. The drainage hole removes water but the dissolved solids stay behind. Evaporation from the soil surface concentrates them further water evaporates but salts remain, building up with every passing day of Indian summer heat.
The result, over a summer of regular watering and feeding, is soil that becomes increasingly hostile to plant roots not because it lacks nutrients, but because it has too much of them dissolved into a concentration that actively works against your plant.
Osmotic stress
This process has a name: osmotic stress. When the salt concentration in the soil exceeds the concentration inside the root cells, water moves osmotically in the wrong direction. Instead of flowing from the soil into the roots, water moves out of the roots and into the over-concentrated soil. Your plant dehydrates in a pot full of wet soil. The roots are present, the water is present, the soil is moist — but the chemistry has reversed, and the plant is losing water to the ground it is sitting in.
This is why salt-stressed plants look exactly like chronically underwatered plants: in a biological sense, they are.
The Capsicum Disaster That Taught Me Everything
📖 Priya’s Story — May 2021, Madanapalle
It was May 2021, my first proper summer gardening on my Madanapalle terrace, and I was convinced I had a watering problem.
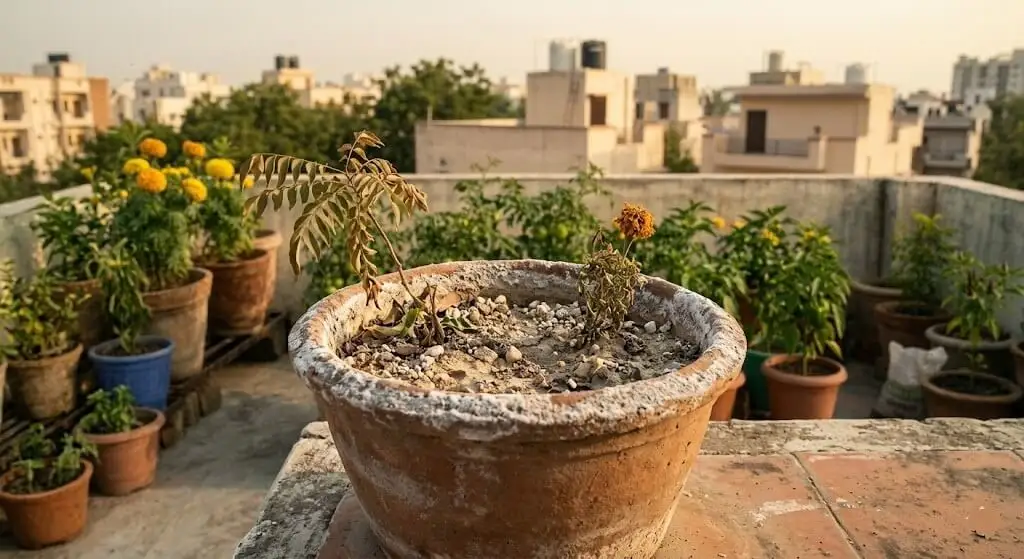
My capsicum plants had been growing beautifully through February and March. By mid-April, the newer leaves had started curling inward. The leaf edges turned yellow, then brown and crispy. The plants wilted by nine every morning even though the soil always felt moist when I checked it. I assumed I was underwatering and increased from once daily to twice daily.
The plants got worse.
I then decided it must be nitrogen deficiency the yellow tips looked similar to what I had seen in gardening guides and added liquid fertiliser at double the recommended dose. The plants nearly died within a week. I changed the soil. They improved for three weeks, then began declining again.
When my neighbour Suresh a retired agriculture officer visited and saw the pots, he picked up a small handful of soil, rubbed it between his fingers, and said without hesitation: “Beta, your soil is full of salt. The roots cannot absorb water anymore. The plant is dying of thirst while sitting in water.”
He asked me to buy a TDS meter. I borrowed one from him that evening and tested the capsicum soil. The reading was 3,400 ppm. The unused potting mix sitting in a bag in my storage room read 280 ppm.
That gap 280 ppm to 3,400 ppm across one summer of enthusiastic watering and fertilising — explained six weeks of wrong diagnosis, one nearly killed batch of plants, and the growing shame of treating confidently the wrong problem.
What I had been doing wrong was not any single thing. It was the accumulation of correct-seeming things: water the plants, feed the plants, repeat. Nothing about that routine looked like a mistake. Nothing about the soil looked dangerous. The problem was invisible, cumulative, and entirely undetectable without measuring it.
That experience is why every section of this guide exists.
Step 1: Test Before You Do Anything – The TDS Meter Method
Before you flush, before you change the soil, before you adjust your fertilising schedule test. Testing tells you whether you have a mild issue, a serious issue, or no issue at all. It also gives you a baseline so you can measure whether your fix is actually working.
🔬 What You Need
A TDS meter. Available on Amazon India for ₹300 to ₹500 search “TDS meter pen India” or “TDS water quality meter.” These are the same devices used to test drinking water quality and work identically for soil testing. This is, genuinely, the single most useful diagnostic purchase I have made as a container gardener. It has paid for itself many times over.
How to test full method (5 minutes):
- Push a clean spoon or trowel 5 to 7cm deep into the pot and collect a tablespoon of soil from the root zone. Place it in a clean glass or container.
- Add 2 tablespoons of distilled water or clean filtered water not tap water, as tap water has its own TDS that will distort your reading. Stir well and let the mixture sit for 5 minutes. This creates a soil solution that reflects the dissolved mineral concentration at root zone depth.
- Strain the mixture through a coffee filter or clean cloth into another container to remove the soil particles. Insert the TDS meter probe into the filtered water and read the number.
- Multiply the result by 2 to correct for the dilution factor. This gives you the approximate soil TDS.
Quick method (60 seconds): If you just want a fast directional reading without the dilution math, push the TDS meter probe directly into moist soil at the root zone depth. The reading will be lower than the corrected calculation above but gives you a useful relative number for comparison across pots and over time.
What your reading means:
| Reading | Soil Status | What to Do |
|---|---|---|
| Below 800 ppm | Healthy | No action needed. Test monthly through summer. |
| 800–1,500 ppm | Elevated but manageable | Reduce fertiliser dose by half for 2–3 weeks. |
| 1,500–2,500 ppm | High — plants showing stress | Flush this week. Fertiliser break 3 weeks. |
| 2,500–3,500 ppm | Dangerously high | Flush immediately. Fertiliser break 4 weeks. |
| Above 3,500 ppm | Crisis level | Flush + partial soil replacement. Roots likely damaged. |
My Actual Readings From 6 Pots Summer 2024, Madanapalle
I tested six of my pots in March 2024, at the end of a full growing season without a formal flush routine. Here is what the numbers showed:
MY 6-POT TDS DATA TABLE
📊 Original data from my Madanapalle terrace, March 2024 — not sourced from any website
| Pot & Plant | Pot Type | Last Fertilised | TDS Reading | Status |
|---|---|---|---|---|
| Tomato, 12-inch | Black plastic | 3 days ago | 2,800 ppm | 🔴 High- flush needed |
| Capsicum, 10-inch | Terracotta | 10 days ago | 1,600 ppm | 🟠 Elevated- reduce fertiliser |
| Methi, 6-inch | Terracotta | Never | 480 ppm | ✅ Healthy |
| Brinjal, 14-inch | Grow bag | 4 days ago | 620 ppm | ✅ Healthy – organic feed only |
| Curry leaf, 8-inch | Terracotta | Borewell water, 2 weeks ago | 1,900 ppm | 🟠 Elevated- reduce fertiliser |
| Tomato (flushed), 12-inch | Terracotta | On break, flushed 10 days ago | 740 ppm | ✅ Recovering well |
The pattern was immediate and clear. The black plastic tomato pot watered with tap water and fertilised weekly had the highest reading. Black pots absorb heat faster than terracotta, which means faster evaporation and therefore faster salt concentration. The methi pot, never fertilised, sat at 480 ppm. The brinjal on organic-only feeding: 620 ppm. The flushed tomato: 740 ppm and recovering.
The same plant type, the same care routine, the same Indian tap water but vastly different TDS readings depending on pot material, fertiliser frequency, and whether a flush had been done.
Why Indian Container Gardens Build Up Salt So Much Faster
This problem affects container gardens everywhere in the world, but three specific Indian conditions combine to make it significantly more severe than what you will find described in Western gardening guides. Understanding why is not academic it directly determines how frequently you need to flush.
Indian tap water starts with a higher mineral baseline.
Municipal tap water in most Indian cities carries higher dissolved solid content than European or North American tap water. Every watering session adds this mineral load to your pot, even before you add a single granule of fertiliser.
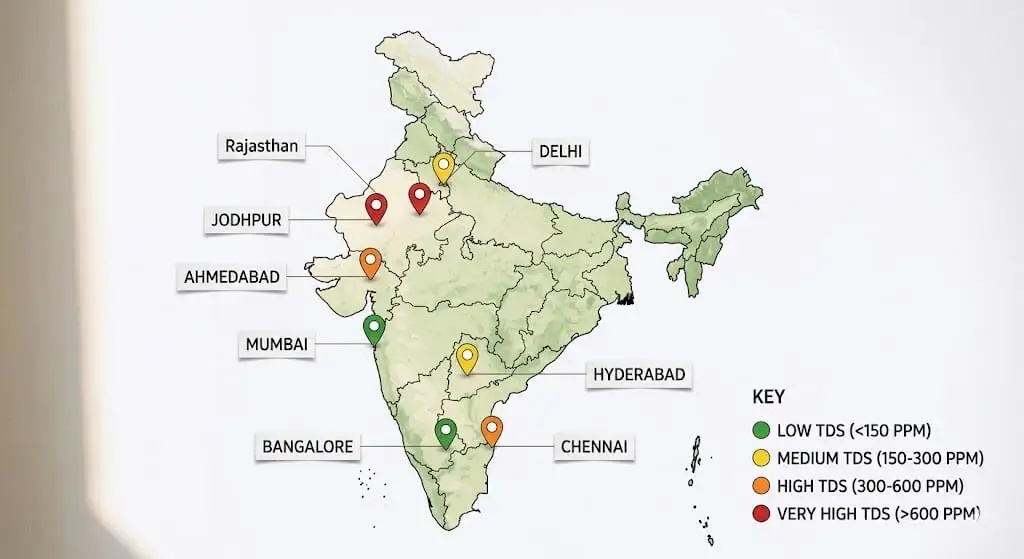
| City | Typical Tap Water TDS | Risk Level | Flush Frequency Needed |
|---|---|---|---|
| Mumbai | 150–250 ppm | Lower | Every 6–8 weeks |
| Bangalore | 200–350 ppm | Lower–Medium | Every 5–6 weeks |
| Hyderabad | 300–500 ppm | Medium | Every 4–5 weeks |
| Delhi | 300–500 ppm | Medium | Every 4–5 weeks |
| Chennai | 400–700 ppm | High | Every 3–4 weeks |
| Ahmedabad | 500–800 ppm | High | Every 3 weeks |
| Madanapalle | 350–550 ppm | Medium | Every 4–5 weeks |
| Borewell water (most regions) | 400–1,200 ppm | High to Very High | Every 2–3 weeks |
| Rajasthan cities | 800–1,500 ppm | Very High | Every 2 weeks |
If you are in Rajasthan, Ahmedabad, or Chennai or using borewell water anywhere in India your baseline salt input with every single watering is significantly higher than someone in Mumbai. You need to flush more often, not because you are making a mistake, but because your water chemistry requires it.
Indian summer heat concentrates salts dramatically faster.
At 40 to 45°C ambient temperatures with direct sun exposure, soil moisture evaporates rapidly from the pot surface. Water evaporates but salts remain. In one week of Indian summer, a 10-inch pot can lose 2 to 3 litres of water to evaporation alone all of which leaves its dissolved minerals behind, concentrating the remaining soil solution with every hot day. The hotter the summer and the more direct sun your pots receive, the faster TDS climbs.
This is also why black plastic pots are especially vulnerable: they absorb solar heat more readily than terracotta or white pots, which means faster evaporation and faster salt concentration for the same watering frequency.
Container volume limits natural dilution and downward movement.
A garden bed has metres of depth and enormous soil volume. Excess salts disperse and migrate downward with rainfall. A 12-inch container holds approximately 8 to 10 litres of soil. There is no depth for salts to move into, no rainfall to flush them through, and no significant soil volume to dilute them in. What enters stays accumulating in a fixed, limited volume with every watering and every fertiliser application.
Over-fertilising is common, and entirely understandable.
The belief that “more fertiliser equals more growth” is so common in gardening culture including mine for my first two seasons that most gardeners never question it. Weekly NPK applications, double doses before fruiting season, adding more when plants look stressed. Every application makes logical sense in isolation. But in a container through an Indian summer, without flushing, these applications stack on top of each other and on top of the high-TDS tap water baseline, and TDS crosses dangerous levels within four to six weeks.
The 5 Signs of Salt Buildup And How to Distinguish Each One
Recognising salt buildup visually saves you the months of confusion I went through. The five signs below are specific enough to distinguish salt damage from the problems it most commonly mimics.
Sign 1: White or Grey Crust on Soil Surface or Pot Exterior
This is the most reliable and distinctive visual sign. When soil water evaporates, dissolved salts crystallise on the soil surface or migrate through porous terracotta and crystallise on the outer wall of the pot. The result is a white, powdery, chalky crust dry to the touch, with no smell that appears on the soil rim or on the outside of terracotta pots.
This is different from the white fuzzy mould that appears after overwatering, which has a soft, slightly raised texture and a faint earthy smell. Salt crust is flat, dry, hard, and powdery like chalk dust. If you are unsure, take a pinch between your fingers: salt feels gritty and dissolves, mould feels cottony and does not.
If you see the white crust, test with a TDS meter. Visible salt crystallisation on the surface means even higher concentrations are present at root zone depth below.
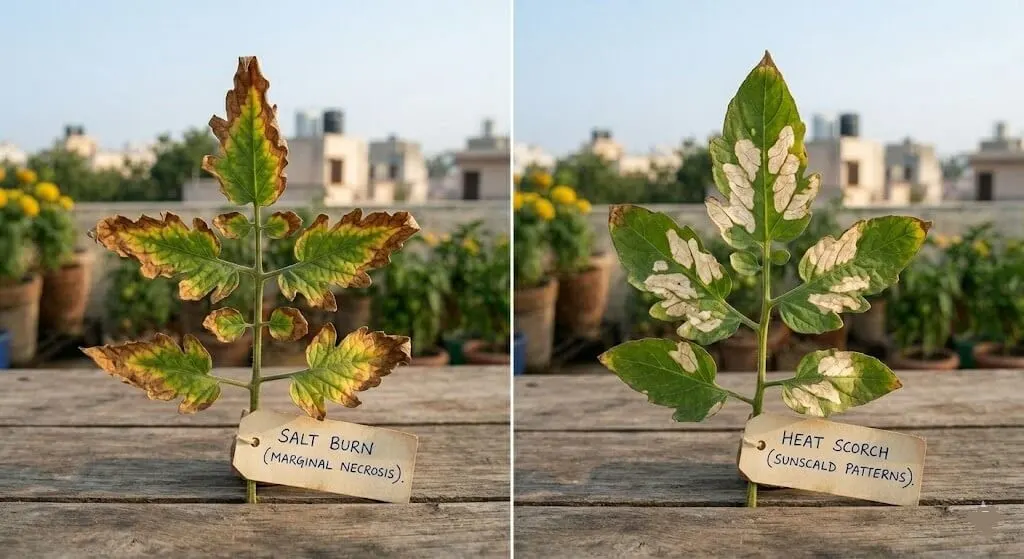
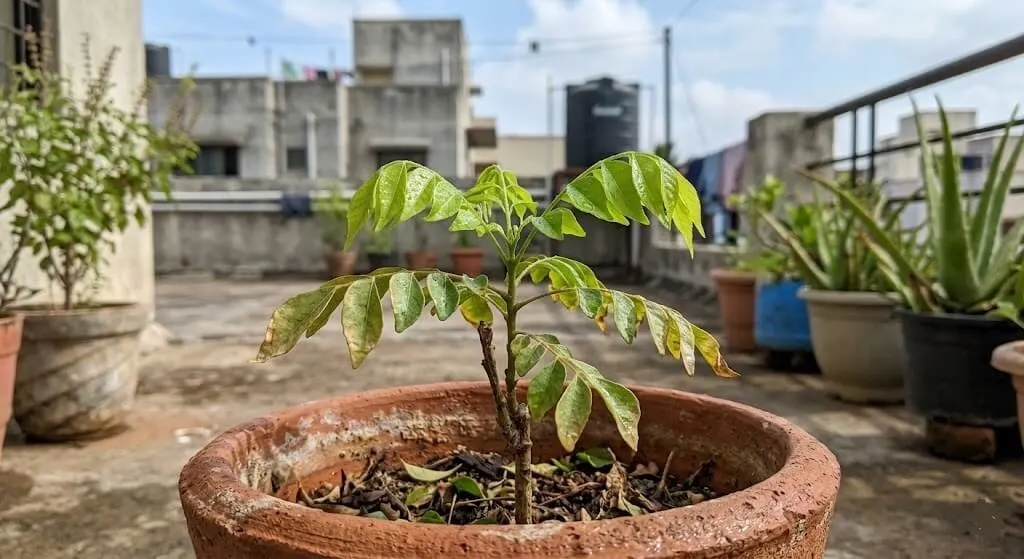
Sign 2: Brown Tips and Edges While the Leaf Centre Stays Green
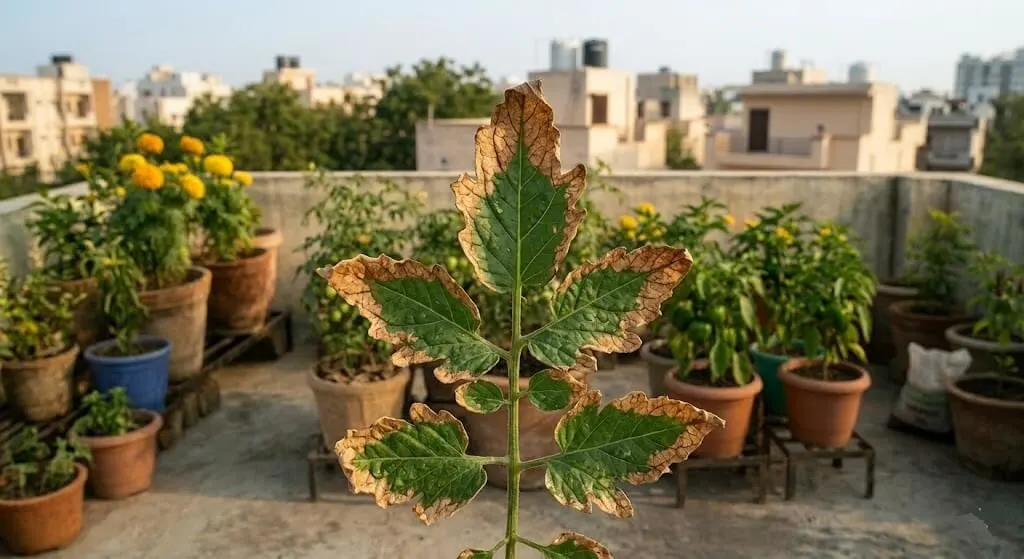
Salt-stressed plants develop burned-looking tips and margins. The edge cells of leaves, furthest from the stem’s water supply and most exposed to the over-concentrated soil solution around them, are the first to lose moisture to osmotic stress. The result is browning that starts specifically at the very tip and works inward yellow first, then brown and crispy while the centre of the same leaf remains green.
This pattern is different from nitrogen deficiency, where the entire leaf turns uniformly pale yellow beginning with the oldest leaves at the base of the plant. It is different from iron deficiency, which produces yellowing between the veins of new growth while veins stay green. And it is different from heat scorch, which creates bleached, papery patches on the sun-facing surface of leaves not at the edges.
Brown edges combined with wilting despite adequate moisture is the most consistent two-sign combination for salt stress.
Sign 3: Plants That Wilt Quickly After Watering, Then Perk Up, Then Wilt Again
This cycling pattern is one of the most diagnostically useful signs of salt stress. When you water a salt-stressed plant, the fresh water temporarily dilutes the soil salt concentration just enough for the osmotic pressure differential to reduce briefly and for the plant to absorb some water. The plant perks up. But as the fresh water is absorbed or evaporates and the salt concentration reasserts itself, the wilting returns, usually within one to two hours.
A healthy plant absorbs water and stays turgid for several hours after watering. If your plants need water twice a day in mild weather, or wilt noticeably by mid-morning despite evening watering, this cycling pattern is worth investigating with a TDS test.
Sign 4: Sudden Deterioration Within a Week of Fertilising
If your plant looked fine, you fertilised it at full or double dose, and within three to seven days it started showing tip burn, yellowing, and wilting you most likely pushed an already-elevated TDS past the threshold of tolerance. The fertiliser salts added to existing accumulation and tipped the soil chemistry into toxic territory.
This is perhaps the most important sign to recognise, because the instinctive response “the plant looks sick, I should fertilise more” makes the situation dramatically worse. Every additional fertiliser application in this state adds more salt on top of the existing crisis. Stop all fertiliser immediately, test TDS, and flush.
Sign 5: TDS Reading Above 1,500 ppm With Symptoms Present
Visual signs confirm the diagnosis, but the TDS meter reading is the only tool that tells you how severe the problem actually is and whether your flush is working. Use the reading categories from Step 1 above to determine the urgency and intensity of your response.
Salt Burn vs. Heat Scorch vs. Nitrogen Deficiency- The Fast Distinction Guide
Because Indian summer produces all three problems in balcony gardens, and all three can appear simultaneously on the same plant, being able to distinguish them quickly matters.
🔑 The Single Most Useful Test
If brown appears on the SHADED side of a leaf the side not receiving direct sun heat scorch is impossible. That’s salt burn, without exception
| What You See | Where It Appears | Additional Signs | Most Likely Cause |
|---|---|---|---|
| Brown crispy tips and edges, yellow transition | Leaf margins, all leaves | White crust on soil | Salt buildup |
| Bleached, papery patches | Sun-facing leaf surface | Appeared after hot afternoon | Heat scorch |
| Uniform pale yellow, whole leaf | Old/bottom leaves first | Whole plant looks washed out | Nitrogen deficiency |
| Yellow between veins, veins stay green | New top leaves only | Only newest growth affected | Iron deficiency |
| Wilting, moist soil, musty smell | All leaves | Soil heavy and wet | Root rot/overwatering |
The most useful single test: Look at where the browning appears. If brown edges appear on the shaded side of a leaf the side not receiving direct sun heat scorch is impossible. Sunlight cannot reach that surface. Browning on the shaded side of leaves means salt or fertiliser burn, without exception.
Kavya’s Story Three Months of Wrong Diagnosis, Fixed in Two Weeks
🌱 Real Story — Kavya, Bangalore 2024
Three Months of Wrong Diagnosis, Fixed in Two Weeks
Kavya from Bangalore messaged me in August 2024 with a methi and spinach problem that had been going on since May. Both plants had been growing reasonably through April, then developed persistent brown crispy edges, slow growth, and wilting despite twice-daily watering. Over three months, she had tried four different solutions: changed the soil, tried two different fertiliser formulations, treated for pests, and tried iron supplements for suspected chlorosis.
Nothing had worked consistently. The plants would improve slightly, then decline again within two weeks.
I asked her two questions. What is your watering source? Bangalore municipal tap water, supplemented from the building’s overhead tank when supply was low. Have you ever tested your soil TDS? She did not own a TDS meter.
I asked her to buy one. Her reading, from the most-affected methi pot: 3,100 ppm.
She had been watering twice daily through summer more than necessary which meant double the salt input compared to once-daily watering. The soil had never been flushed across two full growing seasons. Each of the fertiliser changes she had tried had added more salt on top of the existing accumulation.
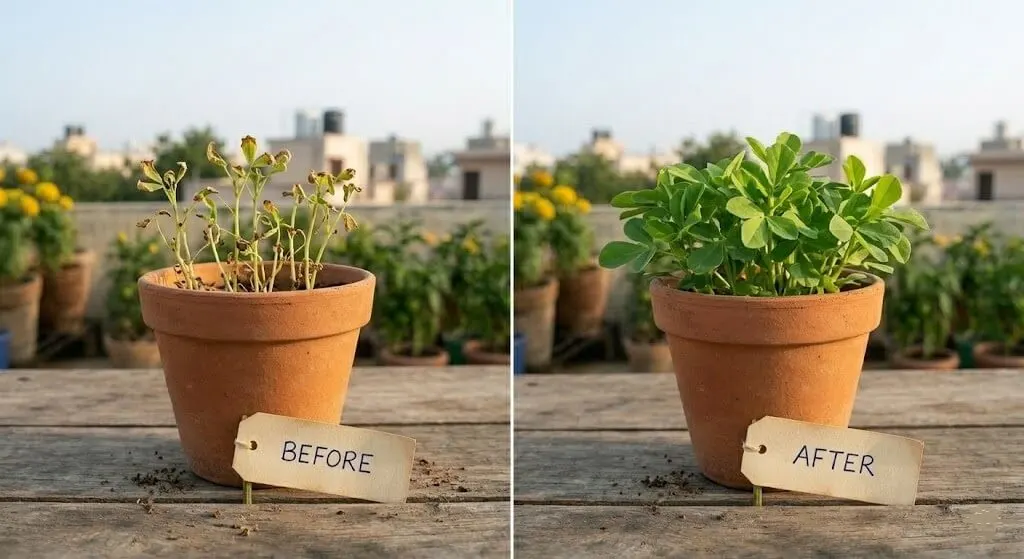
We put her on a full flush protocol: flush every three days for two weeks, no fertiliser at all, and switched her to vermicompost only for feeding after the flush period. After two weeks, her TDS reading was 780 ppm.
The methi that had been stuck at 3 inches for six weeks grew 4 inches in the next ten days. The spinach, which had been showing persistent tip burn through three months of treatment attempts, put out three full sets of healthy new leaves.
“I cannot believe I spent three months thinking something was wrong with the seeds or the soil type,” she wrote. “It was the same soil. It just needed to be washed.”
That reaction relief, and mild frustration at how simple the fix turned out to be is almost universal among gardeners who diagnose salt buildup for the first time. The problem hides in plain sight for months, and the solution is water.
TDS: 3,100 ppm → After 2 flushes: 780 ppm → Day 10: Methi 4 inches tall
The Complete Flush Protocol – Step by Step, Volume and Timing Included
💧 The Complete Flush Protocol
Flushing is the core fix. The principle is simple: run enough water through the pot to dissolve accumulated salts and carry them out through the drainage hole. The critical detail that most guides understate is that the volume of water needed is much larger than most gardeners expect several times the volume of the pot itself.
What you need:
| Plain water | Large volume |
| Pot with drainage hole | Confirmed clear |
| Time | 30–45 minutes per pot |
| TDS meter (optional | ₹300–500 |
- Plain tap water or filtered water do not add vinegar, acidifiers, or anything else. Plain water is what dissolves and carries salts out.
- A pot with a clear, unblocked drainage hole. Before you begin, push a chopstick or pencil through the drainage hole to confirm it is open. Water that cannot drain does not flush it just redistributes salts within the pot.
- A location where runoff can drain freely outside, in a sink, in a bathtub.
The flush step by step:
Step 1: Water the plant normally and let it drain completely. This first watering begins dissolving surface salt crystallisation and saturates the soil, which helps subsequent flush water move evenly through the root zone rather than channelling along the pot wall.
Step 2: Wait 20 to 30 minutes. This soaking period allows water to work into compacted, salt-crusted soil layers.
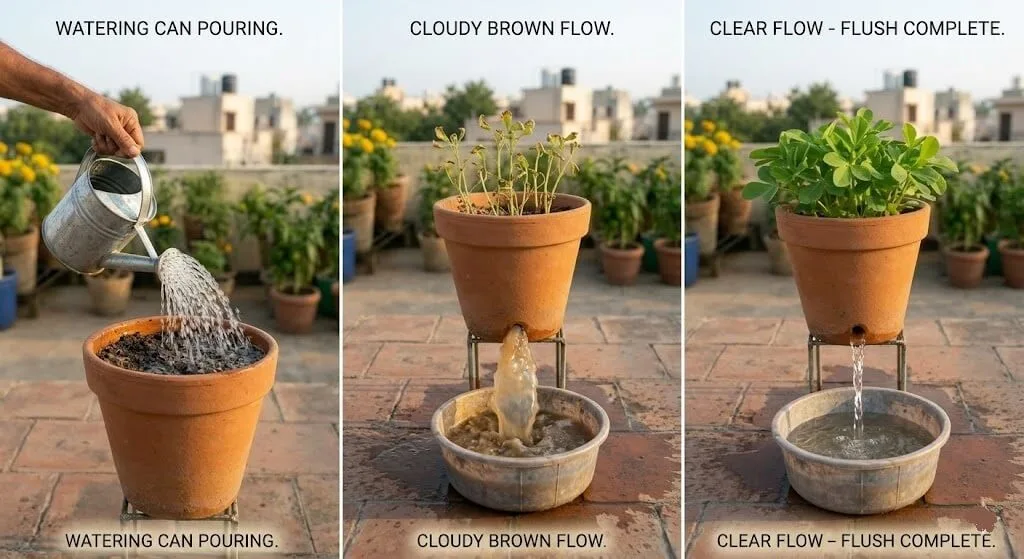
Step 3: Begin the main flush. Pour water slowly and continuously over the entire soil surface — use a watering can with a rose head, or pour from about 30cm height to distribute evenly. Do not rush. Slow, steady water movement carries more dissolved material through the soil and out the drainage hole than fast, forceful pouring.
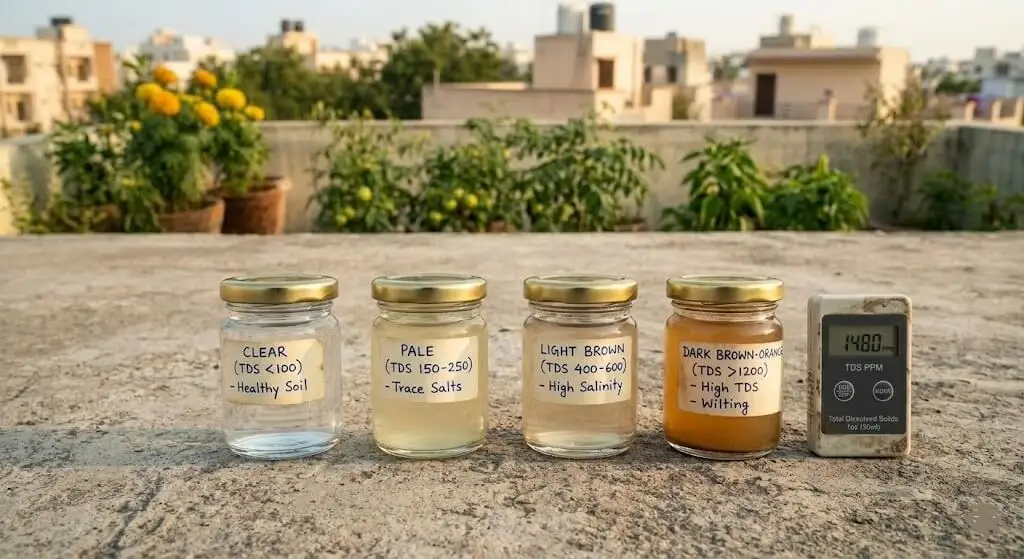
Step 4: Continue pouring until water flows freely and continuously from the drainage hole, then continue for an additional 3 to 4 minutes. For a 12-inch pot, you should be passing approximately 4 to 6 litres of water through during this step. The water coming out of the drainage hole will initially be cloudy or slightly brown-tinged that is the dissolved salts leaving. Continue until the outflow runs clear.
Step 5: Let the pot drain completely for at least 30 minutes. Critically do not let the pot sit in its saucer during this period. The water in the saucer is now salt-laden runoff. If the pot reabsorbs it, you undo part of the flush. Remove or empty the saucer. Discard the drainage water.
Step 6: If your initial TDS reading was above 2,500 ppm, repeat the full flush 24 hours later. One flush reduces TDS by 40 to 50% a second flush reduces it by another 30 to 40%, typically bringing most pots into the safe range.
Step 7: Test TDS again 48 hours after the second flush. If below 1,200 ppm, you are done. If still above 1,500 ppm, do a third flush.
Always flush in the early morning 6 to 7 AM before temperatures rise. Flushing with cold water into hot summer soil can shock the root system.
Cost: ₹0. Time: 30–45 min × 2 days · No fertiliser: 2–4 weeks after flush.
After the Flush: How Long to Stop Fertilising and Why Getting This Wrong Brings It All Back
Flushing clears the existing buildup. But resuming fertilising at the same frequency immediately after flushing means the TDS will return to the same dangerous levels within two to three weeks faster if it is summer and your tap water TDS is high.
Every salt buildup problem has two parts: clearing the existing accumulation (flushing) and reducing the ongoing input (fertiliser break and adjusted routine). Fixing only the first part while ignoring the second is why salt problems keep coming back every few months.
Fertiliser break duration by severity:
| TDS level | Fertiliser break | What to do |
| After flushing from TDS above 2,500 ppm | All fertiliser for 4 full weeks | The plant will look stressed during this period but the root system is recovering. New, healthy growth will emerge as the root cells repair. |
| After flushing from TDS 1,500 to 2,500 ppm | 2 to 3 weeks | Resume at half the normal dose. |
| For routine maintenance flushing (TDS below 1,500 ppm) | 1 week | After each flush, then resume normally. |
💡 Single Most Effective Change
When you do resume, reduce the dose permanently
Most fertiliser packet instructions and most Indian gardening recommendations are written for open garden beds, not containers. Garden beds have enormous soil volumes to dilute and buffer excess salts. A 12-inch container does not. Use half the packet-recommended dose for containers, applied once every three to four weeks rather than weekly. This single change, applied consistently, reduced my average summer TDS by more than 40% compared to my first two seasons.
What I Feed My Plants Now The Organic Routine That Keeps TDS Below 800 ppm Through Indian Summer
This is the change that made the biggest single difference in my garden over time.
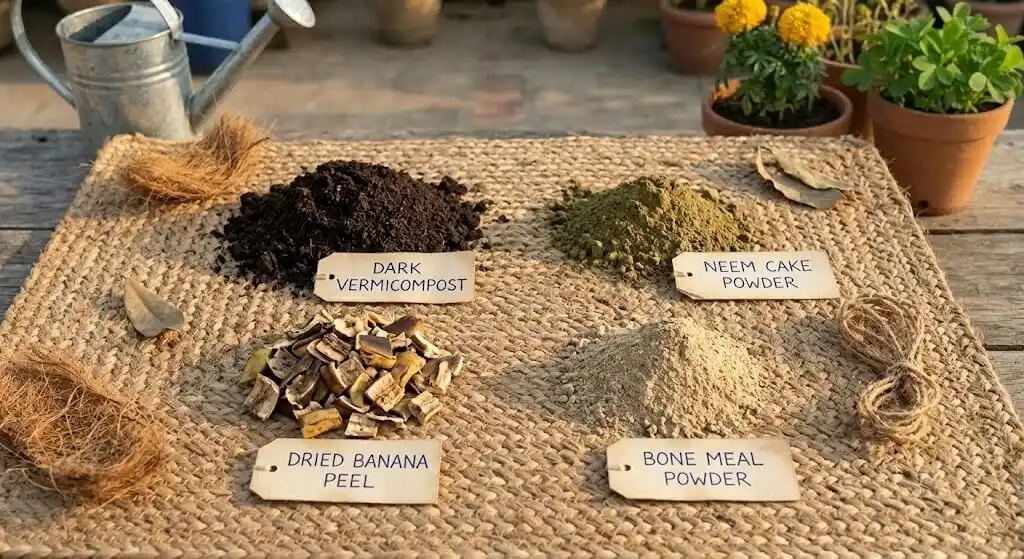
Organic soil amendments vermicompost, neem cake, bone meal, composted cow manure add nutrients in a slow-release form that is bound in organic matter. Soil bacteria and fungi break this material down gradually over weeks, releasing nutrients in small amounts as the plant needs them. The TDS contribution of organic amendments is dramatically lower than chemical fertilisers, because the nutrients are not yet dissolved they are still locked in organic structure.
In my testing over summer 2023 and 2024, pots fed exclusively with vermicompost and neem cake maintained TDS below 800 ppm through the entire summer, even with Indian tap water. Pots fed with weekly NPK and urea reached 2,500 to 3,500 ppm within six weeks.
Practical organic feeding routine:
Every month: top-dress each pot with a 1 to 2cm layer of vermicompost across the soil surface. This single amendment is all most container plants need through summer for steady growth. Cost: ₹40 to ₹80 per kg, or 5kg bags from Ugaoo, Amazon, or local agricultural supply shops at ₹150 to ₹200.
Every six weeks: add one tablespoon of neem cake per 10-inch pot, mixed into the top inch of soil. Neem cake provides slow-release nitrogen and phosphorus and also functions as a natural fungal and pest deterrent. Cost: ₹50 to ₹80 per kg from agricultural supply shops.
Once at the start of summer: mix 1 teaspoon of bone meal per 10-inch pot into the topsoil. This provides slow-release phosphorus for the entire season without any TDS contribution. Cost: ₹60 to ₹100 per kg.
If you want to supplement with liquid chemical fertiliser during peak fruiting: use it at one-quarter the recommended dose, not more than once a month, and flush three days after application.
🍌 Banana Peel Potassium Water
- Soak 2 to 3 banana peels in 1 litre of plain water for 48 hours at room temperature
- Strain and use the water now a mild potassium solution for watering during the flowering and fruiting stage
- it ferments quickly in Indian summer heat
Cost: ₹0 · Use within 3 days · Best during flowering
Your Tap Water Is Already Adding Salt Rainwater, RO Water, and What Never to Use on Plants
Organic feeding reduces the fertiliser contribution to TDS. But your tap water TDS is fixed you cannot change what comes out of your municipal supply. What you can do is reduce how much of it you use, or use lower-TDS alternatives for your most sensitive plants.
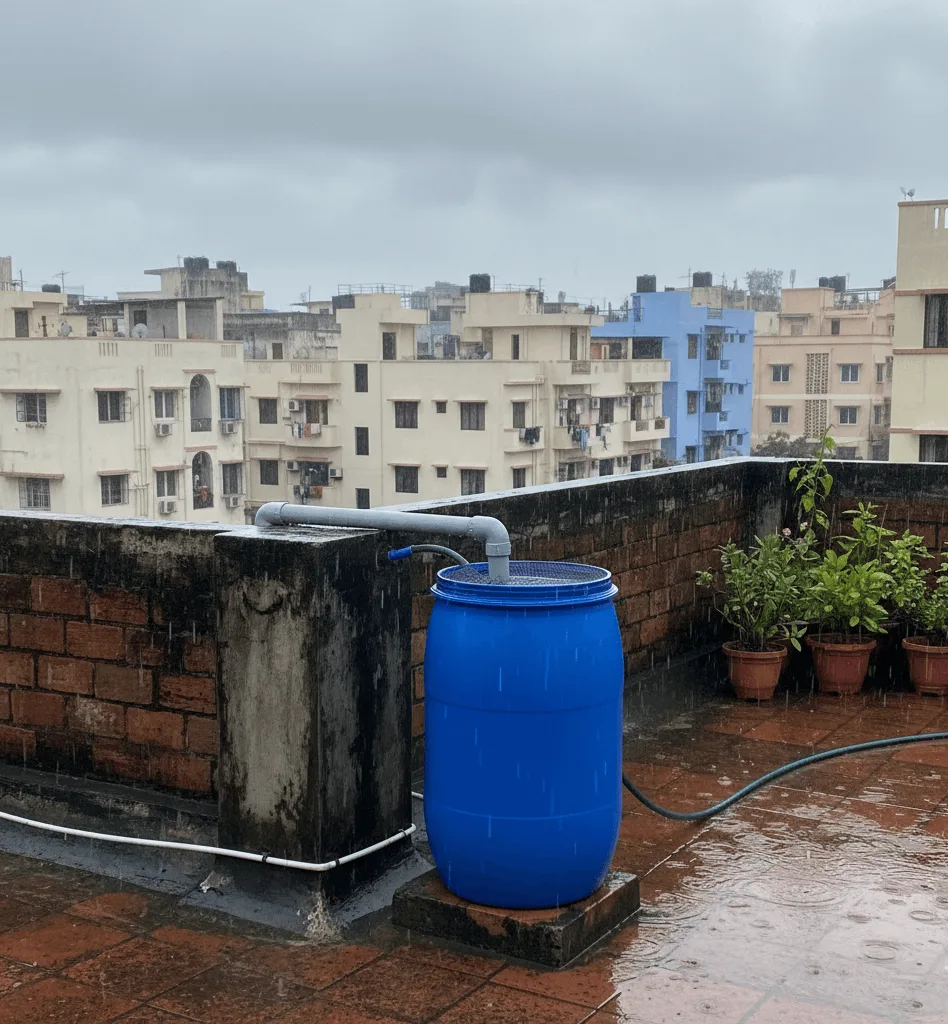
🌧️ Rainwater Collection – Highest Value Strategy
Rainwater has near-zero TDS typically 5 to 20 ppm, compared to 200 to 600 ppm for Indian tap water. Collecting and using monsoon rainwater dramatically reduces salt accumulation throughout the growing season. Even a modest system a barrel under a terrace edge, a large container under a downpipe can supply water for several pots through the monsoon season. I collect monsoon rainwater and use it exclusively for my most sensitive plants: tomatoes, capsicums, and cucumbers.
RO product water the best daily alternative
Many Indian households have RO water purifiers. The product water the filtered output from the system has very low TDS, typically 20 to 50 ppm, and is excellent for plant watering. Use it for sensitive plants or during summer when tap water TDS is highest.
⚠️ RO Reject Water Warning
Never use RO reject water on plants. It has very high TDS the opposite of what you need. Use the product water (filtered output) typically 20–50 ppm.
Diluting borewell water
If your borewell water reads above 800 ppm, mixing it 50/50 with collected rainwater or municipal tap water halves the salt input per watering without completely replacing your water supply.
Never Wait for Symptoms My Year-Round Flush Schedule for Indian Container Gardens
The most effective long-term approach is a scheduled routine not waiting until plants show stress symptoms, which means the soil TDS has already reached levels causing root damage.
The 5-Minute Sunday Check – Cumulative Update for Day 4
Adding to the Sunday check routines from Days 1, 2, and 3:
If you see visible white crust on two or more pots during the visual check, TDS is elevated and a flush is due that week. You do not need to test every pot every Sunday the crust check is the early warning system between formal monthly tests.
Six checks. Under seven minutes. Once a week.
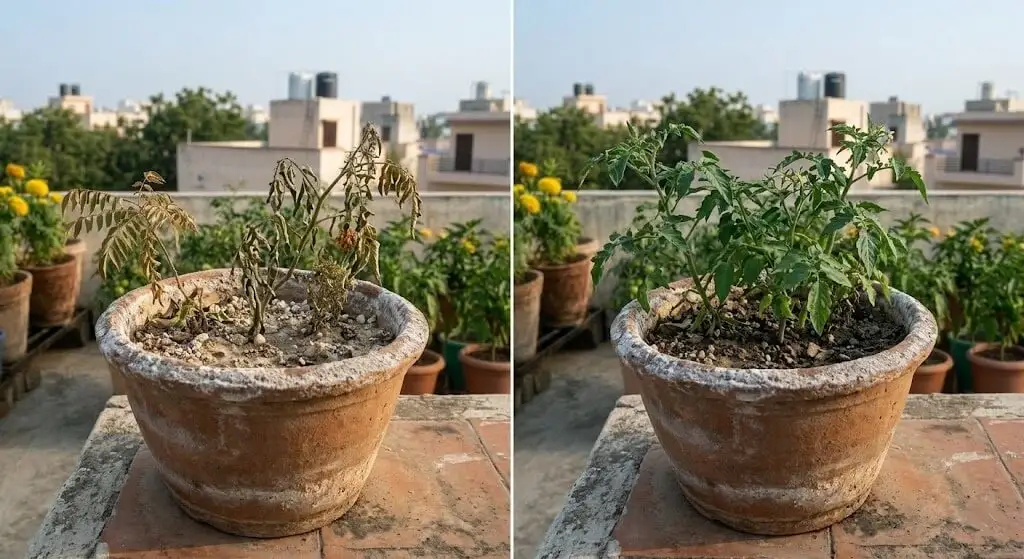
What to Realistically Expect During Recovery
Recovery from salt stress is slower than most other container problems because the root damage cell membrane disruption, blocked water transport pathways takes time to repair even after the chemical cause is removed.
| Timeframe | What to Expect |
|---|---|
| Day 1–2 after first flush | Plant may look briefly worse normal, root system adjusting |
| Day 3–5 | Wilting episodes reduce; plant holds turgidity longer after watering |
| Week 1–2 | New growth begins to emerge; leaf edges stop developing new brown areas |
| Week 2–3 | Plant returns to normal appearance; new leaves are healthy colour and size |
| Week 4–6 | Full recovery; old damaged leaves can be removed; normal productivity resumes |
Important note on damaged leaves:
📌 Important
Leaf tips and edges that have already turned brown will not recover. Judge recovery by new growth emerging from the tip not by changes to existing damaged leaves.
Brown tips and edges that have already formed will not recover. The damaged tissue is dead. Do not judge recovery by changes to already-affected leaves judge it by the colour and health of new growth emerging after the flush.
If you see no improvement after 2 weeks of flushing and fertiliser break, retest TDS. If still above 1,500 ppm, the soil itself may need partial replacement: remove the top 3 inches and replace with fresh potting mix, then flush once more before resuming the fertiliser break.
Product Reference What I Have Actually Used
| Product | Purpose | Cost | Where to Buy in India |
|---|---|---|---|
| TDS meter pen | Diagnose and monitor soil TDS | ₹300–500 | Amazon India “TDS meter pen” |
| Vermicompost | Primary organic fertiliser | ₹80–150/kg | Any nursery; Ugaoo; local agri shops, Amazon |
| Neem cake | Soil conditioner, slow-release N | ₹50–80/kg | Agricultural supply shops, Amazon |
| Bone meal | Slow-release phosphorus | ₹60–100/kg | Nurseries and agri shops, Amazon |
| Composted cow manure | General organic nutrition | ₹30–60/kg | Local nurseries |
| pH strips | Check water and soil alkalinity | ₹50–100 | Online; chemistry suppliers, Amazon |
| RO product water | Low-TDS watering for sensitive plants | ₹0 | From your household RO system |
Frequently Asked Questions
My plant suddenly got worse after I fertilised it is that salt buildup?
Almost certainly yes, if the soil had not been flushed in over a month and you applied a full or heavier-than-normal dose. Each fertiliser application adds salt on top of existing accumulation. If the plant looked fine, you fertilised, and within a week it shows tip burn, wilting, or yellowing in otherwise moist soil stop all fertiliser immediately, test TDS, and flush before adding anything else.
How often should I flush my containers in Indian summer?
Match flush frequency to your city’s water TDS. High-TDS cities like Chennai, Ahmedabad, or Rajasthan: every 2 to 3 weeks. Medium cities like Delhi, Hyderabad: every 3 to 4 weeks. Lower-TDS cities like Mumbai, Bangalore: every 5 to 6 weeks. Borewell water users anywhere in India: every 2 to 3 weeks regardless of city. Monthly flushing is a safe default if you are unsure.
Can I flush too much and wash away all the nutrients?
Yes. Excessive flushing more than once a week without adjusting feeding will leave soil nutrient-depleted. Flushing every 3 to 4 weeks is the appropriate summer maintenance frequency. After each flush, wait one week before resuming fertilising.
My pot does not have a drainage hole. What do I do about salt buildup?
Pots without drainage holes cannot be flushed and accumulate salts at a much faster rate than pots with drainage. This is one of the most important structural reasons to never use drainage-free pots for edible plants. Drill holes in any pot that does not have them, or repot into one that does. If using decorative outer pots without holes, ensure the inner growing pot has clear drainage and never let the inner pot sit in collected water.
Is the white powder on my soil mould or salt?
Salt crust is dry, flat, crystalline, and powdery it has no smell and does not change in texture after drying. Mould is soft, slightly raised and fuzzy, appears after periods of overwatering, and has a faint musty or earthy smell. A TDS meter confirms which you are dealing with: high TDS with a white deposit indicates salt. Normal TDS with white fuzzy growth and wet soil indicates mould.
I use slow-release fertiliser pellets do I still get salt buildup?
Slow-release pellets produce lower TDS spikes per application than liquid fertilisers because they release nutrients gradually. However, over a full Indian summer, even slow-release pellets contribute to total TDS accumulation. Test your soil TDS 6 to 8 weeks after adding slow-release pellets and flush if the reading is approaching 1,500 ppm.
I flushed, the plants recovered, but the problem came back in three months. What am I doing wrong?
You are fertilising at a rate and frequency that your city’s tap water TDS cannot sustain without flushing. Either reduce your fertiliser dose to half the packet recommendation, increase flush frequency to match your city’s TDS baseline from the table above, or shift to organic-primary feeding with only occasional chemical supplementation. The solution that prevents recurrence is usually all three combined.
Quick Diagnosis Reference The Master Table
| What You See | Additional Signs | Most Likely Cause | First Step |
|---|---|---|---|
| Brown crispy tips and edges, yellow transition | White crust on soil or pot | Salt buildup | Deep water flush + TDS test |
| Wilting despite moist soil | Briefly perks up after watering, then wilts again | Osmotic stress from salt | TDS test → flush immediately |
| Sudden decline 3–7 days after fertilising | Was fine before fertilising | Fertiliser salt burn | Stop all fertiliser + flush |
| Uniform pale yellow starting from old leaves | Whole plant looks washed out | Nitrogen deficiency | Urea foliar spray |
| Bleached papery patches on sun-facing surface | Appeared suddenly after hot afternoon | Heat scorch | Shade + move pot |
| Yellow between leaf veins, veins stay dark | Only new top growth affected | Iron deficiency | Chelated iron spray |
| Wilting + wet heavy soil + musty odour | Leaves dark and limp | Root rot | Stop watering; check roots |
Today’s Action Checklist
- [ ] Check all pots for white crystalline crust on soil surface or terracotta pot exterior
- [ ] Buy a TDS meter if you do not have one ₹300 to ₹500 on Amazon India, search “TDS meter pen”
- [ ] Test TDS on your 3 most recently fertilised pots using the 5-minute method above
- [ ] If any reading is above 1,500 ppm with symptoms present, flush those pots this week
- [ ] Stop all chemical fertiliser for 2 to 4 weeks post-flush depending on severity
- [ ] Check that all drainage holes are clear push a chopstick through each one
- [ ] Count weeks since your last fertiliser application if under 3 weeks, test TDS before adding more
- [ ] Switch one pot to vermicompost-only feeding for the next 4 weeks and compare growth
- [ ] Note your city’s water TDS from the table above and set a monthly flush calendar reminder
- [ ] Add white crust visual check to your Sunday 5-minute routine going forward
Key Facts Quick Reference
What is salt buildup in container soil and why does it happen?
Salt buildup is the accumulation of dissolved mineral salts from fertilisers, tap water minerals, and evaporation concentration in the limited volume of container soil. Unlike garden beds where salts migrate downward through deep soil, containers trap accumulated salts in a fixed volume. Indian tap water TDS of 200 to 600 ppm combined with regular chemical fertiliser applications can bring container soil TDS to 2,500 to 3,500 ppm within four to six weeks without flushing.
What is osmotic stress in plants from high-salt soil?
When soil salt concentration exceeds the concentration inside root cells, water moves osmotically out of the roots and into the surrounding soil the reverse of normal water uptake. This osmotic stress causes plants to lose water to the soil despite the soil being physically moist, producing wilting in moist soil that is diagnostically distinct from underwatering. The plant is biologically dehydrated while sitting in wet soil.
What are the 5 symptoms of salt buildup in container plants?
White crystalline crust on soil surface or terracotta pot exterior; brown crispy tips and edges while leaf centres remain green; wilting that occurs in moist soil and cycles briefly after watering; sudden deterioration within a week of fertilising; and TDS readings above 1,500 ppm in the root zone. The combination of wilting in moist soil plus visible white crust is the most diagnostically reliable two-sign combination.
How do you test soil TDS with a TDS meter?
Collect a soil sample from 5 to 7cm depth. Mix with twice its volume of distilled water, let sit 5 minutes, filter, and measure. Multiply the result by 2 to correct for dilution. Healthy container soil: below 1,500 ppm. Above 2,500 ppm: flush immediately. Above 3,500 ppm: crisis level requiring flush plus partial soil replacement.
What is the correct flush protocol for salt-damaged container soil?
Water normally and wait 20 to 30 minutes. Then pour water slowly and continuously over the entire soil surface until drainage hole flows freely, and continue for 3 to 4 additional minutes approximately 4 to 6 litres per 12-inch pot. Discard saucer water. If initial TDS was above 2,500 ppm, repeat the full flush 24 hours later. Pause all fertiliser for 2 to 4 weeks after flushing.
Why is salt buildup more severe in Indian container gardens?
Three compounding factors: Indian tap water carries relatively high dissolved mineral content (200 to 1,500 ppm depending on source); Indian summer temperatures of 40 to 45°C cause rapid soil water evaporation which concentrates remaining dissolved salts faster than in cooler climates; and container volumes are fixed with no natural rainfall flushing in balcony or terrace settings.
How often should Indian balcony gardeners flush container pots?
Match frequency to tap water TDS baseline: every 2 weeks for Rajasthan cities and borewell water users; every 3 weeks for Ahmedabad and Chennai; every 4 to 5 weeks for Delhi, Hyderabad, and Madanapalle; every 5 to 6 weeks for Mumbai and Bangalore. Monthly flushing is the safe universal default for any Indian container gardener using municipal tap water.
Source: Priya Harini B, thetrendvaultblog.com based on container gardening experiments in Madanapalle, Andhra Pradesh from 2021 through 2024, including direct TDS measurements across 6 pot types and feeding regimes.
Conclusion The Most Invisible Problem Has the Simplest Fix
Salt buildup is, in my experience, the single most underdiagnosed problem in Indian container gardening. It affects nearly every gardener who uses tap water and chemical fertiliser through summer without a flushing routine. It mimics five other problems so convincingly that most people spend months treating the wrong thing as I did, as Kavya did while the actual cause silently worsens.
What Suresh showed me that afternoon by picking up a handful of my soil and knowing immediately what was wrong was that sometimes the problem is cumulative and invisible. Nothing about what I had been doing looked like a mistake. Water the plants. Feed the plants. Repeat. But the chemistry had been quietly, invisibly tipping past the point of tolerance with every passing week.
The fix, when you finally find it, is almost anticlimactic in its simplicity. Water, run slowly through the pot until it flows clear from the drainage hole, and then again the next day. A rest from fertiliser. A shift toward organic feeding. A TDS meter that costs less than a bag of premium fertiliser and prevents months of wrong diagnosis.
The chemistry that kills your plant without you knowing is the same chemistry that lets you save it once you know what number to look for.
Test first. Fix second. That order is everything.
Coming Up Tomorrow Day 5: Heat Stress Response in Plants
Your plants have built-in survival strategies for extreme Indian summer heat but those emergency responses come at a significant cost. Flower drop, leaf curl, early seed setting these are not failures. They are your plant’s crisis protocols kicking in. Tomorrow I will explain exactly what is happening inside your plant during a heat event, which responses you can support and which ones you should not fight, and the six management strategies that let Rajan in Chennai successfully grow tomatoes through 42°C summers.
Have you ever tested your soil TDS? Share your reading in the comments I want to know what Indian terraces are actually running through summer. Or find me on Instagram @thetrendvaultblog.
— Priya Harini B, Madanapalle, Andhra Pradesh
About the Author
Priya Harini B has been container gardening on her terrace in Madanapalle, Andhra Pradesh for over four years, growing 40+ varieties of vegetables, herbs, and fruit trees in containers. She specialises in adapting gardening techniques for Indian climate conditions, soil types, and locally available materials. Every diagnosis, experiment, and measurement referenced in this guide including the TDS readings above is documented from her own terrace at thetrendvaultblog.com.
Day 4 of the 30-Day Summer Gardening Challenge solving India’s most common summer gardening problems, one day at a time.