Ready to build your own Indoor Vertical Hydroponic System Setup ? This comprehensive guide walks you through every step of construction, from planning and materials to ongoing maintenance. Whether you’re building your first tower or upgrading an existing system, this guide provides the technical knowledge you need for success.
Table of Contents
Introduction
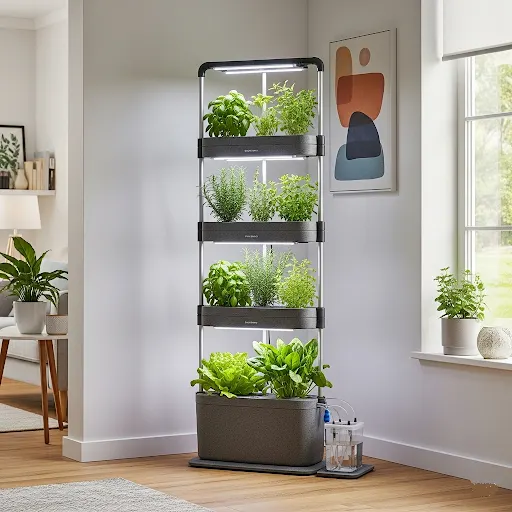
Indoor vertical hydroponic system setup revolutionizes how we approach soilless cultivation in limited spaces, combining advanced growing technology with space-efficient design principles. These innovative systems eliminate traditional soil requirements while maximizing production through vertical farming techniques that can yield 3-5 times more produce than conventional methods. Understanding nutrient solutions, lighting requirements, and proper system maintenance ensures optimal plant health and continuous harvests year-round. Whether you’re growing leafy greens, herbs, or compact vegetables, mastering hydroponic equipment selection and automated irrigation systems creates sustainable indoor growing environments. This complete care guide provides step-by-step instructions for building, maintaining, and troubleshooting your vertical hydroponic system to achieve professional-quality results in your home or urban space.
Step-by-Step DIY Indoor Vertical Hydroponic System Setup Tower Build
Building a DIY hydroponic system requires careful planning, proper materials, and systematic assembly. This step-by-step guide covers construction of a basic vertical tower system that can accommodate 20-30 plants in a compact footprint.
Planning and Design Considerations

System planning begins with assessing available space, determining plant types, and establishing budget parameters. Vertical systems work best in locations with adequate air circulation, access to water and electricity, and sufficient height clearance for the completed structure.
Space Assessment:
- Measure available floor space and ceiling height
- Consider access for maintenance and harvesting
- Plan for electrical outlets and water access
- Account for air circulation requirements
Plant Selection Influence: Plant selection influences design decisions including pot spacing, support requirements, and nutrient solution specifications. Leafy greens require different spacing than fruiting plants, while herbs may need different light intensities than larger crops.
Weight Calculations: Filled systems can weigh several hundred pounds, requiring adequate floor support and stable foundations. A typical 6-foot tower with reservoir can weigh 200-300 pounds when fully operational.
Required Tools and Materials

Essential Tools:
- Measuring tape and marking tools
- Drill with various bit sizes
- Hole saw kit (2-3 inch sizes)
- PVC pipe cutter or hacksaw
- Deburring tool or sandpaper
- Level for proper alignment
Safety Equipment:
- Safety glasses
- Dust mask for cutting operations
- Work gloves
- Ear protection for power tools
Core Materials:
- 6-inch PVC pipe (main tower structure)
- 4-inch PVC pipe (reservoir connections)
- Food-grade reservoir container (20-50 gallons)
- Submersible water pump (400-800 GPH)
- Air pump and air stones
- Food-grade tubing (1/2 inch)
- Net pots (2-3 inch diameter)
- Growing medium (clay pebbles or rockwool)
Cutting and Preparing Materials
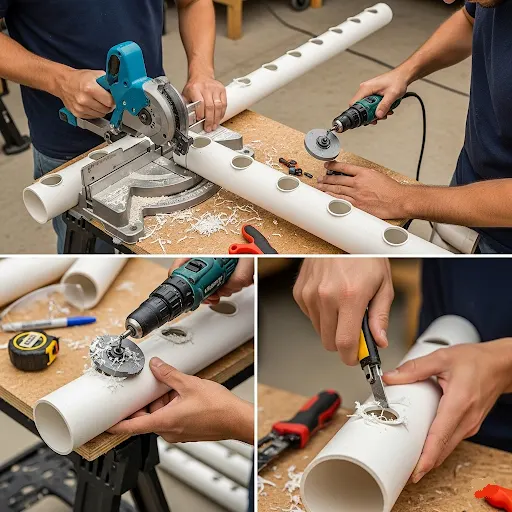
PVC Pipe Preparation:
- Cut main tower pipe to desired height (typically 5-6 feet)
- Cut holes for net pots using hole saw
- Space holes 6-8 inches apart vertically
- Stagger holes around pipe circumference
- Deburr all cuts to prevent root damage
Hole Placement Strategy:
- Mark hole locations before cutting
- Use paper template for consistent spacing
- Test-fit net pots before final assembly
- Ensure holes are sized for snug pot fit
Assembling the Tower Structure
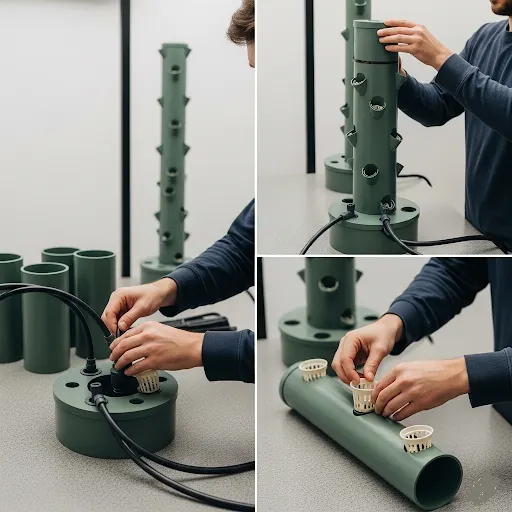
Base Assembly:
- Install bottom cap with drainage fittings
- Connect return tubing to reservoir
- Ensure stable base support
- Test all connections for leaks
Vertical Installation:
- Mount tower vertically with adequate support
- Install distribution system at top
- Connect supply tubing from pump
- Add overflow protection systems
Net Pot Installation: Install net pots systematically to maintain consistent spacing and alignment. Proper pot placement ensures adequate plant spacing while maximizing growing capacity.
Installing Water Circulation System
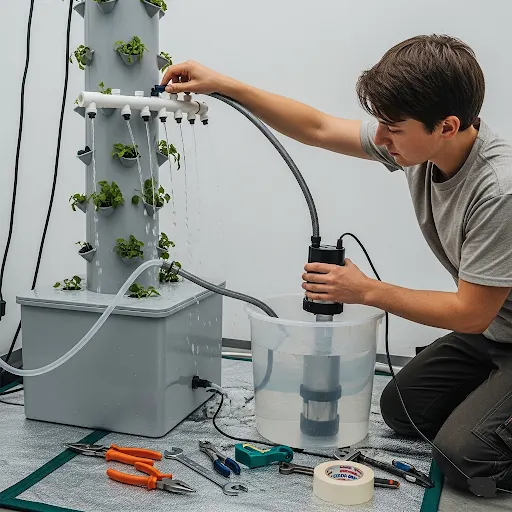
Pump Selection and Installation:
- Choose pump rated for system height and flow requirements
- Install in reservoir with easy access for maintenance
- Use pre-filter to prevent clogging
- Include shut-off valves for system control
Distribution Network:
- Main supply line to tower top
- Distribution manifold for even flow
- Individual drip points for each plant
- Return system back to reservoir
Flow Testing: Verify that all plants receive adequate nutrient solution without system flooding or dry spots. Adjust flow rates as needed to balance distribution throughout the system.
Essential Materials and Components Deep Dive
Growing Medium Options and Selection
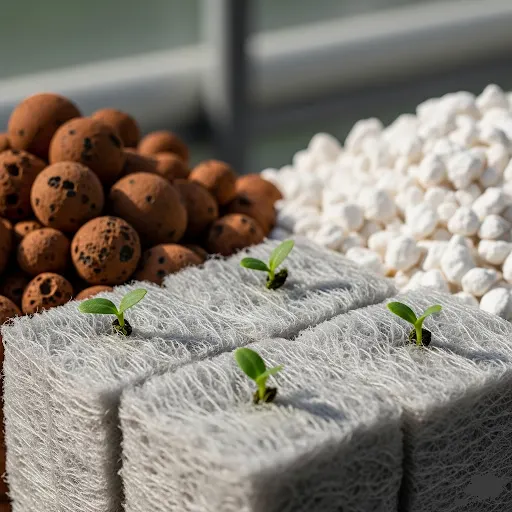
Rockwool Benefits:
- Excellent water retention and aeration
- Sterile growing environment
- Ideal for seed starting
- pH buffering required before use
Clay Pebbles Advantages:
- Excellent drainage and root aeration
- Reusable with proper cleaning
- Stable plant support
- Works well in various system types
Perlite Characteristics:
- Lightweight with excellent aeration
- Good water retention when mixed with other media
- Can clog systems if particles are too fine
- Cost-effective option
Water Circulation Components
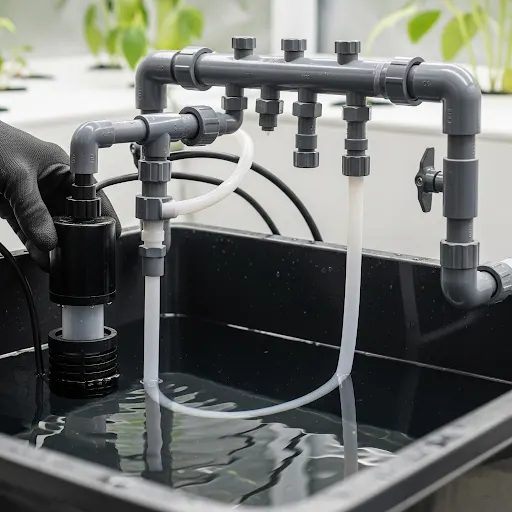
Pump Sizing Guidelines:
- Calculate total system height (head pressure)
- Account for tubing friction losses
- Size for desired flow rate (typically 1-2 GPH per plant)
- Include safety margin for system expansion
Tubing and Fittings:
- Use food-grade materials only
- Select appropriate diameter for flow requirements
- Install shut-off valves for maintenance
- Plan for easy system modifications
Lighting Solutions for Indoor Systems
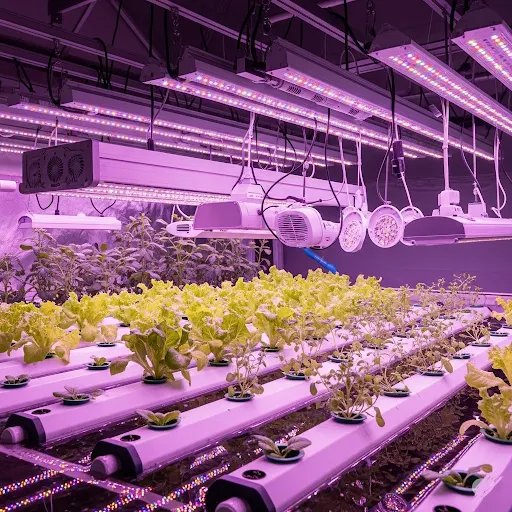
LED Grow Light Selection: Modern LED grow lights offer superior energy efficiency and controllability compared to older lighting technologies. Full-spectrum LEDs provide wavelengths that plants use most efficiently for photosynthesis.
Key Specifications:
- Light Intensity: 200-400 μmol/m²/s for leafy greens, 400-800 μmol/m²/s for fruiting plants
- Spectrum: Full-spectrum white LEDs work well for most applications
- Efficiency: Look for 2.5-3.0 μmol/J efficiency ratings
- Coverage: Plan for slight overlap between fixtures
Positioning and Coverage:
- Mount lights 12-24 inches above plant canopy
- Adjust height as plants grow
- Ensure even coverage across all plant levels
- Use light meters to verify adequate intensity
Lighting Schedules:
- Leafy greens: 14-16 hours daily
- Herbs: 14-16 hours daily
- Fruiting plants: May require photoperiod variations
- Use timers for consistent schedules
Hydroponic Nutrients and Water Management
Nutrient Solution Preparation
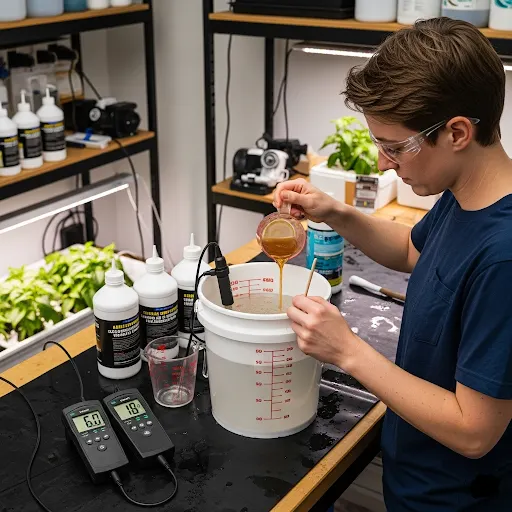
Understanding NPK Ratios:
- Vegetative growth: Higher nitrogen ratios (3-1-2)
- Flowering/fruiting: Higher phosphorus and potassium (1-3-2)
- Micronutrients: Iron, calcium, magnesium, and trace elements equally important
Mixing Procedures:
- Start with clean, room-temperature water
- Add nutrients to water (never water to concentrated nutrients)
- Stir thoroughly to ensure complete dissolution
- Adjust pH to 5.5-6.5 range
- Check EC/TDS levels (1.2-2.0 EC for most plants)
pH and EC Level Monitoring
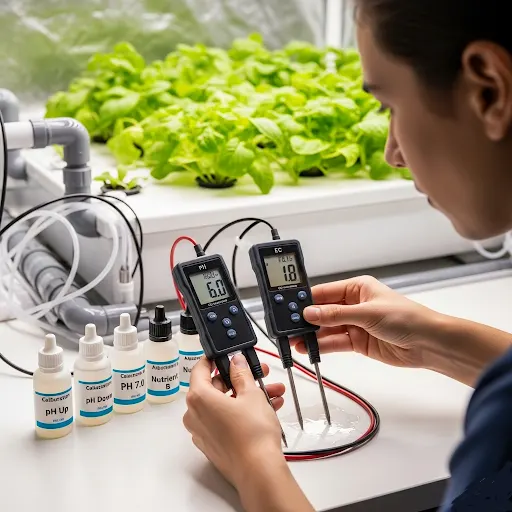
pH Management: pH levels control nutrient availability in hydroponic systems. Most nutrients are most available to plants when pH remains between 5.5 and 6.5. Outside this range, nutrients may become chemically bound and unavailable.
Essential Equipment:
- Digital pH meter (more accurate than test strips)
- pH buffer solutions for calibration
- pH adjustment solutions (pH up and pH down)
- EC/TDS meter for nutrient concentration
Daily Monitoring Routine:
- Check pH levels first thing each morning
- Monitor EC levels to track nutrient consumption
- Record readings to identify trends
- Make small adjustments as needed
Water Change Schedule
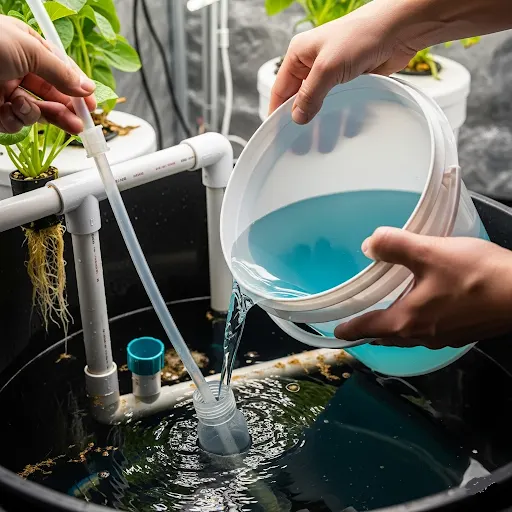
Complete Solution Changes:
- Every 1-2 weeks for optimal plant health
- More frequent changes during rapid growth periods
- Remove accumulated salts and waste products
- Refresh nutrient balance
Partial Water Changes:
- Replace 25-50% of solution weekly
- Top off with fresh nutrients
- Extend solution life while maintaining quality
- Monitor pH and EC more frequently
Preventing Common Problems
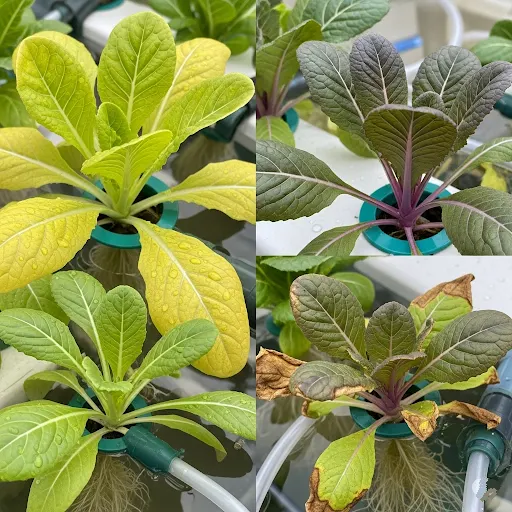
Nutrient Deficiencies:
- Nitrogen deficiency: Yellowing of older leaves starting from tips
- Phosphorus deficiency: Purple or dark coloration on leaves
- Potassium deficiency: Brown leaf edges and poor fruit development
- Iron deficiency: Yellowing between leaf veins in new growth
Nutrient Burn Prevention:
- Start with lower concentrations and increase gradually
- Monitor EC levels to prevent over-concentration
- Increase water changes if burn symptoms appear
- Dilute solution immediately if severe burning occurs
Environmental Controls and Monitoring
Temperature and Humidity Management
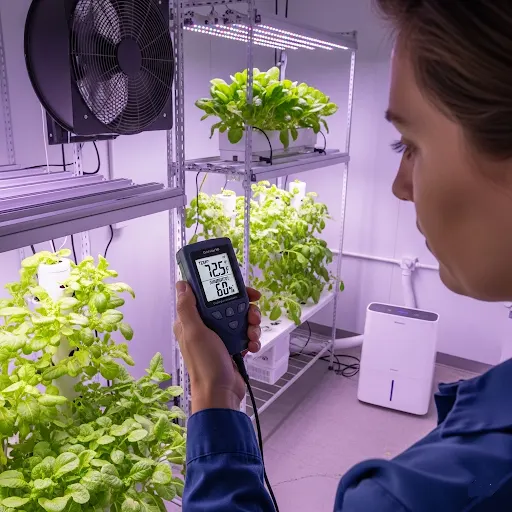
Optimal Ranges:
- Temperature: 65-75°F (18-24°C) during day, slightly cooler at night
- Humidity: 50-70% relative humidity
- Air circulation: Gentle, continuous airflow
Control Systems:
- Heating: Electric heaters with thermostats for cold conditions
- Cooling: Ventilation fans, air conditioning, or evaporative cooling
- Humidity: Dehumidifiers for excess moisture, humidifiers if too dry
Air Circulation Requirements
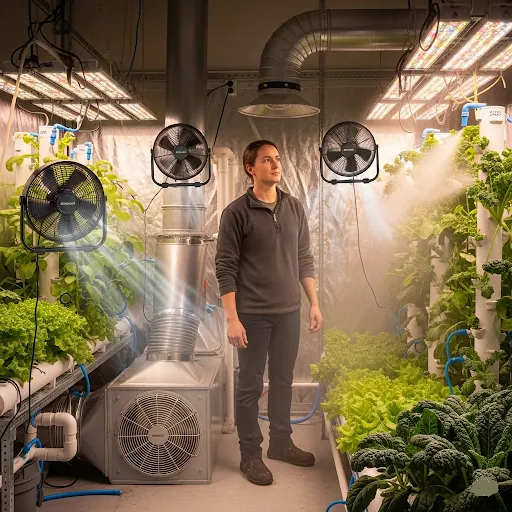
Ventilation Benefits:
- Prevents stagnant air and disease development
- Provides fresh CO2 for photosynthesis
- Helps maintain even temperatures
- Strengthens plant stems through gentle movement
Fan Placement Strategy:
- Intake fans bring fresh air into growing space
- Circulation fans move air throughout system
- Exhaust fans remove stale, heated air
- Avoid direct air streams on plants
Monitoring Systems
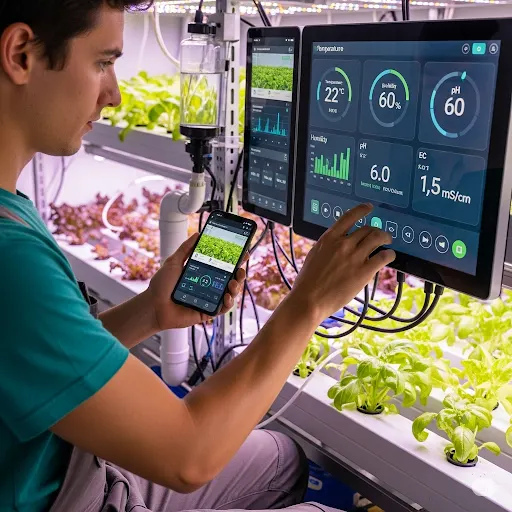
Essential Measurements:
- Temperature at multiple system levels
- Humidity throughout growing space
- pH and EC of nutrient solution
- Water levels in reservoir
Digital Monitoring Options:
- WiFi-enabled sensors for remote monitoring
- Data logging for trend analysis
- Alert systems for out-of-range conditions
- Smartphone apps for convenient access
Maintenance and Care Routines
Daily Tasks (5-10 minutes)
Visual Plant Inspection:
- Check for pest problems or disease symptoms
- Monitor plant growth and development
- Look for nutrient deficiency signs
- Assess overall plant health
System Function Check:
- Verify pump operation and water flow
- Check water levels in reservoir
- Listen for unusual equipment noises
- Ensure lights are operating properly
Weekly Tasks (30-45 minutes)
Water Quality Testing:
- Test and adjust pH levels
- Monitor EC/TDS readings
- Check water temperature
- Record all measurements
Plant Maintenance:
- Harvest mature crops
- Prune excess growth as needed
- Remove dead or diseased plant material
- Check for pest problems
System Cleaning:
- Clean reservoir and refill as needed
- Check and clean pump filters
- Inspect tubing for clogs or algae
- Wipe down growing surfaces
Monthly Tasks (2-3 hours)
Deep System Cleaning:
- Complete reservoir drain and sanitization
- Thorough cleaning of all system components
- Biofilm removal from tubing and fittings
- Replace any worn or damaged parts
Equipment Maintenance:
- Calibrate pH and EC meters
- Check pump performance and wear
- Inspect electrical connections
- Test backup systems and alarms
Growing Medium Care:
- Replace or clean growing medium as needed
- Remove old root systems
- Sanitize net pots and holders
- Prepare fresh growing medium for new plants
Troubleshooting Common Problems
Root Rot Prevention and Treatment
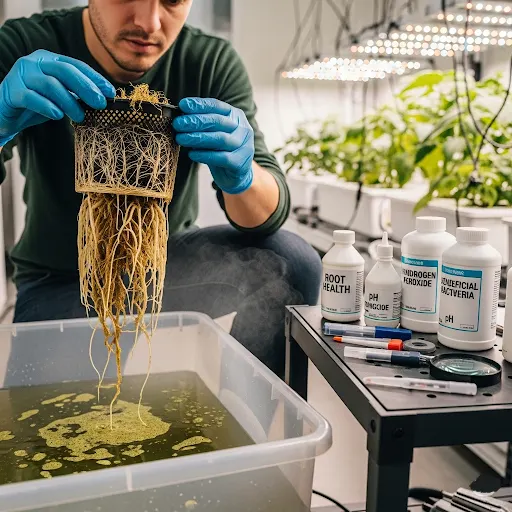
Prevention Strategies:
- Maintain adequate water oxygenation
- Keep reservoir temperatures cool (below 70°F)
- Use proper sanitation practices
- Avoid overwatering conditions
Early Detection:
- Check for slimy or discolored roots
- Notice unpleasant odors from reservoir
- Monitor for wilting despite adequate water
- Look for stunted plant growth
Treatment Options:
- Increase water oxygenation immediately
- Clean and sanitize entire system
- Remove affected plants if severely damaged
- Apply beneficial bacteria products
- Adjust environmental conditions
Pump Failures and Flow Issues
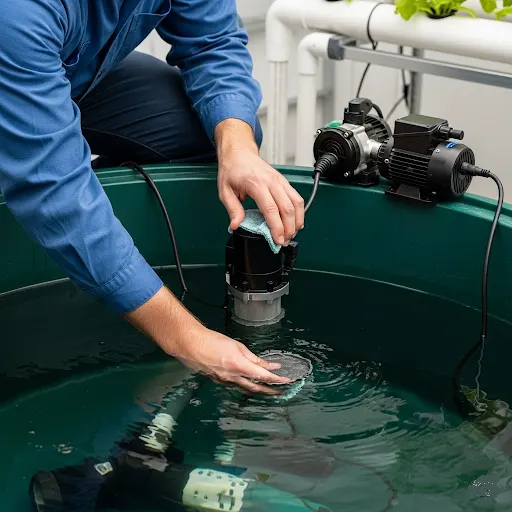
Preventive Maintenance:
- Clean pump intake screens regularly
- Monitor for unusual noises or vibrations
- Check flow rates periodically
- Maintain proper water levels
Emergency Procedures:
- Keep backup pump available for critical systems
- Manual watering procedures for pump failures
- Quick-connect fittings for easy pump replacement
- Emergency contact information for suppliers
Algae Control
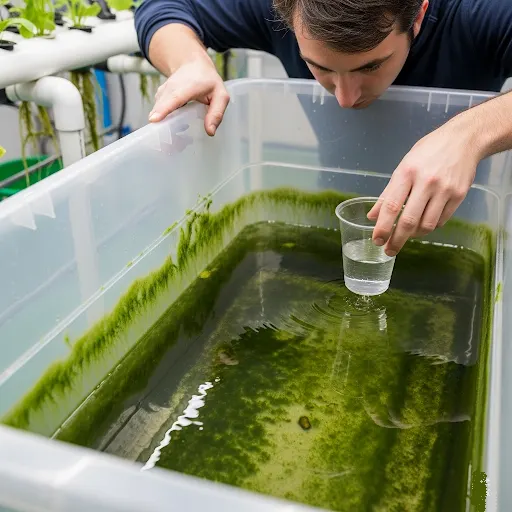
Prevention Methods:
- Block all light from nutrient solutions
- Use opaque reservoirs and tubing
- Maintain proper nutrient concentrations
- Keep growing areas clean
Control Strategies:
- UV sterilizers in circulation systems
- Hydrogen peroxide treatments
- System cleaning and sanitization
- Light reduction in affected areas
Ready for Advanced Features?
Now that you understand the construction and basic management of vertical hydroponic systems, you’re ready to explore advanced features like automation, smart monitoring, and system optimization. Our next post will cover these advanced topics, helping you transform your basic system into a sophisticated growing operation that practically runs itself.
With proper construction and diligent care, your vertical hydroponic system will provide years of productive growing and fresh, healthy food for your family. The investment in time and effort pays dividends in both cost savings and the satisfaction of growing your own food.