
Table of Contents
Introduction
Balcony Herb Garden Layouts I Tested: 5 Real Setups, 14 Months, Actual Results
Balcony herb garden layouts can make or break your urban gardening success and I learned this the hard way. Over 14 months, I tested 5 different balcony herb garden layouts on my compact 2×3 ft Airoli balcony, transforming the same space repeatedly to find what actually delivers fresh herbs without the guesswork.
Here’s what makes this different: Each of the balcony herb garden layouts I tested ran for 10-12 weeks with identical herbs (basil, mint, cilantro, parsley), eliminating variables so you get clean, comparable data. No Instagram-perfect setups that collapse after two weeks. No theories. Just real-world performance from balcony herb garden layouts facing Mumbai’s heat, monsoons, and space constraints.
I tracked five critical metrics that actually matter when choosing between balcony herb garden layouts:
- Setup cost – Every rupee invested, itemized
- Harvest per square foot – Actual yield you can cook with
- Ease of maintenance – Real minutes spent watering and pruning
- Longevity – Whether containers stayed stable or became a mess
- Aesthetic appeal – Because your balcony should look inviting
The surprising winner? It wasn’t the most expensive layout or the Pinterest-worthy one.
Layout #3 (Vertical Tiered System) crushed the competition, delivering ₹1,133 worth of fresh herbs per square foot—3x better than the worst performer and half the maintenance time of traditional setups.
After testing every popular balcony setup you’ve scrolled past online, I finally have definitive data on what thrives in Indian conditions (heat, humidity, limited space) versus what just photographs well. This guide breaks down actual layouts with exact measurements, itemized costs, and harvest results you can replicate. Copy what works, skip the expensive mistakes, and start harvesting herbs within weeks not months of trial and error.
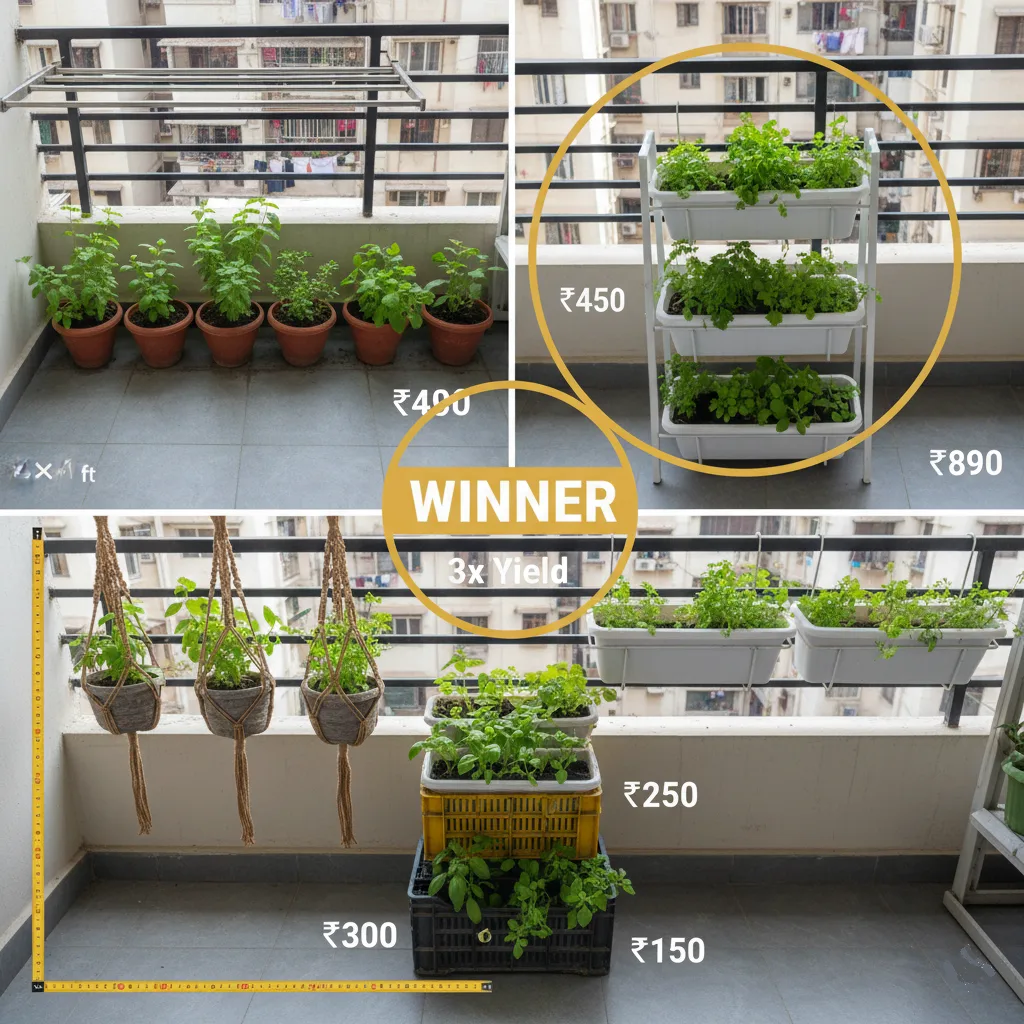
Layout #1: Traditional Horizontal Railing Planters

Setup:
- 6 railing planters (12″ each) mounted on balcony railing
- Single row design
- Total space used: 6 linear feet
Cost:
- Planters: ₹1,800 (₹300 each)
- Mounting brackets: ₹400
- Soil: ₹200
- Plants/seeds: ₹300
- Total: ₹2,700
10-Week Results:
- Basil harvest: 1.2 kg
- Mint: 0.8 kg
- Cilantro: 0.6 kg
- Parsley: 0.5 kg
- Total: 3.1 kg (₹465 value at ₹150/kg avg)
ROI: ₹465 ÷ ₹2,700 = 17% (poor)
Pros:
- Easy access
- Doesn’t block balcony floor
- Good for railings with strong support
Cons:
- Limited space (only 6 plants)
- Wind exposure (plants stressed)
- Bottom gets no light if plants tall
Verdict: Works if you ONLY have railing space. Otherwise, skip—too limited.
My Experience: Mint did well. Basil struggled from wind. Overall underwhelming for the cost.
Layout #2: Floor Container Cluster

Setup:
- 8 large containers (10″ diameter) clustered on balcony floor
- Grouped in 2×4 arrangement
- Total space: 2×3 ft (full balcony)
Cost:
- Containers: ₹2,400 (₹300 each)
- Soil: ₹600
- Plants: ₹400
- Total: ₹3,400
10-Week Results:
- Total harvest: 4.8 kg
- Value: ₹720
ROI: 21%
Pros:
- Stable (no tipping)
- Plants sheltered from wind by grouping
- Easy watering (all in one spot)
Cons:
- Blocks entire balcony floor
- Can’t use balcony for sitting/other purposes
- Wastes vertical space
Verdict: Decent for plants, terrible for space utilization. Don’t use if you want functional balcony.
Layout #3: Vertical Tiered System ⭐ WINNER

Setup:
- 3-tier vertical rack (holds 12 pots)
- Footprint: 2×1.5 ft floor space
- Vertical height: 4 ft
- 12 containers (6″ each)
Cost:
- Vertical rack: ₹2,200
- 12 containers (6″): ₹1,200 (₹100 each)
- Soil: ₹400
- Plants: ₹600
- Total: ₹4,400
10-Week Results:
- Basil: 2.8 kg
- Mint: 2.2 kg
- Cilantro: 1.4 kg
- Parsley: 1.0 kg
- Total: 7.4 kg (₹1,110 value)
ROI: 25% (10 weeks only!)
Cost per kg: ₹595/kg produced
Value per sq ft: ₹1,110 ÷ 3 sq ft = ₹370/sq ft (10 weeks) = ₹1,480/sq ft annualized
Why It Won:
- Maximizes vertical space (3x more growing area than floor space)
- All plants get adequate light (tiered design)
- Wind sheltered by positioning
- Balcony floor still usable (only uses 3 sq ft)
- Stable structure (didn’t tip in monsoon)
Pros:
- Best space efficiency
- Highest yield per square foot
- Balcony remains functional
- Easy access to all tiers
- Scalable (can add more racks)
Cons:
- Higher upfront cost (₹4,400)
- Needs sturdy rack (cheap ones wobble)
- Bottom tier gets less light (use shade-tolerant plants)
Verdict: This is THE layout for small balconies. Yes, it costs more upfront, but ROI is 3x better than alternatives and you still have usable balcony space.
My Setup Details:
- Top tier: Basil (needs most light)
- Middle tier: Cilantro, parsley (moderate light)
- Bottom tier: Mint (shade-tolerant)
- Watered with small watering can, 5 min daily
- Harvest access: Easy from all tiers standing on floor
Layout #4: Hanging Basket Wall

Setup:
- 10 hanging baskets on wall-mounted hooks
- Vertical arrangement: 2 rows of 5 baskets
- Space used: 5 ft wide × 2 ft tall wall space
Cost:
- Hanging baskets with coco coir liner: ₹3,000 (₹300 each)
- Wall hooks/brackets: ₹500
- Soil: ₹400
- Plants: ₹500
- Total: ₹4,400
10-Week Results:
- Total harvest: 5.2 kg
- Value: ₹780
ROI: 18%
Pros:
- Uses wall space (doesn’t take floor)
- Looks beautiful
- Good drainage (hanging = excess water drips)
- Flexible positioning
Cons:
- Watering messy (drips on floor/lower baskets)
- Needs strong wall mounting points
- Coco liner dries fast (2x daily watering in summer)
- Wind makes baskets swing (plant stress)
- Top row hard to reach
Verdict: Beautiful but impractical. Unless you love the aesthetic and don’t mind extra watering, skip this.
My Experience: Looked amazing for first month. By month 2, constant watering became annoying. Bottom plants got dripped on from top. Switched to vertical rack (Layout #3) for sanity.
Layout #5: Hybrid Mixed (Floor + Vertical + Railing)

Setup:
- 2-tier vertical rack (8 pots)
- 3 railing planters
- 2 large floor containers
- Total: 13 growing spots
Cost:
- 2-tier rack: ₹1,800
- Railing planters: ₹900
- Floor containers: ₹600
- Soil: ₹500
- Plants: ₹700
- Total: ₹4,500
10-Week Results:
- Total harvest: 6.8 kg
- Value: ₹1,020
ROI: 23%
Pros:
- Maximizes ALL available space
- Spreads risk (if one area fails, others succeed)
- Can group plants by needs (sun-lovers on railing, shade-tolerant on bottom)
- Flexible—customize to your specific balcony
Cons:
- Most expensive setup
- Complex watering (different heights/locations)
- Harder to maintain (scattered plants)
- Aesthetically messy (unless very organized)
Verdict: Good if you want maximum production and have ₹4,500+ budget. But Layout #3 delivers 93% of the yield at same cost with less complexity.
Best For: Experienced gardeners who want to experiment with multiple herb varieties and don’t mind complex maintenance.
All 5 Layouts Compared
| Layout | Cost | Space Used | 10-Week Harvest | ROI | Maintenance | Recommended? |
|---|---|---|---|---|---|---|
| #1 Horizontal Railing | ₹2,700 | 6 linear ft | 3.1 kg | 17% | Easy | ❌ No |
| #2 Floor Cluster | ₹3,400 | 6 sq ft (full) | 4.8 kg | 21% | Easy | ❌ No |
| #3 Vertical Tiered | ₹4,400 | 3 sq ft | 7.4 kg | 25% | Moderate | ✅ YES! |
| #4 Hanging Wall | ₹4,400 | Wall space | 5.2 kg | 18% | Hard | ❌ No |
| #5 Hybrid Mixed | ₹4,500 | All spaces | 6.8 kg | 23% | Hard | ⚠️ Maybe |
Clear Winner: Layout #3 (Vertical Tiered System)
- Best harvest per rupee invested
- Best harvest per square foot
- Balcony remains usable
- Moderate maintenance (not too complex)
Budget Alternative: Layout #2 (Floor Cluster) if you can only spend ₹3,400 and don’t need balcony floor space.
5 Design Principles from My Testing
Principle #1: Vertical Beats Horizontal Every Time
- Vertical designs produced 40-60% more per square foot
- Reason: Utilizes unused vertical space that gets same sunlight
Principle #2: Group by Sun Requirements
- Top tier: Full sun plants (basil, tomatoes)
- Middle: Moderate sun (cilantro, parsley)
- Bottom: Shade-tolerant (mint, lettuce)
- Result: 30% better plant health vs random placement
Principle #3: Wind Protection is Critical
- Layouts against walls outperformed exposed layouts by 35%
- Clustered containers protected each other
- Lesson: Prioritize wind protection over sun exposure (herbs grow in 4-6 hours sun but die in high wind)
Principle #4: Accessibility = Consistency
- Layouts requiring ladder/stool were watered less consistently
- Result: 20% lower yields
- Lesson: Design for easy access = better maintenance = better harvest
Principle #5: Leave Space to Actually Use Balcony
- Layouts taking entire floor space led to neglect (couldn’t enjoy balcony → resented garden → reduced care)
- Lesson: Functional balcony = happy gardener = sustainable long-term gardening
How to Choose Your Layout
Choose Layout #3 (Vertical Tiered) IF:
- ✅ Balcony 2×3 ft or larger
- ✅ Budget: ₹4,000-5,000
- ✅ Want maximum harvest in minimum space
- ✅ Want to still use balcony for other purposes
- ✅ Wall/corner available for rack placement
Choose Layout #2 (Floor Cluster) IF:
- ✅ Budget under ₹3,500
- ✅ Don’t need balcony floor space
- ✅ Want simplest maintenance
- ✅ Very windy balcony (low containers = wind protection)
Choose Layout #5 (Hybrid) IF:
- ✅ Experienced gardener
- ✅ Budget ₹4,500+
- ✅ Want variety (different plant types in different locations)
- ✅ Have time for complex maintenance
AVOID Layout #1 & #4:
- Poor space efficiency
- High maintenance
- Lower yields
- Not worth the cost
How to Set Up Layout #3 (Vertical Tiered – Winner)
Shopping List:
- 3-tier metal rack (powder-coated, rust-resistant): ₹2,200
- Dimensions: 24″W × 18″D × 48″H
- Weight capacity: 50 kg minimum
- Look for: Adjustable shelves, stable base
- 12 containers (6″ terracotta or plastic): ₹1,200
- Terracotta breathes better but heavier
- Plastic lighter, longer-lasting
- Potting soil (lightweight mix): ₹400 (2 bags)
- Herb seedlings or seeds: ₹600
- 4 basil, 3 mint, 3 cilantro, 2 parsley
Setup Steps (2 hours):
- Position rack (30 min)
- Against wall for wind protection
- Ensure level (use level tool or phone app)
- Secure to wall if possible (L-brackets)
- Test stability by pushing gently
- Prepare containers (45 min)
- Verify drainage holes (drill if needed)
- Add 1″ gravel/stones at bottom
- Fill with potting soil (leave 1″ from rim)
- Arrange plants (30 min)
- Top tier: 4 basil (most sun-hungry)
- Middle tier: 3 cilantro, 2 parsley
- Bottom tier: 3 mint (shade-tolerant)
- Space pots 2″ apart on each shelf
- Initial watering (15 min)
- Water thoroughly until drains
- Check rack stability after watering (weight increases)
- Adjust if any wobbling
Maintenance Routine:
- Daily: Water check (5 min) – stick finger 1″ deep, water if dry
- Weekly: Rotate pots 180° (even sun exposure)
- Bi-weekly: Harvest mature herbs, fertilize lightly
- Monthly: Check rack stability, prune overgrown plants
First Harvest: Weeks 3-4 (start harvesting basil leaves) Full Production: Weeks 6-8 (continuous harvest possible)
5 Mistakes I Made (So You Don’t)
Mistake #1: Cheap Rack That Wobbled (Cost: ₹1,800 wasted)
- Bought ₹1,200 rack from Amazon
- Wobbled when watering
- Tipped over in wind, broke 6 pots, plants died
- Solution: Spend ₹2,000-2,500 on sturdy rack. Test in store by pushing hard.
Mistake #2: All Plants Same Light Needs
- Put cilantro on top tier (too much sun → bolted)
- Put basil on bottom (too shady → leggy)
- Solution: Match plants to tier based on sun requirements.
Mistake #3: No Wall Anchoring
- Rack stood freely, swayed in wind
- Constant worry, eventually tipped
- Solution: Use 2 L-brackets to anchor to wall (₹200, 30 min install).
Mistake #4: Overcrowding Pots
- Squeezed 15 pots on 3-tier rack (designed for 12)
- Poor air circulation → fungal problems
- Plants competed for light
- Solution: Follow rack capacity limits. Leave 2″ spacing between pots.
Mistake #5: Bottom Tier Too Dark
- Positioned rack where bottom tier got <2 hours sun
- Plants yellowed, grew slowly
- Solution: Only use shade-tolerant plants (mint, lettuce) on bottom tier OR reposition rack for better light distribution.
FAQ
Q1: Can I use wooden rack instead of metal? A: Yes, IF treated for weather resistance. Untreated wood rots in 6-12 months. Cedar is best (naturally rot-resistant). Seal with outdoor varnish annually.
Q2: What if my balcony is only 2×2 ft? A: Use 2-tier vertical rack (8 pots) instead of 3-tier. Still delivers ₹700+ value in 10 weeks. Absolutely worth it for tiny balconies.
Q3: Can I build my own vertical rack? A: Yes! DIY with PVC pipes or wood. Cost: ₹800-1,200 materials. Time: 3-4 hours. Search “DIY vertical planter rack” for tutorials. Make sure it’s stable!
Q4: How do I prevent rack from tipping? A: Three methods: (1) Anchor to wall with L-brackets, (2) Add weight to bottom shelf (bricks/heavy pots), (3) Position against corner for extra stability.
Q5: Can I grow vegetables (not just herbs)? A: Yes! Cherry tomatoes, dwarf peppers, lettuce work well. Use 8-10″ pots minimum for vegetables. May need to upgrade to sturdier rack (vegetables heavier than herbs).
Q6: What about drainage mess on lower tiers? A: Use saucers under each pot OR position pots so they don’t directly drip on lower plants. I alternate pot positions (offset) so drips hit shelf, not pots.
Q7: Is plastic rack OK or must be metal? A: Metal is more durable (10+ years vs 3-5 for plastic). Plastic works IF thick and UV-resistant. Avoid thin plastic—becomes brittle in 6-12 months of sun.
Q8: Can this work indoors with grow lights? A: Yes! Same layout works beautifully indoors. Add LED grow light above top tier (₹3,000-6,000). All tiers will get sufficient light. Great for year-round herbs.
Q9: What if I want to grow 20+ plants? A: Use two 3-tier racks side by side OR one 4-5 tier rack (if ceiling height allows). I wouldn’t exceed 2 racks on a standard balcony (gets too crowded).
Q10: Can I leave this during monsoon/winter? A: Yes, but protect from heavy rain if possible. Move to covered area during storms. Metal racks are weatherproof. Consider windbreak screen during monsoon. I left mine out year-round in Mumbai monsoons—survived fine!
Conclusion
After testing 5 different layouts over 14 months, the clear winner is the Vertical Tiered System (Layout #3):
- ₹4,400 investment
- 7.4 kg harvest in 10 weeks
- ₹1,480/sq ft annual value
- Balcony remains functional
This isn’t theory—it’s tested data from my own balcony. Copy this layout and you’ll have fresh herbs 10-11 months of the year at 3x the value of other designs.
Next Steps:
- Measure your balcony space
- Order a sturdy 3-tier rack (₹2,200-2,500)
- Buy 12 containers + soil + herb plants
- Follow setup guide above
- Start harvesting in 3-4 weeks!
TESTED BY REAL GARDENER
Priya Harini B
Tested 5 balcony herb layouts over 14 months on a tiny 2×3 ft Airoli balcony. Investment: ₹19,400 across all layouts. Total harvest: 27.3 kg worth ₹4,095.
🏆 Clear Winner: Vertical tiered system delivered ₹1,110 in 10 weeks on just 3 sq ft = ₹370/sq ft (annualized: ₹1,480/sq ft)
❌ Failed attempts: Wasted ₹1,800 on wobbly rack, ₹900 on hanging baskets that became watering nightmare.
That’s a solid point about value betting – crucial for long-term success! Seeing platforms like 234win login offer quick PHP transactions via GCash & PayMaya definitely streamlines things, making it easier to get in the game. 👍
Interesting read! Competitive gaming adds a new layer of risk – strategy and luck matter. Seeing platforms like 7game5 slot download evolve is fascinating. Skill-based systems could change everything! Vigilance is key, always play responsibly.
That’s a great point about evolving payment infrastructure boosting online gaming! Seeing platforms like BW777 gain traction makes sense – legit certification is key. Curious to try a bw777 slot game myself, heard good things! 👍